Epson Stylus Pro 10600 - UltraChrome Ink Product Information Guide - Page 15
Using and Replacing the Cutter Blade, Replacing the Blade
 |
View all Epson Stylus Pro 10600 - UltraChrome Ink manuals
Add to My Manuals
Save this manual to your list of manuals |
Page 15 highlights
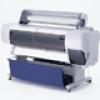
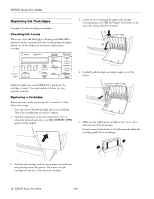
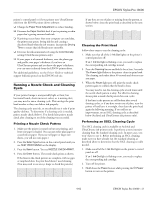
EPSON Stylus Pro 10600 Using and Replacing the Cutter Blade To use the printer's built-in cutter, select the appropriate option from the control panel: ❏ Roll Auto Cut to cut each page automatically ❏ Roll Cutter Off if you're printing on heavy media that can damage or prematurely wear out the cutter Do not use the printer's built-in cutter when printing with these EPSON papers or other heavy media (thicker than 10 mil): ❏ Enhanced Matte Posterboard ❏ Posterboard Semigloss ❏ Smooth Fine Art Paper ❏ Textured Fine Art Paper ❏ Velvet Fine Art Paper ❏ Adhesive Vinyl ❏ Somerset Velvet for EPSON Fine Art Paper ❏ Canvas ❏ Backlight Film When done printing on heavy media, remove your printout using scissors or the optional Manual Media Cutting System (part no. C815182). Replacing the Blade If you notice that paper isn't cut cleanly, the cutter blade may need to be replaced. You can check the status of the cutter by printing a status check sheet (see page 9). 1. Make sure that the printer is on and the front cover is closed. 2. Press the SelecType button until MAINTENANCE MENU appears on the display. 3. Press the Item button until CUT. REPLACE=EXEC. appears on the display. 4. Press the Enter button. The print head moves to the cutter replacement position. 5. When OPEN LOWER COVER appears on the display, open the lower cover. 6. To release the cutter blade, push down on its white side pin, then turn the black latch upward to the right. 7. Slowly take your finger off the side pin, then remove the cutter blade. CAUTION: Be careful not to let the cutter or the spring fly out of the casing. 9/02 EPSON Stylus Pro 10600 - 15
-
 1
1 -
2
-
3
-
4
-
5
-
6
-
7
-
8
-
9
-
 10
10 -
 11
11 -
 12
12 -
 13
13 -
 14
14 -
 15
15 -
 16
16
 |
 |