Epson TM-L90 Plus Users Manual 4 Model
Epson TM-L90 Plus Manual
 |
View all Epson TM-L90 Plus manuals
Add to My Manuals
Save this manual to your list of manuals |
Epson TM-L90 Plus manual content summary:
- Epson TM-L90 Plus | Users Manual 4 Model - Page 1
User's Manual - Epson TM-L90 Plus | Users Manual 4 Model - Page 2
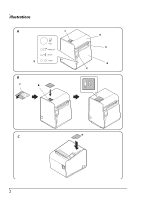
Illustrations A 2 B 7 8 1 6 5 4 3 C 9 2 - Epson TM-L90 Plus | Users Manual 4 Model - Page 3
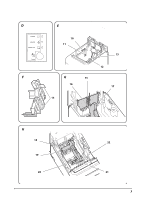
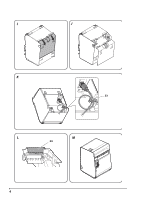
D E 10 11 13 12 F G 15 16 17 14 H 18 19 20 22 21 3 - Epson TM-L90 Plus | Users Manual 4 Model - Page 4
I J K 23 L M 24 4 - Epson TM-L90 Plus | Users Manual 4 Model - Page 5
N O 25 P Q 5 - Epson TM-L90 Plus | Users Manual 4 Model - Page 6
R S 27 T 6 26 28 29 - Epson TM-L90 Plus | Users Manual 4 Model - Page 7
cover 5 Manual cutter 6. Cutter cover lIustration B: 7. Power switch cover 8. Power switch waterproof cover lIustration C: 9. Control panel label Illustration D Epson Corporation's operating and maintenance instructions. Seiko Epson Corporation shall not be liable against any damages or problems - Epson TM-L90 Plus | Users Manual 4 Model - Page 8
in this manual are Seiko Epson service center for or a Seiko Epson service center for printer and the telephone line may be damaged. Use a shield cable for the drawer connector cable. CAUTION: Do not connect cables in ways other than those mentioned in this manual fingers on the manual cutter • - Epson TM-L90 Plus | Users Manual 4 Model - Page 9
downloaded from one of the following URLs. For customers in North America, go to the following web site: http://www.epson.com/support/ For customers in other countries, go to the following web site: http://download.epson-biz.com/?service=pos Printer Parts See Illustrations A. TM-L90 User's Manual 9 - Epson TM-L90 Plus | Users Manual 4 Model - Page 10
set, be sure to attach a connector cover to the printer. When you install the printer horizontally, attach the control panel label (See illustration C and D) and position the roll paper the bottom of the printer. 3. Tighten the screw and make sure the lever moves smoothly. 10 TM-L90 User's Manual - Epson TM-L90 Plus | Users Manual 4 Model - Page 11
printer is set to use the paper layout for the bundled label epson.com/support/ to download the memory switch setting utility and TM-L90 Technical Reference Guide. Connecting Cables 1. Place the printer printer. 4. Attach the cover while passing the cables through the holes. TM-L90 User's Manual 11 - Epson TM-L90 Plus | Users Manual 4 Model - Page 12
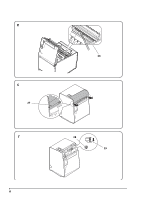
the printer cover. Clean the thermal elements of the thermal head with a cotton swab moistened with an alcohol solvent (ethanol or IPA). See illustration R. Epson recommends cleaning the thermal head periodically (generally every 3 months) to maintain receipt print quality. 12 TM-L90 User's Manual - Epson TM-L90 Plus | Users Manual 4 Model - Page 13
into the slots on both sides of the printer, and lift the cover in the direction of the arrow in illustration S to remove it. 3. Turn the knob in the direction of the arrow in illustration T, by using a ballpoint pen or tweezers, until you see a triangle mark in the opening. TM-L90 User's Manual 13 - Epson TM-L90 Plus | Users Manual 4 Model - Page 14
90 mm 58mm: 57.5 ± 0.5 max 90 mm Thermal paper type Roll paper:Monochrome: ENTPD, ENTPE Label paper: Monochrome: ENTLA series Interface (compatible) Serial (RS-232)/Parallel (IEEE 1284)/USB [Compliance: USB Rated output: 24 V/2.0 - 10.0 A, Maximum output: 240 VA or less 14 TM-L90 User's Manual - Epson TM-L90 Plus | Users Manual 4 Model - Page 15
B: 7 8 C: 9 D 圖⽰ E: 10. 槓桿 11. 螺絲 12. 通孔 13 F: 14 G: 15. 槽⼝ 16 17 H: 18. 卡鉤 19. 軸 20. 螺絲 21. 標尺 22 I 圖⽰ J 圖⽰ K: 23 圖⽰ L: 24 M 圖⽰ N 圖⽰ O: 25 P 圖⽰ Q 圖⽰ R: 26 S: 27 槽 圖⽰ T: 28 29. 旋鈕 Seiko Epson Corporation Epson EPSON Exceed Your Vision Seiko Epson Corporation 2013-2017 - Epson TM-L90 Plus | Users Manual 4 Model - Page 16
主要標識 安全防範 Seiko Epson 注意標籤 16 TM-L90 - Epson TM-L90 Plus | Users Manual 4 Model - Page 17
使⽤限制 開箱 URL 下載。 http://download.epson-biz.com/?service=pos A。 控制⾯板 A 2。 送紙 (FEED)鍵 缺紙 (PAPER OUT)指⽰燈 錯誤 (ERROR)指⽰燈 電源 (POWER)指⽰燈 TM-L90 17 - Epson TM-L90 Plus | Users Manual 4 Model - Page 18
B。 WH-10 C 與 D E。 1 3 或 4 次。 2 3 更改紙寬 80 mm 38 mm ⾄ 70 mm 61mm ⾄ 70 mm 2 38 mm ⾄ 60 mm F 1 2 G。 3 4 H 2 18 TM-L90 - Epson TM-L90 Plus | Users Manual 4 Model - Page 19
ERROR 在錯誤(ERROR 1 2 3 TM-L90 TM-L90 http:// download.epson-biz.com/?service=pos TM-L90 連接線 1 I 2 J 3 3 4 K 23 USB K。 L 25.4 mm {1 31.4 mm {1.24 安裝紙捲 1 M。 2 3 N。 4 O。 5 P 與 Q。 TM-L90 19 - Epson TM-L90 Plus | Users Manual 4 Model - Page 20
清潔 R。 Epson 故障排除 20 20 錯誤 (ERROR PAPER OUT 卡紙 20 20 TM-L90 - Epson TM-L90 Plus | Users Manual 4 Model - Page 21
1 2 S 蓋。 3 T TM-L90 21 - Epson TM-L90 Plus | Users Manual 4 Model - Page 22
203 mm {5.83 5.51 7.99 ⼤約 1.9 kg {4.19 lb} dpi: 點 /25.4 mm 24 V/2.0 - 10.0 A 240 VA 或以下 其他資訊 製造商: SEIKO EPSON CORPORATION 地址: 3-5, Owa 3-chome, Suwa-shi, Nagano-ken 392-8502, Japan 電話: 81-263-52-2552 進⼝商: 地址: 7 號 14 樓 電話: (02)8786-6688 22 TM-L90 - Epson TM-L90 Plus | Users Manual 4 Model - Page 23
- Epson TM-L90 Plus | Users Manual 4 Model - Page 24
Printed in China
-
 1
1 -
 2
2 -
 3
3 -
 4
4 -
 5
5 -
 6
6 -
 7
7 -
8
-
9
-
10
-
11
-
12
-
13
-
14
-
15
-
16
-
17
-
18
-
19
-
20
-
21
-
22
-
23
-
24
 |
 |
User’s Manual /
使⽤說明書