Epson TM-L90 Plus Users Manual 4 Model - Page 11
Changing the Paper Width, Notes on Changing the Paper Type, Connecting Cables, Steps to fix Errors
 |
View all Epson TM-L90 Plus manuals
Add to My Manuals
Save this manual to your list of manuals |
Page 11 highlights
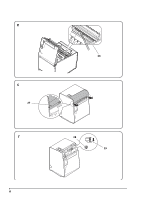
Changing the Paper Width This printer accommodates 80 mm wide roll paper with no adjustments. For rolls from 38 mm to 70 mm wide, use the roll paper spacer included with the printer. (If the rolls are from 61 to 70 mm wide, break two tabs off the back of the roll paper spacer. (You can still use widths from 38 mm to 60 mm with the roll paper spacer with the tabs broken off. See illustration F) Follow the steps below to attach the roll paper spacer. 1. Open the roll paper cover. 2. Insert the roll paper spacer so that the front edge goes through the notch; then push down the spacer so that the hook on the spacer and the shaft align. See illustration G. 3. Push the roll paper spacer until you feel it clicks onto the shaft. Check that the roll paper spacer slides smoothly to the left and right. 4. Slide the roll paper spacer to the appropriate width. You can use the ruler printed inside the printer, aligning the inside edge of the spacer with the desired measurement. See illustration H. Tighten the spacer with the screw included with the spacer as shown in illustration. (Although there are two holes, this is the only one to put the screw in.) Notes on Changing the Paper Type This printer is set to use the paper layout for the bundled label roll paper (or receipt paper). In some cases, changing the paper type may cause an error. Follow the steps below to fix the error and set the new paper layout. (When an error occurs, the ERROR LED flashes twice repeatedly.) Steps to fix Errors While the ERROR LED is flashing twice repeatedly, 1. Open the roll paper cover. 2. Load a roll of paper to use. 3. Close the roll paper cover. The roll paper is fed automatically, the error is fixed, and the paper layout is set automatically. Note: When using black mark die-cut label paper, you may not be able to use the paper normally even if you follow the steps above. In this case, set the paper layout with the memory switch setting utility. See the TM-L90 Technical Reference Guide for details. See the TM-L90 Technical Reference Guide also for how to use the product and detailed product specifications. Go to http://www.epson.com/support/ to download the memory switch setting utility and TM-L90 Technical Reference Guide. Connecting Cables 1. Place the printer and pull the cover in the direction of the arrow in the illustration I to remove the cover. 2. Break off by hand any of the three portions indicated by circles in illustration J to pass the cables through. 3. Connect the cables to the printer. 4. Attach the cover while passing the cables through the holes. TM-L90 User's Manual 11
-
 1
1 -
2
-
3
-
4
-
5
-
 6
6 -
 7
7 -
 8
8 -
 9
9 -
 10
10 -
 11
11 -
 12
12 -
 13
13 -
 14
14 -
 15
15 -
 16
16 -
17
-
18
-
19
-
20
-
21
-
22
-
23
-
24
 |
 |
