Epson WF-M1030 Start Here - Installation Guide - Page 1
Epson WF-M1030 Manual
 |
View all Epson WF-M1030 manuals
Add to My Manuals
Save this manual to your list of manuals |
Page 1 highlights
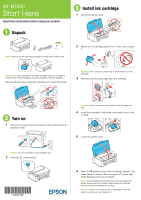
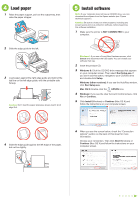
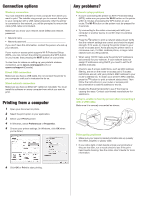
WF-M1030 Start Here Read these instructions before using your product. 1 Unpack 3 Install ink cartridge 1 Lift up the printer cover. Note: Remove the ink cartridge package from the back of the printer. 2 Shake the ink cartridge gently 4 or 5 times, then unpack it. Caution: Do not open the ink cartridge package until you are ready to install the ink. The cartridge is vacuum packed to maintain reliability. Remove all protective materials, including from inside the printer. Caution: Don't touch the green chip or small window on the cartridge. 3 Remove only the yellow tape from the cartridge. 2 Turn on 1 Connect the power cord to the back of the printer and to an electrical outlet. Caution: Don't remove any other seals or the cartridge may leak. 4 Insert the cartridge in the holder, and press it down until it clicks. 5 Lower the printer cover. Caution: Do not connect to your computer yet. 2 Press the power button. *412491700* *412491700* 6 Press the button to prime the ink delivery system. This takes about 5 minutes. When the green power light stops flashing, priming is complete. Note: The cartridge included with the printer is designed for printer set up and not for resale. After some ink is used for priming, the rest is available for printing. Caution: Don't turn off the printer or load paper while the printer is priming or you'll waste ink.
-
 1
1 -
 2
2 -
 3
3 -
 4
4
 |
 |