Epson WorkForce 600 Using the Control Panel for Wireless Network Installation
Epson WorkForce 600 - All-in-One Printer Manual
 |
View all Epson WorkForce 600 manuals
Add to My Manuals
Save this manual to your list of manuals |
Epson WorkForce 600 manual content summary:
- Epson WorkForce 600 | Using the Control Panel for Wireless Network Installation - Page 1
Using the Control Panel for Wireless Network Installation WorkForce™ 600 Series Artisan™ 700 Series - Epson WorkForce 600 | Using the Control Panel for Wireless Network Installation - Page 2
point is set up and working correctly. Then follow the instructions in this guide to set up the printer for use on a network. Do one of the following: ■ If you're installing the printer for the first time, see the next section to connect the printer to your wireless network. ■ If you're setting up - Epson WorkForce 600 | Using the Control Panel for Wireless Network Installation - Page 3
space provided below: Network name (SSID Security mode (select one): ❑ None ❑ WEP-64, ASCII ❑ WEP-64, Hexadecimal ❑ WEP-128, ASCII ❑ WEP-128, Hexadecimal ❑ WPA-PSK (TKIP) ❑ WPA-PSK (AES) WEP key or WPA passphrase Note: The printer supports the following wireless security modes: WEP-64, WEP-128 - Epson WorkForce 600 | Using the Control Panel for Wireless Network Installation - Page 4
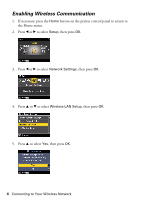
Enabling Wireless Communication 1. If necessary, press the Home button on the printer control panel to return to the Home menu. 2. Press l or r to select Setup, then press OK. 3. Press l or r to select Network Settings, then press OK. 4. - Epson WorkForce 600 | Using the Control Panel for Wireless Network Installation - Page 5
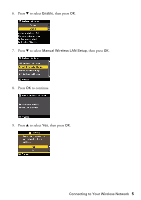
6. Press d to select Enable, then press OK. 7. Press d to select Manual Wireless LAN Setup, then press OK. 8. Press OK to continue. 9. Press u to select Yes, then press OK. Connecting to Your Wireless Network 5 - Epson WorkForce 600 | Using the Control Panel for Wireless Network Installation - Page 6
10. Press OK to select Infrastructure Mode. Continue with the next section. Searching for Your Wireless Network 1. Press OK to select Search SSID. 2. Press u or d to select the name of your wireless network, and press OK. Then continue with "Selecting Security Settings" on page 8. 6 Connecting to - Epson WorkForce 600 | Using the Control Panel for Wireless Network Installation - Page 7
If your network name isn't listed, try the following: ■ Make sure that your wireless router or access point is turned on and working correctly. Press the Back button to return to the previous screen, press OK to select Search SSID, then repeat step 2. ■ If you still can't find the network name in - Epson WorkForce 600 | Using the Control Panel for Wireless Network Installation - Page 8
the security mode that your wireless network is using. Note: If your wireless network doesn't have security enabled, select None. 2. Press OK. 3. Do one of the following: ■ If your wireless network doesn't have security enabled, see "Confirming Your Network Settings" on page 11. ■ If your wireless - Epson WorkForce 600 | Using the Control Panel for Wireless Network Installation - Page 9
Selecting WPA Security Settings 1. Enter your WPA passphrase. Note: If your WPA passphrase contains upper- or lowercase letters, be sure to enter them correctly. ■ Press Menu to switch between uppercase (ABC), lowercase (abc), or numeric (123) characters. ■ Press u or d until you see the character - Epson WorkForce 600 | Using the Control Panel for Wireless Network Installation - Page 10
Selecting WEP Security Settings 1. Press u or d to select Alphanumeric if your WEP key is ASCII, or select Hexadecimal if your WEP key is in hexadecimal format. Note: If the WEP key is 5 or 13 characters, it's ASCII. If the WEP key is 10 or 26 characters, it's hexadecimal. 2. Enter your WEP key. ■ - Epson WorkForce 600 | Using the Control Panel for Wireless Network Installation - Page 11
Confirming Your Network Settings 1. When you see a screen like this one, verify that the settings are correct. If you need to change a setting, press Back until you see the setting you need to change. 2. Once you - Epson WorkForce 600 | Using the Control Panel for Wireless Network Installation - Page 12
approved devices list. Installing Software The steps show installation screens for the WorkForce 600 Series, but the installation instructions are the same for other models. 1. Insert the printer software CD. 2. Windows Vista: If you see the AutoPlay window, click Run Epsetup.exe. When you see the - Epson WorkForce 600 | Using the Control Panel for Wireless Network Installation - Page 13
3. Click Install. 4. When you see this screen, select Install driver for network connection and click Next. 5. Follow the on-screen instructions to install the software for your product. Note: These installations take several minutes to complete. Installing Software 13 - Epson WorkForce 600 | Using the Control Panel for Wireless Network Installation - Page 14
Select Set up an additional computer to use this printer, then click Next. Note: Make sure you select Set up an additional computer to use this printer even if this is the first time that you're installing the printer. 7. Make sure that the printer is turned on. 8. When you see the FireWall Warning - Epson WorkForce 600 | Using the Control Panel for Wireless Network Installation - Page 15
X, configure your firewall software to allow network access for Epson EasyInstall. 10. Select the printer you want to install, then click Next. Note: It may take up to 90 seconds for your computer to find the printer on the network. If your printer doesn't appear in the list after 90 seconds, make - Epson WorkForce 600 | Using the Control Panel for Wireless Network Installation - Page 16
instructions. When you see the screen below, you can do the following: ■ Enter a new name for the printer in the Printer instructions to print a test page and finish the installation. When installation is complete, you're ready to scan and print. See your printed documentation and on-screen Epson - Epson WorkForce 600 | Using the Control Panel for Wireless Network Installation - Page 17
the on-screen instructions. When you see this screen, click Finish. 2. When you see this screen, click Add Printer. 3. Follow the steps on the right side of the screen to add your EPSON TCP/IP printer. Note: It may take up to 90 seconds for your computer to find the EPSON TCP/IP printer on the - Epson WorkForce 600 | Using the Control Panel for Wireless Network Installation - Page 18
instructions to finish installing software. When installation is complete, you're ready to print. See your printed documentation and on-screen Epson the network, you need to configure Epson Scan network settings. 1. If necessary, press the Home button on the printer control panel to return to the - Epson WorkForce 600 | Using the Control Panel for Wireless Network Installation - Page 19
5. Write down the IP Address displayed on the LCD screen. IP Address Note: Your printer's settings will be different from the ones shown above. 6. From the Finder menu, select Go > Utilities. 7. Double-click the EPSON Scan Settings icon. 8. This screen appears twice. Click No both times it appears - Epson WorkForce 600 | Using the Control Panel for Wireless Network Installation - Page 20
9. Select Network as the Connection setting. 10. Click Add. You see this screen: 11. Select the IP address that you wrote down in step 5. Note: To rename the scanner, type a name for it in the Scanner Name text box. 20 Finishing the Installation - Epson WorkForce 600 | Using the Control Panel for Wireless Network Installation - Page 21
. Note: If the printer's IP address changes, you will need to repeat steps 1 through 13 to reconfigure Epson Scan network settings. You're ready to scan and print. See your printed documentation and on-screen Epson Information Center for details. Troubleshooting If you have problems setting up or - Epson WorkForce 600 | Using the Control Panel for Wireless Network Installation - Page 22
register the printer's MAC address point's documentation for instructions. ■ Check to the SSID manually (see page printer's IP address setting to Auto(DHCP). ■ If you want to manually configure the printer for your printer. All IP DHCP, set the printer's IP address to address of your printer: 192.168 - Epson WorkForce 600 | Using the Control Panel for Wireless Network Installation - Page 23
the network settings are correct. ■ When using TCP/IP, make sure the printer's IP address is set correctly for your network. If your network does not assign IP addresses using DHCP, you will need to set the IP address manually. ■ Print a Network Status Sheet (see page 25). If the Link Status says - Epson WorkForce 600 | Using the Control Panel for Wireless Network Installation - Page 24
Network Status Sheet (see page 25), click EPSON Scan Settings > Add > Enter address, and enter the IP address manually. ■ If you are scanning a large document printer on, or set your DHCP server to reserve an IP address for the printer (see your router's documentation for details). 24 Troubleshooting - Epson WorkForce 600 | Using the Control Panel for Wireless Network Installation - Page 25
Printing a Network Status Sheet 1. Load a few sheets of plain paper. 2. If necessary, press the Home button on the printer control panel to return to the Home menu. 3. Press l or r to select Setup, then press OK. 4. Press l or r to select Network Settings, then press OK. 5. - Epson WorkForce 600 | Using the Control Panel for Wireless Network Installation - Page 26
Resetting Network Settings 1. If necessary, press the Home button on the printer control panel to return to the Home menu. 2. Press l or r to select Setup OK. 5. Select Yes and press OK as necessary to reset the printer's network settings. 6. Press Home to return to the Home menu. 26 Troubleshooting - Epson WorkForce 600 | Using the Control Panel for Wireless Network Installation - Page 27
or alterations to this product, or (excluding the U.S.) failure to strictly comply with Seiko Epson Corporation's operating and maintenance instructions. Seiko Epson Corporation shall not be liable for any damages or problems arising from the use of any options or any consumable products other than
-
 1
1 -
 2
2 -
 3
3 -
 4
4 -
 5
5 -
 6
6 -
 7
7 -
8
-
9
-
10
-
11
-
12
-
13
-
14
-
15
-
16
-
17
-
18
-
19
-
20
-
21
-
22
-
23
-
24
-
25
-
26
-
27
 |
 |

Using the Control Panel for
Wireless Network Installation
WorkForce
™
600 Series
Artisan
™
700 Series