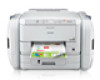
Epson WorkForce Pro WF-R5190 User Manual
Epson WorkForce Pro WF-R5190 Manual
 |
View all Epson WorkForce Pro WF-R5190 manuals
Add to My Manuals
Save this manual to your list of manuals |
Epson WorkForce Pro WF-R5190 manual content summary:
- Epson WorkForce Pro WF-R5190 | User Manual - Page 1
WF-R5190 User's Guide - Epson WorkForce Pro WF-R5190 | User Manual - Page 2
- Epson WorkForce Pro WF-R5190 | User Manual - Page 3
Contents WF-R5190 User's Guide ...11 Printer Parts - Inside ...21 Printer Parts - Back...21 Using Eco Mode ...22 Changing the Eco Settings ...22 Changing the Sleep Timer Settings 23 Changing the Power Off Timer Settings 24 Epson Connect Solutions for Smartphones, Tablets, and More 25 Using Epson - Epson WorkForce Pro WF-R5190 | User Manual - Page 4
Disabling Wi-Fi Features ...40 Enabling Epson Universal Print Driver (PCL) or PostScript Printing 42 Selecting PDL (Page Description Language) Settings 42 PDL Print Configuration Options...43 Selecting Printer Language and Interface Settings 45 Printer - Epson WorkForce Pro WF-R5190 | User Manual - Page 5
Settings ...89 Selecting Default Print Settings - Windows 90 Changing the Language of the Printer Software Screens 91 Changing Automatic Update Options 92 Printing with OS X ...93 Selecting OS X 107 Checking Print Status - OS X 107 Printing with the Epson Universal Print Driver - Windows 109 5 - Epson WorkForce Pro WF-R5190 | User Manual - Page 6
145 Replacing Ink Supply Units (Ink Packs) and Maintenance Boxes 146 Check Ink and Maintenance Box Status 146 Checking Ink Status on the LCD Screen 146 Checking Ink and Maintenance Box Status With Windows 147 Checking Ink and Maintenance Box Status with OS X 150 Purchase Epson Ink Packs and - Epson WorkForce Pro WF-R5190 | User Manual - Page 7
Ink Packs - Windows 156 Printing with Expended Color Ink Packs - OS X 156 Conserving Low Black Ink with Windows 158 Replacing Ink Tubes ...173 Cleaning the Paper Guide ...174 Cleaning and Transporting Your Product 176 Cleaning the Product...176 Transporting Your Product ...176 Solving Problems - Epson WorkForce Pro WF-R5190 | User Manual - Page 8
Using the Postscript Printing Software 194 Documents Print Incorrectly Using the Postscript Printing Software 195 Accessing Printer Properties - Postscript - Windows 195 Solving Problems Printing from a Computer 196 Nothing Prints ...196 Product Icon Does Not Appear in Windows Taskbar 197 - Epson WorkForce Pro WF-R5190 | User Manual - Page 9
...222 Symbol Sets ...226 Notices ...234 Important Safety Instructions...234 General Printer Safety Instructions 234 Ink Pack Safety Instructions ...236 LCD Screen Safety Instructions 236 Wireless Connection Safety Instructions 237 FCC Compliance Statement...237 Software Notice...238 Trademarks - Epson WorkForce Pro WF-R5190 | User Manual - Page 10
- Epson WorkForce Pro WF-R5190 | User Manual - Page 11
WF-R5190 User's Guide Welcome to the WF-R5190 User's Guide. For a printable PDF copy of this guide, click here. 11 - Epson WorkForce Pro WF-R5190 | User Manual - Page 12
features of your product. Note: Your product may differ from the illustrations in this guide, but the instructions are the same. Using the Control Panel Product Parts Locations Using Eco Mode Epson Connect Solutions for Smartphones, Tablets, and More Using AirPrint Using Google Cloud Print Using - Epson WorkForce Pro WF-R5190 | User Manual - Page 13
1 The power button and light 2 The Paper Setup button 3 The Error and Data lights 4 The LCD screen 5 The Back button 6 The arrow buttons and the OK button 7 The Stop button Status Icons Parent topic: Using the Control Panel Status Icons Status icons may be displayed on the LCD screen depending on - Epson WorkForce Pro WF-R5190 | User Manual - Page 14
Setting a Password and Locking the Control Panel You can set an administrator password to lock the following control panel settings: • System Administration Setup settings • Eco mode settings When the control panel is locked, you must enter the password to access any of the locked settings. 1. Press - Epson WorkForce Pro WF-R5190 | User Manual - Page 15
to select Lock Setting and press the OK button. 9. Select On and press the OK button. Note: If you forget your password, contact Epson support for assistance. Entering Characters on the LCD Screen Parent topic: Using the Control Panel Entering Characters on the LCD Screen Follow these guidelines to - Epson WorkForce Pro WF-R5190 | User Manual - Page 16
2. Press the down arrow button, select System Administration, and press the OK button. Enter the administrator password, and press the OK button. 2. Press the down arrow button, select System Administration, and press the OK button. Enter the administrator password, if necessary. You see a screen - Epson WorkForce Pro WF-R5190 | User Manual - Page 17
, contact your administrator for assistance. 1. Press the up or down arrow buttons, select Menu, and press the OK button. 2. Press the down arrow button, select System Administration, and press the OK button. Enter the administrator password, if necessary. You see a screen like this: 3. Select - Epson WorkForce Pro WF-R5190 | User Manual - Page 18
Disable and press the OK button. Parent topic: Using the Control Panel Product Parts Locations See these sections to identify the parts on your product. Printer Parts - Top Printer Parts - Inside Printer Parts - Back Parent topic: Product Basics 18 - Epson WorkForce Pro WF-R5190 | User Manual - Page 19
Printer Parts - Top 1 Ink cases 2 Paper cassette 1 3 Paper cassette 2 4 Paper cassette cover 19 - Epson WorkForce Pro WF-R5190 | User Manual - Page 20
1 Rear paper feeder guard 2 Rear paper support 3 Rear paper feed slot edge guides 4 Output tray 5 Output tray extension 6 Paper stopper 7 Cassette edge guides Parent topic: Product Parts Locations 20 - Epson WorkForce Pro WF-R5190 | User Manual - Page 21
Printer Parts - Inside 1 Control panel 2 Print head 3 Front cover (opened) Parent topic: Product Parts Locations Printer Parts - Back 21 - Epson WorkForce Pro WF-R5190 | User Manual - Page 22
1 USB port 2 Ethernet LAN port 3 Service USB port (do not use) 4 Rear cover 5 AC inlet arrow buttons, select Menu, and press the OK button. 2. Press the up or down arrow buttons, select System Administration, and press the OK button. Enter the administrator password, if necessary. 3. Press the up or - Epson WorkForce Pro WF-R5190 | User Manual - Page 23
. 1. Press the up or down arrow buttons, select Menu, and press the OK button. 2. Press the up or down arrow buttons, select System Administration, and press the OK button. Enter the administrator password, if necessary. 3. Press the down arrow button, select Common Settings, and press the - Epson WorkForce Pro WF-R5190 | User Manual - Page 24
, contact your administrator for assistance. 1. Press the up or down arrow buttons, select Menu, and press the OK button. 2. Press the down arrow button, select System Administration, and press the OK button. Enter the administrator password, if necessary. You see a screen like this: 24 - Epson WorkForce Pro WF-R5190 | User Manual - Page 25
printing as described in this manual. See the link below. 2. If you did not already set up Email Print when you installed your product software, visit epson.com/connect to learn more about Email Print, check compatibility, and get detailed setup instructions. 3. Send an email with attachments - Epson WorkForce Pro WF-R5190 | User Manual - Page 26
your product for network printing as described in this manual. See the link below. 2. Visit epson.com/connect to learn more about Remote Print and in your application and choose the Remote Print driver for your Epson product. Parent topic: Epson Connect Solutions for Smartphones, Tablets, and More - Epson WorkForce Pro WF-R5190 | User Manual - Page 27
. You can also print from Chromebooks and the Google Chrome browser without drivers or cables. Set up your Epson product for network printing as described in this manual. See the link below. Note: Make sure your Epson printer and computer are connected to the same network before starting the Google - Epson WorkForce Pro WF-R5190 | User Manual - Page 28
instructions. 10. Click Finish printer Epson Support for more information on using Google Cloud Print, or the Google Cloud Print website for a list of supported drivers or cables. Set up your Epson product for network printing as described in this manual. See the link below. Note: Make sure your Epson - Epson WorkForce Pro WF-R5190 | User Manual - Page 29
Google Account and can be accessed from any Chromebook, iPhone, or Android phone with Internet access. For more information on using Google Cloud Print, visit Epson Support. Parent topic: Using Google Cloud Print 29 - Epson WorkForce Pro WF-R5190 | User Manual - Page 30
your computer using a wireless router or access point. The wireless router or access point can be connected to your computer over a wireless or wired network. 1 Epson product 2 Wireless router or access point 30 - Epson WorkForce Pro WF-R5190 | User Manual - Page 31
wireless network, follow the instructions on the Start Here sheet and install the necessary software. The installer program guides you through network setup. Note: Breakdown or repair of this product may cause loss of network data and settings. Epson is - Epson WorkForce Pro WF-R5190 | User Manual - Page 32
the name of your wireless network and press the OK button. Note: To enter the wireless network name manually, select Other Networks and press the OK button. Use the printer's buttons to enter your network name. 4. Enter your wireless password using the control panel buttons. Note: The network - Epson WorkForce Pro WF-R5190 | User Manual - Page 33
directly with your computer or another device without requiring a wireless router or access point. 1 Epson product 2 Computer with a wireless interface 3 Other wireless device You can select one of these select it from the Web Config Utility, under Advanced Settings > Services > Wi-Fi Direct. 33 - Epson WorkForce Pro WF-R5190 | User Manual - Page 34
Enabling Wi-Fi Direct Mode Parent topic: Wi-Fi or Wired Networking Enabling Wi-Fi Direct Mode You can enable Wi-Fi Direct mode to allow direct communication between your product and a computer or other devices without a wireless router or access point. Note: You may need to enable the Wi-Fi Direct - Epson WorkForce Pro WF-R5190 | User Manual - Page 35
6. Enter a Wi-Fi Direct password using the control panel buttons. Note: Your password must be at least 8 and no more than 22 characters long. • To enter letters or symbols, press the up or down arrow buttons to scroll through characters, and press the right arrow button to select one. • To enter - Epson WorkForce Pro WF-R5190 | User Manual - Page 36
11. Press the Back button to return to the Home screen. You see the connection symbol on the LCD screen and should be able to print directly to your product from your computer or device. Note: If the connection symbol is not displayed on the LCD screen, Wi-Fi Direct mode is not enabled. Repeat - Epson WorkForce Pro WF-R5190 | User Manual - Page 37
Push Button Setup (WPS), and press the OK button. 3. Follow the instructions on the LCD screen to complete WPS setup. 4. Press the Back button You can print a network status sheet to help you determine the causes of any problems you may have using your product on a network. 1. Press the up or down - Epson WorkForce Pro WF-R5190 | User Manual - Page 38
printing the network status sheet. Examine the settings shown on the network status sheet to diagnose any problems you have. Parent topic: Wi-Fi or Wired Networking Changing or Updating Network Connections See these more information on the Web Config utility see the Administrator's Guide. 38 - Epson WorkForce Pro WF-R5190 | User Manual - Page 39
to a USB connection, leave the USB cable connected to your product. 2. Download and install your product software from the Epson website using the instructions on the Start Here sheet. Parent topic: Changing or Updating Network Connections Changing a Wi-Fi Connection to a Wired Network Connection - Epson WorkForce Pro WF-R5190 | User Manual - Page 40
Setup printer for the first time. 9. Continue following the rest of the on-screen instructions. problem with your network connection. Note: Before disabling Wi-Fi features, make a note of your product's SSID (network name) and password, and any network settings selected for the Epson Connect services - Epson WorkForce Pro WF-R5190 | User Manual - Page 41
You see this screen: 2. Press the down arrow button, select Disable Wi-Fi, and press the OK button. 3. Press the up arrow button to disable Wi-Fi. Parent topic: Changing or Updating Network Connections 41 - Epson WorkForce Pro WF-R5190 | User Manual - Page 42
Epson Universal Print Driver or PostScript drivers, go to epson.com/support/wfr5190. Selecting PDL (Page Description Language) Settings Selecting Printer the OK button. You see a screen like this: 2. Select System Administration and press the OK button. Enter the administrator password, if necessary - Epson WorkForce Pro WF-R5190 | User Manual - Page 43
the settings you want to use. PDL Print Configuration Options Parent topic: Enabling Epson Universal Print Driver (PCL) or PostScript Printing PDL Print Configuration Options Select the PDL Print Configuration the quality for PCL or PostScript printing. Saves ink by reducing print density. 43 - Epson WorkForce Pro WF-R5190 | User Manual - Page 44
print job. Selects duplex printing. Uses a font preinstalled on the printer. Uses a font you have downloaded. Selects the default font number for is not available for the selected symbol set, the font source and number are replaced with IBM-US (the default setting). Sets the number of lines for the - Epson WorkForce Pro WF-R5190 | User Manual - Page 45
the line feed command when printing with a driver from a specific operating system. Makes the paper source select commands compatible PDL (Page Description Language) Settings Selecting Printer Language and Interface Settings You can select printer language and interface settings using the control - Epson WorkForce Pro WF-R5190 | User Manual - Page 46
Select System Administration and press the OK button. Enter the administrator password, if necessary. 3. Select Printer Printer Language and Interface Options Parent topic: Enabling Epson Universal Print Driver (PCL) or PostScript Printing Printer Language and Interface Options Select the printer - Epson WorkForce Pro WF-R5190 | User Manual - Page 47
using the PCL or PostScript driver. This setting is necessary to avoid endless USB communication. Select the language for the USB or network interface. Select whether to allow computers to connect to the product via USB connection. Parent topic: Selecting Printer Language and Interface Settings - Epson WorkForce Pro WF-R5190 | User Manual - Page 48
Parent topic: Enabling Epson Universal Print Driver (PCL) or PostScript Printing 48 - Epson WorkForce Pro WF-R5190 | User Manual - Page 49
do. Note: Load only plain paper when printing with the PostScript (PS3) printer software. Loading Paper for Documents in the Cassette Loading Paper for Photos in the in the Rear Paper Feed Slot Paper Loading Capacity Available Epson Papers Paper or Media Type Settings - Printing Software Selecting - Epson WorkForce Pro WF-R5190 | User Manual - Page 50
3. Slide the edge guides outward. Note: If you are using legal-size paper or larger, squeeze the tab and extend the paper cassette. 4. Slide the edge guide to your paper size. 50 - Epson WorkForce Pro WF-R5190 | User Manual - Page 51
the paper is loaded against the edge guide and not sticking out from the end of the cassette. 6. Slide the edge guides against the paper, but not too tightly. Note: Make sure the paper fits beneath the top edges of the guides. Caution: To prevent paper feeding problems, make sure you do not load - Epson WorkForce Pro WF-R5190 | User Manual - Page 52
7. Gently insert the paper cassette. Note: The paper may slide forward slightly as you insert the cassette. This is normal. 8. When prompted by the product's LCD screen, select the size and type of the paper you just loaded and press the OK button. 9. Extend the output tray and open the paper - Epson WorkForce Pro WF-R5190 | User Manual - Page 53
or pre-printed paper top edge first. • Do not load paper above the arrow mark inside the edge guide. • Check the paper package for any additional loading instructions. Parent topic: Loading Paper Related references Paper Loading Capacity Related tasks Loading Paper for Photos in the Cassette - Epson WorkForce Pro WF-R5190 | User Manual - Page 54
2. Pull out the paper cassette. 3. Slide the edge guides outward. 4. Slide the edge guide to your paper size. 54 - Epson WorkForce Pro WF-R5190 | User Manual - Page 55
the paper is loaded against the edge guide and not sticking out from the end of the cassette. 6. Slide the edge guides against the paper, but not too tightly. Note: Make sure the paper fits beneath the top edges of the guides. Caution: To prevent paper feeding problems, make sure you do not load - Epson WorkForce Pro WF-R5190 | User Manual - Page 56
7. Gently insert the paper cassette. Note: The paper may slide forward slightly as you insert the cassette. This is normal. 8. When prompted by the product's LCD screen, select the size and type of the paper you just loaded and press the OK button. 9. Extend the output tray and open the paper - Epson WorkForce Pro WF-R5190 | User Manual - Page 57
• Load the printable side facedown. • Do not load paper above the arrow mark inside the edge guide. • Check the paper package for any additional loading instructions. Parent topic: Loading Paper Related references Paper Loading Capacity Related tasks Loading Paper for Documents in the Cassette - Epson WorkForce Pro WF-R5190 | User Manual - Page 58
2. Pull up the paper support for the rear paper feed slot. 3. Flip the feeder guard forward, then slide the edge guides outward. 58 - Epson WorkForce Pro WF-R5190 | User Manual - Page 59
4. If you are inserting a stack of paper, fan the sheets first and tap the stack on a flat surface to even the edges. Note: You can load one sheet of binder paper with holes on one of the long edges as shown. Do not select automatic 2-sided printing for this type of paper. 5. Do one of the following - Epson WorkForce Pro WF-R5190 | User Manual - Page 60
Caution: To prevent paper feeding problems, make sure you do not load too much paper in the slot. • Load envelopes short edge first, with the flap facing down and the flap edge to the left, in the center of the slot. 6. Slide the edge guides against the paper, but not too tightly. 7. Select - Epson WorkForce Pro WF-R5190 | User Manual - Page 61
mark inside the edge guides. • If you have trouble loading a stack of for any additional loading instructions. Parent topic: Loading Capacity Paper type Plain paper Epson Bright White Paper Loading capacity 356 mm]) 200 sheets Epson Presentation Paper Matte - Loading capacity - rear paper - Epson WorkForce Pro WF-R5190 | User Manual - Page 62
Ultra Premium Photo Paper Glossy Epson Premium Photo Paper Semigloss Envelopes - Parent topic: Loading Paper Loading capacity - rear paper feed slot 10 sheets Letter (8.5 × 11 inches [216 × 279 mm]) and A4 (8.3 × 11.7 inches [210 × 297 mm]) 5 sheets for manual two-sided printing 1 sheet Legal - Epson WorkForce Pro WF-R5190 | User Manual - Page 63
purchase genuine Epson ink and paper at Epson Supplies Central at epson.com/ink3 (U.S. sales) or epson.ca (Canadian sales). You can also purchase supplies from an Epson authorized reseller. To find the nearest one, call 800-GO-EPSON (800-463-7766). Paper Type Epson Bright White Paper Epson Brochure - Epson WorkForce Pro WF-R5190 | User Manual - Page 64
60 100 20 20 25 50 40 20 Parent topic: Loading Paper Paper or Media Type Settings - Printing Software For this paper Plain paper Epson Bright White Paper Letterhead paper Recycled paper Color paper Preprinted paper Envelopes Select this paper Type or Media Type setting Plain Paper / Bright White - Epson WorkForce Pro WF-R5190 | User Manual - Page 65
Premium Photo Paper Semi-gloss Premium Photo Paper Semi-Gloss Epson Presentation Paper Matte Premium Presentation Paper Matte Epson Premium Presentation Paper Matte Epson Premium Presentation Paper Matte Doublesided Epson Brochure & Flyer Paper Matte Double-sided Cardstock up to 68 lb (256 - Epson WorkForce Pro WF-R5190 | User Manual - Page 66
Panel For this paper Select this Paper Type setting Plain paper Plain Paper Epson Bright White Paper Epson Presentation Paper Matte Epson Iron-on Cool Peel Transfer paper Epson Photo Quality Self-adhesive Sheets Letterhead paper Letterhead Recycled paper Recycled Color paper Color - Epson WorkForce Pro WF-R5190 | User Manual - Page 67
, select Menu, and press the OK button. 2. Press the down arrow button, select System Administration, and press the OK button. Enter the administrator password, if necessary. You see this screen: 3. Select Printer Settings and press the OK button. 4. Select Paper Source Settings and press the OK - Epson WorkForce Pro WF-R5190 | User Manual - Page 68
You see a screen like this: 5. Select the paper source options you want to use. 6. When you are finished, press the Back button to return to the Home screen. Paper Source Settings Options Parent topic: Selecting Default Paper Settings - Administrator Paper Source Settings Options Select the Paper - Epson WorkForce Pro WF-R5190 | User Manual - Page 69
for assistance. 1. Press the up or down arrow buttons, select Menu, and press the OK button. 2. Press the down arrow button, select System Administration, and press the OK button. Enter the administrator password, if necessary. You see this screen: 3. Press the down arrow button, select Universal - Epson WorkForce Pro WF-R5190 | User Manual - Page 70
Parent topic: Selecting Default Paper Settings - Administrator Universal Print Settings Options Select the universal print settings you want to use. Universal Print Settings option Available settings Top Offset - Left Offset Top Offset in Back - Left Offset in Back Check Paper Width On Off - Epson WorkForce Pro WF-R5190 | User Manual - Page 71
click OK. The update scans your system to see if you have the latest product software. Follow the on-screen instructions. Printing with Windows Printing with OS X Printing with the Epson Universal Print Driver - Windows Printing with the PostScript (PS3) Printer Software - Windows Printing with the - Epson WorkForce Pro WF-R5190 | User Manual - Page 72
help utility for details. 3. If necessary, select your product name as the printer you want to use. Note: You may also need to select Properties or Preferences to view your print settings. You see the Main tab of your printer settings window: 4. For the Paper Source setting, select where you loaded - Epson WorkForce Pro WF-R5190 | User Manual - Page 73
6. Select the orientation of your document. Note: If you are printing an envelope, select Landscape. 7. Select the type of paper you loaded as the Paper Type setting. Note: The setting may not exactly match the name of your paper. Check the paper type settings list for details. 8. Select the Quality - Epson WorkForce Pro WF-R5190 | User Manual - Page 74
Paper Source Options - Windows You can select any of the available options in the Paper Source menu to print on the paper loaded in that source. Auto Select Automatically selects the paper source based on the selected paper size. Paper Cassette 1 Selects the paper in cassette 1 as the paper source. - Epson WorkForce Pro WF-R5190 | User Manual - Page 75
and prompting you to flip the paper over on the long edge to print the other side (recommended for paper types that do not support automatic duplexing). • Manual (Short-edge binding) to print your double-sided print job by printing one side and prompting you to flip the paper over on the - Epson WorkForce Pro WF-R5190 | User Manual - Page 76
You see this window: 3. Select the double-sided printing options you want to use. 4. Click OK to return to the Main tab. 5. Click the Print Density button. 76 - Epson WorkForce Pro WF-R5190 | User Manual - Page 77
return to the Main tab. 9. Print a test copy of your double-sided document to test the selected settings. 10. Follow any instructions displayed on the screen during printing. Double-sided Printing Options - Windows Print Density Adjustments - Windows Parent topic: Printing with Windows Double-sided - Epson WorkForce Pro WF-R5190 | User Manual - Page 78
to adjust the print quality of your double-sided print job. Print Density Sets the level of ink coverage for double-sided printing. Increase Ink Drying Time Sets the amount of time required for drying ink after printing on one side of the paper before printing the other side in double-sided printing - Epson WorkForce Pro WF-R5190 | User Manual - Page 79
Selecting Additional Layout and Print Options - Windows You can select a variety of additional layout and printing options for your document or photo on the More Options tab. 1. To change the size of your printed document or photo, select the Reduce/Enlarge Document checkbox and select one of these - Epson WorkForce Pro WF-R5190 | User Manual - Page 80
• Select Custom and click the Advanced button to manually adjust the color correction settings or turn off color management in your printer software. • Select Image Options to access additional settings for improving printed images. Note: You can also select Color Universal Print settings. 3. To add - Epson WorkForce Pro WF-R5190 | User Manual - Page 81
Custom Color Correction Options - Windows You can select any of the available options in the Color Correction window to customize the image colors for your print job. Color Controls Lets you select a Color Mode setting, individual settings for Brightness, Contrast, Saturation, and Density, and - Epson WorkForce Pro WF-R5190 | User Manual - Page 82
ICM Lets you manage color using installed color printing profiles. No Color Adjustment Turns off color management in your printer software so you can manage color using only your application software. Parent topic: Selecting Additional Layout and Print Options - Windows Image Options and Additional - Epson WorkForce Pro WF-R5190 | User Manual - Page 83
High Speed Speeds up printing but may reduce print quality. Mirror Image Flips the printed image left to right. Parent topic: Selecting Additional Layout and Print Options - Windows Header/Footer Settings - Windows You can select any of the Header/Footer Settings options to add headers or footers - Epson WorkForce Pro WF-R5190 | User Manual - Page 84
Selecting a Printing Preset - Windows For quick access to common groups of print settings, you can select a printing preset on the Main or More Options tab. Note: You can create your own preset by clicking the Add/Remove Presets button. 1. Click the Main or More Options tab. You see the available - Epson WorkForce Pro WF-R5190 | User Manual - Page 85
to all the print jobs you send to your product. 1. Access the Windows Desktop and right-click the product icon in the Windows taskbar. 2. Select Printer Settings. 3. Click the Maintenance tab. You see the maintenance options: 85 - Epson WorkForce Pro WF-R5190 | User Manual - Page 86
5. Select any of the extended settings to customize your print. 6. Click OK to close the Extended Settings window. 7. Click OK to close the printer software window. Parent topic: Printing with Windows Printing Your Document or Photo - Windows Once you have selected your print settings, you are ready - Epson WorkForce Pro WF-R5190 | User Manual - Page 87
, such as this one: 2. Click OK or Print to start printing. Parent topic: Printing with Windows Locking Printer Settings - Windows Administrators can lock some printer settings to prevent unauthorized changes. The following settings can be locked: • Anti-copy pattern • Watermark • Header/footer - Epson WorkForce Pro WF-R5190 | User Manual - Page 88
Printers. Right-click your product and select Printer properties. • Windows 7: Click and select Devices and Printers. Right-click your product and select Printer product and select Properties. • Windows XP: Click Start and select Printers and Faxes. Right-click your product and select Properties. 2. - Epson WorkForce Pro WF-R5190 | User Manual - Page 89
You see this window: 4. Select the checkbox for the function or functions you want to lock. To lock all print settings, select All Document Settings. 5. Under Advanced Settings, select the setting you want for each selected function. 6. Click OK. Administrator Lock Settings Parent topic: Printing - Epson WorkForce Pro WF-R5190 | User Manual - Page 90
of the paper Prohibits multi-page settings Prints 2 pages on one sheet of paper Prints 4 pages on one sheet of paper Parent topic: Locking Printer Settings - Windows Selecting Default Print Settings - Windows When you change your print settings in a program, the changes apply only while you are - Epson WorkForce Pro WF-R5190 | User Manual - Page 91
printing in any program session. Changing the Language of the Printer Software Screens Parent topic: Printing with Windows Changing the Language of the Printer Software Screens You can change the language used on the Windows printer software screens. 1. Access the Windows Desktop and right-click the - Epson WorkForce Pro WF-R5190 | User Manual - Page 92
You see the maintenance options: 4. Select the language you want to use as the Language setting. 5. Click OK to close the printer software window. The printer software screens appear in the language you selected the next time you access them. Parent topic: Selecting Default Print Settings - Windows - Epson WorkForce Pro WF-R5190 | User Manual - Page 93
you choose to disable the automatic update feature, you can check for updates manually. Parent topic: Printing with Windows Related tasks Checking for Software Updates Printing with to your product software on Epson's support website. Selecting Basic Print Settings - OS X Selecting Page Setup Settings - - Epson WorkForce Pro WF-R5190 | User Manual - Page 94
on your screen, the Print option in the File menu, or another command. See your application's help utility for details. 3. Select your product as the Printer setting. 4. If necessary, click the arrow next to the Printer setting or the Show Details button to expand the print window. 94 - Epson WorkForce Pro WF-R5190 | User Manual - Page 95
You see the expanded printer settings window for your product: Note: The print window may look different, depending on the version of OS X and the application you are using. 5. Select - Epson WorkForce Pro WF-R5190 | User Manual - Page 96
6. Select the page setup options: Paper Size and Orientation. Note: If you do not see these settings in the print window, check for them in your application before printing. They may be accessible by selecting Page Setup from the File menu. 7. Select any application-specific settings that appear on - Epson WorkForce Pro WF-R5190 | User Manual - Page 97
You see these settings: 9. Select the Paper Source you wish to print from. 10. Select the type of paper you loaded as the Media Type setting. Note: The setting may not exactly match the name of your paper. Check the paper type settings list for details. 11. Select the Print Quality setting you want - Epson WorkForce Pro WF-R5190 | User Manual - Page 98
Printing Your Document or Photo - OS X Paper Source Options - OS X You can select any of the available options in the Paper Source menu to print on the paper loaded in that source. Auto Select Automatically selects the paper source based on the selected paper size. Cassette 1 Selects the paper in - Epson WorkForce Pro WF-R5190 | User Manual - Page 99
Grayscale Prints text and graphics in black or shades of gray. Mirror Image Lets you flip the printed image horizontally. Parent topic: Selecting Basic Print Settings - OS X Selecting Page Setup Settings - OS X Depending on your application, you may be able to select the paper size and orientation - Epson WorkForce Pro WF-R5190 | User Manual - Page 100
Selecting Print Layout Options - OS X You can select a variety of layout options for your document or photo by selecting Layout from the popup menu on the print window. • To print multiple pages on one sheet of paper, select the number of pages in the Pages per Sheet pop-up menu. To arrange the - Epson WorkForce Pro WF-R5190 | User Manual - Page 101
Selecting Double-sided Printing Settings - OS X You can print on both sides of the paper by selecting Two-sided Printing Settings from the pop-up menu on the print window. Note: Some options may be pre-selected or unavailable, depending on other settings you have chosen or if you are accessing the - Epson WorkForce Pro WF-R5190 | User Manual - Page 102
are printing as the Document Type setting. The software automatically sets the Adjustments options for that document type. 3. If necessary, customize the Adjustments settings as instructed on the screen. 4. Print a test copy of your double-sided document to test the selected settings. 5. Follow any - Epson WorkForce Pro WF-R5190 | User Manual - Page 103
Sets the level of ink coverage for double-sided printing. Increased Ink Drying Time Sets the amount of time required for drying ink after printing on one printout, or turn off color management in your printer software. 1. Select Color Matching from the pop-up menu in the print window. 2. - Epson WorkForce Pro WF-R5190 | User Manual - Page 104
OS X You can select from these settings on the Color Matching and Color Options menus. Color Matching Settings EPSON Color Controls Lets you manage color using controls in your printer software or turn off color management. ColorSync Prints using standard color profiles for your product and paper to - Epson WorkForce Pro WF-R5190 | User Manual - Page 105
Color Options Settings Manual Settings Lets you select manual color adjustments. Click the arrow next to menu or the Dock, select System Preferences. 2. Select Print & Fax, Print & Scan, or Printers & Scanners, select your product, and select Options & Supplies. 3. Select Driver or Options. 105 - Epson WorkForce Pro WF-R5190 | User Manual - Page 106
Preferences - OS X Parent topic: Printing with OS X Printing Preferences - OS X You can select from these settings on the Options or Driver tab. Thick Paper and Envelopes Prevents ink from smearing when you print on envelopes or other thick paper. Skip Blank Page Ensures that your product does not - Epson WorkForce Pro WF-R5190 | User Manual - Page 107
Notifications Lets you choose whether or not to receive warning notifications from the printer software for various operating conditions. Establish bidirectional communication Allows the product to printing, you can view the progress of your print job, control printing, and check ink status. 107 - Epson WorkForce Pro WF-R5190 | User Manual - Page 108
a print job, click the print job marked "Hold" and click the Resume icon. • To pause printing for all queued print jobs, click the Pause Printer icon. • To check ink status, click the Supply Levels icon. OS X 10.8/10.9: • To cancel printing, click the button next to the print job. • To pause a print - Epson WorkForce Pro WF-R5190 | User Manual - Page 109
Driver - Windows Locking Printer Settings - Epson Universal Print Driver - Windows Adding Network Printers - Epson Universal Print Driver - Windows Parent topic: Printing from a Computer Installing the Epson Universal Print Driver - Windows The Epson Universal Print Driver supports multiple printer - Epson WorkForce Pro WF-R5190 | User Manual - Page 110
the on-screen instructions until you see the screen below. 4. Select Yes: Network connection and click OK. Note: Select the Set Default of Printer Control Language to PCL6 checkbox if you want to set the default printer language to PCL6. Leave this option deselected to set the printer language to - Epson WorkForce Pro WF-R5190 | User Manual - Page 111
5. Do one of the following: • If you are installing one product, make sure Add EPSON Universal Print Driver is selected, and continue with the next step. • If you are installing more than one product, select Add found printers, and go to step 9. Note: You can customize and filter your product search - Epson WorkForce Pro WF-R5190 | User Manual - Page 112
new port created automatically. 7. Select the product you want to install from the Found Printers list. Note: Deselect the Set as default printer checkbox if you do not want the product to be set as your default printer. 8. Click OK, then skip the remaining steps. 9. Select each product you want to - Epson WorkForce Pro WF-R5190 | User Manual - Page 113
11. Click OK. Parent topic: Printing with the Epson Universal Print Driver - Windows Synchronizing Printer Settings - Epson Universal Print Driver - Windows You may need to synchronize the printer driver with the product if the printer driver does not detect the correct information or settings from - Epson WorkForce Pro WF-R5190 | User Manual - Page 114
Get. The product's settings and other information appears in the Current Printer Information area. 4. Click OK. Parent topic: Printing with the Epson Universal Print Driver - Windows Selecting Basic Print Settings - Epson Universal Print Driver - Windows Select the basic settings for the document or - Epson WorkForce Pro WF-R5190 | User Manual - Page 115
3. If necessary, select EPSON Universal Print Driver as the printer you want to use. Note: You may also need to select Properties or Preferences to view your print settings. You see the Main tab of your printer settings window: Note: For more information about a setting, right-click it and select - Epson WorkForce Pro WF-R5190 | User Manual - Page 116
save your print job as a project that can be modified and combined with other print jobs, select Job Arranger Lite. Parent topic: Printing with the Epson Universal Print Driver - Windows 116 - Epson WorkForce Pro WF-R5190 | User Manual - Page 117
Selecting Additional Layout and Print Options - Epson Universal Print Driver Windows You can select a variety of additional layout and printing options for your document or photo on the More Options tab. Note: For more information - Epson WorkForce Pro WF-R5190 | User Manual - Page 118
• Select Custom and click the Advanced button to manually adjust the color correction settings or turn off color management in your printer software. • Select Image Options to access additional to customize your print. Parent topic: Printing with the Epson Universal Print Driver - Windows 118 - Epson WorkForce Pro WF-R5190 | User Manual - Page 119
Selecting Maintenance Options - Epson Universal Print Driver - Windows You can select maintenance and other pattern to check for clogged nozzles. • Head Cleaning lets you clean the print head. • Network printer search lets you search for and connect to a product on the network. • Job Arranger Lite - Epson WorkForce Pro WF-R5190 | User Manual - Page 120
• Language lets you change the language of the printer software screens. Extended Settings - Epson Universal Print Driver - Windows Parent topic: Printing with the Epson Universal Print Driver - Windows Extended Settings - Epson Universal Print Driver - Windows You can select from these settings on - Epson WorkForce Pro WF-R5190 | User Manual - Page 121
Datatype Increases print speed and may solve other printing problems. Print as Bitmap Increases print speed when printing Printers. Right-click EPSON Universal Print Driver and select Print Preferences. • Windows 7: Click and select Devices and Printers. Right-click EPSON Universal Print Driver and - Epson WorkForce Pro WF-R5190 | User Manual - Page 122
• Windows XP: Click Start and select Printers and Faxes. Right-click EPSON Universal Print Driver and select Printing Preferences. You see the printer settings window: Note: For more information about a setting, right-click it and select Help. 2. Select the print settings you want to use as defaults - Epson WorkForce Pro WF-R5190 | User Manual - Page 123
Control Panel > Hardware and Sound > Devices and Printers. Right-click EPSON Universal Print Driver and select Printer properties. • Windows 7: Click and select Devices and Printers. Right-click EPSON Universal Print Driver and select Printer properties. • Windows Vista: Click and select Control - Epson WorkForce Pro WF-R5190 | User Manual - Page 124
You see this window: Note: You can prevent access to the Optional Settings tab by changing the user or group permissions in the Security tab. 3. Click Driver Settings. 124 - Epson WorkForce Pro WF-R5190 | User Manual - Page 125
Settings, select the setting you want for each selected function. 6. Click OK. Epson Universal Print Driver Lock Settings Parent topic: Printing with the Epson Universal Print Driver - Windows Epson Universal Print Driver Lock Settings Select the settings you want to use for locking print functions - Epson WorkForce Pro WF-R5190 | User Manual - Page 126
on one sheet of paper Parent topic: Locking Printer Settings - Epson Universal Print Driver - Windows Adding Network Printers - Epson Universal Print Driver - Windows You can use the Epson Universal Print Driver to find and add network printers. 1. Do one of the following: • Windows 8.x: Navigate - Epson WorkForce Pro WF-R5190 | User Manual - Page 127
• Windows XP: Click Start and select Printers and Faxes. Right-click EPSON Universal Print Driver and select Properties. 2. Click the Optional Settings tab. You see this window: 3. Click Network printer search. 4. When you see the search results, select Add found printers. 127 - Epson WorkForce Pro WF-R5190 | User Manual - Page 128
You see a screen like this: 5. Select the printer or printers you want to add. 6. Click Add to Printer Folder. The selected printer or printers appear in the lower section of the screen. 7. Click OK. Parent topic: Printing with the Epson Universal Print Driver - Windows 128 - Epson WorkForce Pro WF-R5190 | User Manual - Page 129
before installing the printer software. 1. Download the Drivers and Utilities Combo Package - PS3 PostScript from epson.com/support/wfr5190. 2. Double-click the downloaded package. 3. Click OK. 4. Click Accept. 5. Click Install. 6. Click Next and follow the on-screen instructions. Parent topic - Epson WorkForce Pro WF-R5190 | User Manual - Page 130
. See your application's help utility for details. 3. If necessary, select your product name as the printer you want to use, and then click the Preferences button. You see the Layout tab of your printer settings window: 4. Select the orientation of your document. 5. To print on both sides of the - Epson WorkForce Pro WF-R5190 | User Manual - Page 131
photo, select the Color setting. • To print text and graphics in black only, select the Black & White setting. Parent topic: Printing with the PostScript (PS3) Printer Software - Windows 131 - Epson WorkForce Pro WF-R5190 | User Manual - Page 132
Additional Layout and Print Options - PostScript Printer Software - Windows You can select a variety enlarge your document or photo by a specific percentage. 4. To utilize the Windows Image Color Management system, set the ICM Method option to one of the ICM Handling options and select the ICM - Epson WorkForce Pro WF-R5190 | User Manual - Page 133
Navigate to the Apps screen and select Control Panel > Hardware and Sound > Devices and Printers. Right-click your product name and select Print Preferences. • Windows 7: Click and select Devices and Printers. Right-click your product name and select Printing Preferences. • Windows Vista: Click and - Epson WorkForce Pro WF-R5190 | User Manual - Page 134
in these sections. Note: The PostScript printer software supports products that are connected via Ethernet. If your product is connected via USB, you will need to install the standard Epson printer software. To download the standard Epson printer software, go to epson.com/support/wfr5190. 134 - Epson WorkForce Pro WF-R5190 | User Manual - Page 135
to the same network as your computer before installing the printer software. 1. Download the Drivers and Utilities Combo Package - PS3 PostScript from epson.com/support/wfr5190. 2. Double-click the downloaded package. 3. Double-click EPSON. 4. Click Continue on the next two screens. 5. Click Agree - Epson WorkForce Pro WF-R5190 | User Manual - Page 136
on your screen, the Print option in the File menu, or another command. See your application's help utility for details. 3. Select your product as the Printer setting. 4. If necessary, click the arrow next to the Printer setting or the Show Details button to expand the print window. 136 - Epson WorkForce Pro WF-R5190 | User Manual - Page 137
You see the expanded printer settings window for your product: Note: The print window may look different, depending on the version of OS X and the application you are using. 5. Select - Epson WorkForce Pro WF-R5190 | User Manual - Page 138
6. Select the page setup options: Paper Size and Orientation. Note: If you do not see these settings in the print window, check for them in your application before printing. They may be accessible by selecting Page Setup from the File menu. 7. Select any application-specific settings that appear on - Epson WorkForce Pro WF-R5190 | User Manual - Page 139
10. Select Printer Features from the pop-up menu. You see these settings: 11. Select Plain as the MediaType setting. Note: The PostScript printer software supports plain paper printing on these paper and envelope sizes: • A4 (8.3 × 11.7 inches [210 × 297 mm]) • Letter (8.5 × 11 inches [216 × 279 mm - Epson WorkForce Pro WF-R5190 | User Manual - Page 140
text and graphics in black only, select the Monochrome setting. 15. Select any of the available print options. Parent topic: Printing with the PostScript (PS3) Printer Software - OS X 140 - Epson WorkForce Pro WF-R5190 | User Manual - Page 141
Sizing Printed Images - PostScript Printer Software - OS X You can adjust the size of the image as you print it by selecting Paper Handling from the and select a paper size from the Destination Paper Size pop-up menu. Parent topic: Printing with the PostScript (PS3) Printer Software - OS X 141 - Epson WorkForce Pro WF-R5190 | User Manual - Page 142
the printed image, select the Reverse page orientation or Flip horizontally settings. Parent topic: Printing with the PostScript (PS3) Printer Software - OS X Managing Color - PostScript Printer Software - OS X You can adjust the Color Matching settings to fine-tune the colors in your printout. 142 - Epson WorkForce Pro WF-R5190 | User Manual - Page 143
the active color profile. • To use the product's default color matching, select In printer. Parent topic: Printing with the PostScript (PS3) Printer Software - OS X Printing Your Document or Photo - PostScript Printer Software - OS X Once you have selected your print settings, you are ready to - Epson WorkForce Pro WF-R5190 | User Manual - Page 144
a print job, click the print job marked "Hold" and click the Resume icon. • To pause printing for all queued print jobs, click the Pause Printer icon. • To check ink status, click the Supply Levels icon. OS X 10.8/10.9: • To cancel printing, click the button next to the print job. • To pause a print - Epson WorkForce Pro WF-R5190 | User Manual - Page 145
• To check ink status, click the Settings icon, then click the Supply Levels tab. Parent topic: Printing Your Document or Photo - PostScript Printer Software - OS X Cancelling Printing Using a Product Button If you need to cancel printing, press the Stop button on your product. Parent topic: - Epson WorkForce Pro WF-R5190 | User Manual - Page 146
Epson printer software. To download the standard Epson printer software, go to epson.com/support/wfr5190. Checking Ink Status on the LCD Screen Checking Ink and Maintenance Box Status With Windows Checking Ink and Maintenance Box Status with OS X Parent topic: Replacing Ink Supply Units (Ink Packs - Epson WorkForce Pro WF-R5190 | User Manual - Page 147
Maintenance Box Status Related tasks Removing and Installing Ink Packs Replacing the Maintenance Box Checking Ink and Maintenance Box Status With Windows A low ink reminder appears if you try to print when ink is low, and you can check your ink or maintenance box status at any time using a utility - Epson WorkForce Pro WF-R5190 | User Manual - Page 148
You see this window: 2. Replace or reinstall the maintenance box or ink pack as indicated on the screen. Note: If any of the ink packs installed in the product is broken, incompatible with the product model, or improperly installed, Epson Status Monitor will not display an accurate ink status. 3. To - Epson WorkForce Pro WF-R5190 | User Manual - Page 149
You see this window: 4. Deselect the Display Epson Offers checkbox. Parent topic: Check Ink and Maintenance Box Status Related tasks Checking Ink Status on the LCD Screen Removing and Installing Ink Packs Replacing the Maintenance Box 149 - Epson WorkForce Pro WF-R5190 | User Manual - Page 150
Mac. 1. In the Apple menu or the Dock, select System Preferences. Select Print & Fax, Print & Scan, or Printers & Scanners, select your product, and select Options & Supplies. Select Utility and select Open Printer Utility. 2. Select EPSON Status Monitor. You see this window: 3. Do the following - Epson WorkForce Pro WF-R5190 | User Manual - Page 151
on the LCD Screen Removing and Installing Ink Packs Replacing the Maintenance Box Purchase Epson Ink Packs and Maintenance Boxes You can purchase genuine Epson ink, maintenance boxes, and paper at Epson Supplies Central at epson.com/ink3 (U.S. sales) or epson.ca (Canadian sales). You can also - Epson WorkForce Pro WF-R5190 | User Manual - Page 152
R14X R14X Parent topic: Purchase Epson Ink Packs and Maintenance Boxes Removing and Installing Ink Packs Make sure you have your replacement ink packs handy before you begin. You must install new ink packs immediately after removing the old ones. 1. If an ink pack is low or expended, a message - Epson WorkForce Pro WF-R5190 | User Manual - Page 153
ink pack pops out. 4. Lift up the ink pack and remove it from the ink case. Warning: If ink gets on your skin, wash it thoroughly with soap and water. If ink gets into your eyes, flush them immediately with water. If ink gets into your mouth, spit it out and see a doctor right away. Keep ink packs - Epson WorkForce Pro WF-R5190 | User Manual - Page 154
7. Shake the ink pack horizontally 20 times as shown. Caution: Do not remove any labels or seals, or ink will leak. 8. Place the ink pack in the case. Make sure the bottom of the ink pack fits over the base as shown. 9. Place the ink pack handle on the holder as shown. 154 - Epson WorkForce Pro WF-R5190 | User Manual - Page 155
are installed correctly. 12. When you are finished, close the ink case. Parent topic: Replacing Ink Supply Units (Ink Packs) and Maintenance Boxes Printing with Black Ink and Expended Color Ink Packs When a color ink pack is expended, you can temporarily continue printing from your computer using - Epson WorkForce Pro WF-R5190 | User Manual - Page 156
topic: Printing with Black Ink and Expended Color Ink Packs Printing with Expended Color Ink Packs - OS X If printing stops, you can cancel your print job and select settings to temporarily print with only black ink on plain paper or on an envelope. 1. Click the printer icon in the Dock. 2. If - Epson WorkForce Pro WF-R5190 | User Manual - Page 157
menu or the Dock, select System Preferences. 4. Select Print & Fax, Print & Scan, or Printers & Scanners, select your product, and select Options & Supplies. 5. Select Driver or Options. You see a screen to print your document. Parent topic: Printing with Black Ink and Expended Color Ink Packs 157 - Epson WorkForce Pro WF-R5190 | User Manual - Page 158
Disable this feature to continue using the remaining black ink. Note: If you disable this feature, it remains disabled until you replace the black ink pack. Parent topic: Replacing Ink Supply Units (Ink Packs) and Maintenance Boxes Replacing the Maintenance Box Make sure you have a new maintenance - Epson WorkForce Pro WF-R5190 | User Manual - Page 159
your mouth, spit it out and see a doctor right away. Keep the maintenance box out of the reach of children and do not drink the ink. 5. Place the used maintenance box in the plastic bag that came with the new maintenance box. Seal the bag and dispose of it carefully. 6. Insert - Epson WorkForce Pro WF-R5190 | User Manual - Page 160
7. Replace the rear cover. 8. Select Done on the product control panel and press the OK button. Parent topic: Replacing Ink Supply Units (Ink Packs) and Maintenance Boxes 160 - Epson WorkForce Pro WF-R5190 | User Manual - Page 161
. To download the standard Epson printer software, go to epson.com/support/wfr5190. If running these utilities does not solve the problem, you may need to replace the ink packs. Print Head Maintenance Print Head Alignment Flushing the Ink Tubes Cleaning the Paper Guide Print Head Maintenance If your - Epson WorkForce Pro WF-R5190 | User Manual - Page 162
Parent topic: Print Head Maintenance Checking the Nozzles Using the Product Control Panel You can check the print head nozzles using the control panel on your product. 1. Make sure plain paper is loaded in Cassette 1. 2. Press the up or down arrow buttons, select Menu, and press the OK button. 3. - Epson WorkForce Pro WF-R5190 | User Manual - Page 163
select Clean the print head and press the OK button. 8. Follow the instructions on the screen to clean the print head, check the nozzles, and repeat replaced. Parent topic: Print Head Nozzle Check Related tasks Cleaning the Print Head Using the Product Control Panel Removing and Installing Ink Packs - Epson WorkForce Pro WF-R5190 | User Manual - Page 164
• OS X: In the Apple menu or the Dock, select System Preferences. Select Print & Fax, Print & Scan, or Printers & Scanners, select your product, and select Options & Supplies. Select Utility and select Open Printer Utility. 3. Select Nozzle Check. You see a window like this: 4. Click Print. 164 - Epson WorkForce Pro WF-R5190 | User Manual - Page 165
indicates clogged nozzles, you can clean the print head. Note: You cannot clean the print head if ink is expended, and may not be able to clean it when ink is low. You must replace the ink pack first. Cleaning the Print Head Using the Product Control Panel Cleaning the Print Head Using a Computer - Epson WorkForce Pro WF-R5190 | User Manual - Page 166
Note: Use the nozzle check pattern to determine which colors need cleaning. You can save ink by cleaning only selected colors. When the cleaning cycle is finished, you see a message , one of the ink cartridges may be old or damaged and needs to be replaced. Parent topic: Print Head Cleaning 166 - Epson WorkForce Pro WF-R5190 | User Manual - Page 167
Related tasks Removing and Installing Ink Packs Cleaning the Print Head Using a Computer Utility Checking taskbar. • OS X: In the Apple menu or the Dock, select System Preferences. Select Print & Fax, Print & Scan, or Printers & Scanners, select your product, and select Options & Supplies. Select - Epson WorkForce Pro WF-R5190 | User Manual - Page 168
You see a window like this: 5. Click Start to begin the cleaning cycle. The power light flashes throughout the cleaning cycle and stays on when the cleaning cycle is finished. Note: Do not open the front cover during the cleaning cycle. Caution: Never turn off the product during a cleaning cycle or - Epson WorkForce Pro WF-R5190 | User Manual - Page 169
on and wait at least 6 hours. Then try cleaning the print head again. Parent topic: Print Head Cleaning Related tasks Removing and Installing Ink Packs Print Head Alignment If your printouts become grainy or blurry, you notice misalignment of vertical lines, or you see dark or light horizontal bands - Epson WorkForce Pro WF-R5190 | User Manual - Page 170
Aligning the Print Head Using the Product Control Panel You can align the print head using the touch panel on your product. 1. Make sure plain paper is loaded in Cassette 1. 2. Press the up or down arrow buttons, select Menu, and press the OK button. 3. Press the down arrow button, select - Epson WorkForce Pro WF-R5190 | User Manual - Page 171
in the Windows taskbar. • OS X: In the Apple menu or the Dock, select System Preferences. Select Print & Fax or Print & Scan, select your product, and select Options & Supplies. Select Utility and select Open Printer Utility. 4. Select Print Head Alignment. 5. Click Next, then click Print to print - Epson WorkForce Pro WF-R5190 | User Manual - Page 172
You see a window like this: 6. Check the printed pattern and follow the instructions on the screen to choose the number representing the best printed pattern for each set. Vertical alignment Horizontal alignment 172 - Epson WorkForce Pro WF-R5190 | User Manual - Page 173
the maintenance box service life. 1. Turn off the product. 2. Press and hold the back button while pressing the power button to turn the product back on. You see a message asking if you want to run Power Ink Flushing. 3. Select Yes, press the OK button, and follow the instructions on the screen - Epson WorkForce Pro WF-R5190 | User Manual - Page 174
the Print Head and press the OK button. Parent topic: Adjusting Print Quality Cleaning the Paper Guide If you see ink on the back of a printout, you can clean the paper guide rollers to remove any excess ink. 1. Load a few sheets of plain paper in the product. 2. Press the up or down arrow buttons - Epson WorkForce Pro WF-R5190 | User Manual - Page 175
You see this screen: 4. Press the down arrow button, select Paper Guide Cleaning, and press the OK button. 5. Select the cassette and press the OK button. 6. Press the up arrow button. 7. Check the back of the ejected - Epson WorkForce Pro WF-R5190 | User Manual - Page 176
Cleaning and Transporting Your Product See these sections if you need to clean or transport your product. Cleaning the Product Transporting Your Product Cleaning the Product To keep your product working at its best, you should clean it several times a year. Caution: Do not use a hard brush, benzene, - Epson WorkForce Pro WF-R5190 | User Manual - Page 177
leak. • Remove the ink packs before transportation, but leave the maintenance box installed; otherwise ink may leak. 1. Turn off the product. 2. Remove all the paper from the product. 3. Unplug the power cable. 4. Disconnect any connected cables. 5. Close the rear paper support and the output tray - Epson WorkForce Pro WF-R5190 | User Manual - Page 178
on the ink pack. The ink pack pops out. 8. Lift up the ink pack and remove it from the ink case. 9. Push in the pop-out section and close the ink case. 10. Follow the steps 6 to 9 to remove the color ink packs on the other side of the product. 11. Carefully transport the removed ink packs lying flat - Epson WorkForce Pro WF-R5190 | User Manual - Page 179
idea to check Epson's support website for free updates to your product software. You can select Download the Latest Software from the Home screen of this manual or visit Epson's driver download site (U.S. downloads or Canadian downloads). • Windows: Your printer software automatically checks for - Epson WorkForce Pro WF-R5190 | User Manual - Page 180
If there is no paper jam, contact Epson for support. You need to replace the following ink Replace the ink packs indicated on the LCD screen. supply unit(s). Maintenance box is nearing end of its The maintenance box is near the end of its service life. service life. Maintenance box is at the end - Epson WorkForce Pro WF-R5190 | User Manual - Page 181
Wi-Fi or Wired Networking Loading Paper Running a Product Check Running a product check helps you determine if your product is operating properly. 1. Disconnect any interface cables connected to your product. 2. Make sure plain paper is loaded in Cassette 1. 3. Press the up or down arrow buttons, - Epson WorkForce Pro WF-R5190 | User Manual - Page 182
printer software. • If the page prints but the nozzle check pattern has gaps, clean or align the print head. • If the page does not print, the product may have a problem. Check the other solutions in this manual. If they do not work, contact Epson. Parent topic: Solving Problems System - Epson WorkForce Pro WF-R5190 | User Manual - Page 183
Problems Solving Setup Problems Check these sections if you have problems while setting up your product. Noise After Ink Installation Software Installation Problems Parent topic: Solving Problems Noise After Ink charging is still in progress. If it is still in progress, contact Epson for help. 183 - Epson WorkForce Pro WF-R5190 | User Manual - Page 184
securely connected at both ends. If you still have problems installing software, disconnect the cable and carefully follow the instructions on the Start Here sheet. Also make sure your system meets the requirements for your operating system. • Close any other programs, including screen savers and - Epson WorkForce Pro WF-R5190 | User Manual - Page 185
trouble mode. See your router documentation for instructions. • Verify that your router sheet. Then follow the instructions in your router or access instructions that came with your product to enter your wireless network name manually documentation for instructions. • may have trouble accessing a - Epson WorkForce Pro WF-R5190 | User Manual - Page 186
you initialize your router, so note the next step before initializing it. 4. Download your product software from the Epson website using the instructions on the Start Here sheet. • If you have replaced your router, reinstall your product software to connect to the new router. Note: If you are using - Epson WorkForce Pro WF-R5190 | User Manual - Page 187
in OS X Printer Window If your product does not appear in the OS X printer window, try these your router documentation for instructions. Parent topic: Solving Network Problems Related concepts When to IP addresses using DHCP, set the IP address manually. • Make sure your computer and product are - Epson WorkForce Pro WF-R5190 | User Manual - Page 188
dual band (2.4 GHz and 5 GHz) mode. See your router documentation for instructions. • Check to see if your wireless router or access point has an enabled necessary, reinstall your software. Parent topic: Solving Network Problems Related concepts When to Uninstall Your Product Software Related tasks - Epson WorkForce Pro WF-R5190 | User Manual - Page 189
from the rear feed slot, try cleaning the paper guide using an Epson cleaning sheet. • Be sure to insert the paper instructions that came with the paper. Parent topic: Solving Paper Problems Related references Paper Jam Problems Inside the Product Paper Jam Problems in the Cassette Paper Jam Problems - Epson WorkForce Pro WF-R5190 | User Manual - Page 190
Paper Jam Problems Inside the Product If paper has jammed inside the product, follow the steps here to clear the jam. 1. messages. If you still see a paper jam message, check the other paper jam solutions. Parent topic: Solving Paper Problems Related references Paper Jam Problems in the Cassette 190 - Epson WorkForce Pro WF-R5190 | User Manual - Page 191
in the Duplexer (Rear Cover) Paper Jam Problems in the Cassette If paper has jammed in the cassette, follow the steps here to clear the Pull out the paper cassette. 4. Carefully remove any paper jammed inside the product. 5. Carefully follow all paper loading instructions and reload the paper. 191 - Epson WorkForce Pro WF-R5190 | User Manual - Page 192
see a paper jam message, check the other paper jam solutions. Parent topic: Solving Paper Problems Related references Paper Jam Problems in the Duplexer (Rear Cover) Paper Jam Problems Inside the Product Paper Jam Problems in the Duplexer (Rear Cover) If paper has jammed in the duplexer, follow the - Epson WorkForce Pro WF-R5190 | User Manual - Page 193
the LCD screen to clear any error messages. If you still see a paper jam message, check the other paper jam solutions. Parent topic: Solving Paper Problems Related references Paper Jam Problems in the Cassette Paper Jam Problems Inside the Product 193 - Epson WorkForce Pro WF-R5190 | User Manual - Page 194
Nothing Prints Using the Postscript Printing Software Documents Print Incorrectly Using the Postscript Printing Software Accessing Printer Properties - Postscript - Windows Parent topic: Solving Problems Nothing Prints Using the Postscript Printing Software If your document doesn't print, try these - Epson WorkForce Pro WF-R5190 | User Manual - Page 195
as Adobe Photoshop, make sure the settings in the application match the printer driver settings. • EPS files created in binary format may not print correctly : Solving PostScript Printing Problems Accessing Printer Properties - Postscript - Windows You can access the printer properties to view and - Epson WorkForce Pro WF-R5190 | User Manual - Page 196
are different from those covered in this manual. See the Apple website for details. Note: For problems while printing with the Epson Universal Print Driver or PostScript (PS3) printer software, see the sections covering that software in this manual. Nothing Prints Product Icon Does Not Appear - Epson WorkForce Pro WF-R5190 | User Manual - Page 197
. (Or open the Control Panel, select Printers and Other Hardware, if necessary, and select Printers and Faxes.) Right-click your product name, select Open, right-click the stalled print job, click Cancel, and click Yes. Parent topic: Solving Problems Printing from a Computer Related tasks Running - Epson WorkForce Pro WF-R5190 | User Manual - Page 198
the minimum requirements. If necessary, increase your system's memory. • If you are using Windows 7, close the Devices and Printers window before you print. • Make sure Problems Printing from a Computer Related references Paper Type Settings - Control Panel Windows System Requirements OS X System - Epson WorkForce Pro WF-R5190 | User Manual - Page 199
in your printer software. (This option has different names, depending on your operating system version.) Note: Leave these options turned on when you print on Epson Iron-on Cool Peel Transfer paper, if available for your product. Parent topic: Solving Page Layout and Content Problems Related tasks - Epson WorkForce Pro WF-R5190 | User Manual - Page 200
clogged. Then clean the print head, if necessary. • Make sure your product is selected as the printer in your printing program. Parent topic: Solving Page Layout and Content Problems Related concepts Print Head Nozzle Check Print Head Cleaning Related tasks Selecting Basic Print Settings - Windows - Epson WorkForce Pro WF-R5190 | User Manual - Page 201
Make sure your paper is positioned correctly for feeding into the printer. You can use the preview option in your printer software to check your margins before you print. Parent topic: Solving Page Layout and Content Problems Related tasks Selecting Basic Print Settings - Windows Selecting Extended - Epson WorkForce Pro WF-R5190 | User Manual - Page 202
guides against the edges of the paper. • Select a higher print quality setting in your printer manual. See the Apple website for details. White or Dark Lines in Printout Blurry or Smeared Printout Faint Printout or Printout Has Gaps Grainy Printout Incorrect Colors Parent topic: Solving Problems - Epson WorkForce Pro WF-R5190 | User Manual - Page 203
to replace the ink packs. Parent topic: Solving Print Quality Problems support sheet with special paper, or load special paper one sheet at a time. • Make sure your paper meets the specifications for your product. • Use Epson papers to ensure proper saturation and absorption of genuine Epson inks - Epson WorkForce Pro WF-R5190 | User Manual - Page 204
Avoid handling printouts on glossy paper right after printing to allow the ink to set. • Turn off any high speed settings in your Problems Related concepts Print Head Cleaning Print Head Alignment Related references Available Epson Papers Paper Specifications Related tasks Cleaning the Paper Guide - Epson WorkForce Pro WF-R5190 | User Manual - Page 205
Panel Related tasks Selecting Basic Print Settings - Windows Selecting Basic Print Settings - OS X Cleaning the Paper Guide Related topics Loading Paper Replacing Ink Supply Units (Ink Packs) and Maintenance Boxes Grainy Printout If your printouts are grainy, try these solutions: • Make sure you - Epson WorkForce Pro WF-R5190 | User Manual - Page 206
print. Consider the limitations of your computer system when selecting a resolution, and select the . Parent topic: Solving Print Quality Problems Related concepts Print Head Nozzle Check Grayscale setting is not selected in your printer software. • If you selected Standard-Vivid (Windows) or - Epson WorkForce Pro WF-R5190 | User Manual - Page 207
. • The ink packs may be old or low on ink, and you may need to replace them. • Your printed colors can never exactly match your on-screen colors. However, you can use a color management system to get as close as possible. Try using the color management options in your printer software. • For - Epson WorkForce Pro WF-R5190 | User Manual - Page 208
your product, if necessary, and click OK. Then follow any on-screen instructions. • Windows (other versions): Click or Start, and select All Programs or Programs. Select Epson, select your product, then click EPSON Printer Software Uninstall. Note: If you see a User Account Control window, click Yes - Epson WorkForce Pro WF-R5190 | User Manual - Page 209
contact Epson for technical support services, use the following support options. Internet Support Visit Epson's support website at epson.com/support (U.S.) or epson.ca/support (Canada) for solutions to common problems. You can download drivers and documentation, get FAQs and troubleshooting advice - Epson WorkForce Pro WF-R5190 | User Manual - Page 210
You can purchase genuine Epson ink and paper at Epson Supplies Central at epson.com/ink3 (U.S. sales) or epson.ca (Canadian sales). You can also purchase supplies from an Epson authorized reseller. To find the nearest one, call 800-GO-EPSON (800-463-7766). Parent topic: Solving Problems 210 - Epson WorkForce Pro WF-R5190 | User Manual - Page 211
. Note: Epson offers a recycling program for end of life products. Please go to this site for information on how to return your products for proper disposal. Windows System Requirements OS X System Requirements Printing Specifications Paper Specifications Printable Area Specifications Ink Pack - Epson WorkForce Pro WF-R5190 | User Manual - Page 212
only the printer driver; any additional included software is not supported. Note: Visit Epson's support website at epson.com/support (U.S.) or epson.ca/support (Canada) for the latest in compatibility and drivers for your product. Parent topic: Technical Specifications OS X System Requirements To - Epson WorkForce Pro WF-R5190 | User Manual - Page 213
guarantee the quality of any non-Epson brand or type of paper. Always test a sample of paper stock before purchasing large quantities or printing large jobs. Poor quality paper may reduce print quality and cause paper jams or other problems. If you encounter problems, switch to a higher grade of - Epson WorkForce Pro WF-R5190 | User Manual - Page 214
Printable Area Specifications Note: Print quality may decline in the shaded areas shown here due to the printer's mechanism. Single sheets 1 Margin: 0.12 inch (3 mm) minimum 2 Quality border/top: 1.77 inch (45 mm) 3 Quality border/bottom: 1.97 inch (50 mm) 214 - Epson WorkForce Pro WF-R5190 | User Manual - Page 215
18 mm) 4 Quality border/left: 1.77 inch (45 mm) Parent topic: Technical Specifications Ink Pack Specifications Note: The printer is designed for use with Epson ink packs only, not third-party ink. The ink packs included with the product are designed for product setup and not for resale. After some - Epson WorkForce Pro WF-R5190 | User Manual - Page 216
17.1 inches (435 mm) Printing: 25.8 inches (655 mm); with the output tray extension extended Weight 46.1 lb (20.9 kg) (without ink packs or power cord) Parent topic: Technical Specifications Electrical Specifications Input voltage range Rated frequency range Input frequency range Rated current - Epson WorkForce Pro WF-R5190 | User Manual - Page 217
with either IEEE 802.11 b/g or IEEE 802.11 b/g/n, depending on purchase location WEP (64/128 bit) WPA-PSK (TKIP/AES); complies with WPA2 with support for WPA/WPA2 Personal WPA2-Enterprise 2.4 GHz Infrastructure mode Ad hoc mode Wi-Fi Direct Note: Wi-Fi Direct Simple AP mode available even if - Epson WorkForce Pro WF-R5190 | User Manual - Page 218
Computer Corporation. • Type: WLU6117-D69 (RoHS) This product conforms to Part 15 of FCC Rules and RSS-210 of the IC Rules. Epson cannot accept responsibility for any failure to satisfy the protection requirements resulting from a non-recommended modification of the product. Operation is subject to - Epson WorkForce Pro WF-R5190 | User Manual - Page 219
To prevent radio interference to the licensed service, this device is intended to be operated indoors and away from windows to provide maximum shielding. Equipment (or its transmit antenna) that is installed outdoors - Epson WorkForce Pro WF-R5190 | User Manual - Page 220
Joanna, Joanna Italic, Joanna Bold, Joanna Bold Italic LetterGothic, LetterGothic Slanted, LetterGothic Bold, LetterGothic Bold Slanted ITC Lubalin Graph Book, ITC Lubalin Graph Book Oblique, ITC Lubalin Graph Demi, ITC Lubalin Graph Demi Oblique Marigold Monaco ITC Mona Lisa Recut New Century - Epson WorkForce Pro WF-R5190 | User Manual - Page 221
PCL5 Mode Fonts Font name FixedPitch 810 Ding Dings SWA Dutch 801 Zapf Humanist 601 Ribbon 131 Clarendon 701 Swiss 742 Swiss 742 Condensed Incised 901 Aldine 430 Calligraphic 401 Flareserif 821 Ryadh BT Miryam BT David BT Narkis Tam BT Swiss 721 SWM Dutch 801 SWM Swiss 721 SWA Swiss 721 Narrow SWA - Epson WorkForce Pro WF-R5190 | User Manual - Page 222
801 SWA Chancery 801 Medium SWA Italic Symbol SWM Symbol SWA More WingBats SWM FixedPitch 850 Naskh BT Koufi BT FixedPitch 810 Dark Line Printer OCR A OCR B Code39 EAN/UPC Family Light, Demi Bold, Light Italic, Demi Bold Italic Medium, Bold, Italic, Bold Italic Medium, Bold, Italic, Bold Italic - Epson WorkForce Pro WF-R5190 | User Manual - Page 223
Font name FixedPitch 810 Bold Italic FixedPitch 850 Regular FixedPitch 850 Bold FixedPitch 850 Italic FixedPitch 810 Dark FixedPitch 810 Dark Bold FixedPitch 810 Dark Italic FixedPitch 810 Dark Bold Italic Dutch 801 Dutch 801 Bold Dutch 801 Italic Dutch 801 Bold Italic Zapf Humanist 601 Zapf - Epson WorkForce Pro WF-R5190 | User Manual - Page 224
Font name Incised 901 Incised 901 Bold Incised 901 Italic Aldine 430 Aldine 430 Bold Aldine 430 Italic Aldine 430 Bold Italic Calligraphic 401 Flareserif 821 Medium Flareserif 821ExtraBold Swiss 721 SWM Swiss 721 SWM Bold Swiss 721 SWM Italic Swiss 721 SWM Bold Italic Dutch 801 SWM Dutch 801 SWM - Epson WorkForce Pro WF-R5190 | User Manual - Page 225
Font name Zapf Calligraphic 801 SWA Zapf Calligraphic 801 SWA Bold Zapf Calligraphic 801 SWA Italic Zapf Calligraphic 801 SWA Bold Italic Geometric 711 SWA Geometric 711 SWA Bold Geometric 711 SWA Oblique Geometric 711 SWA Bold Italic Revival 711 Light SWA Revival 711 Demi SWA Bold Revival 711 Light - Epson WorkForce Pro WF-R5190 | User Manual - Page 226
BT Koufi BT Bold Naskh BT Naskh BT Bold Ryadh BT Ryadh BT Bold Symbol set *7 *7 *7 *7 *7 *7 *8 *8 *8 *8 *8 *8 Bitmap Font Font name Line Printer Symbol set *9 Parent topic: Technical Specifications Symbol Sets Your product can access a variety of symbol sets. Many of these symbol sets differ - Epson WorkForce Pro WF-R5190 | User Manual - Page 227
PCL5 Mode Typefaces and Symbol Sets In the PCL5 mode symbol sets table, you can use any of these typefaces in the left column: • Zapf Humanist 601 • Ribbon 131 • Clarendon 701 • Swiss 742 Condensed • Incised 901 • Aldine 430 • Calligraphic 401 • Flareserif 821 • Swiss 721 SWM • Dutch 801 SWM • Swiss - Epson WorkForce Pro WF-R5190 | User Manual - Page 228
PCL5 Mode Symbol Sets Typeface details FixedPitch 810 Dutch 801 Swiss 742 FixedPitch 850 Line Printer FixedPitch 810 Dutch 801 Swiss 742 FixedPitch 850 Symbol set names IBM-US (10U) ECM94-1 (0N) 8859-9 ISO (5N) IBM-DN (11U) Legal (1U) PcBlt775 ( - Epson WorkForce Pro WF-R5190 | User Manual - Page 229
BT Naskh BT Koufi BT Ryadh BT FixedPitch 810 Dutch 801 Swiss 742 FixedPitch 850 FixedPitch 810 Dutch 801 Swiss 742 FixedPitch 850 Line Printer Line Printer FixedPitch 810 FixedPitch 850 David BT Narkis Tam BT Miryam BT Symbol set names PsMath (5M) Math-8 (8M) ANSI ASCII (0U) Pc866Cyr (3R) WinCyr - Epson WorkForce Pro WF-R5190 | User Manual - Page 230
Typeface details Koufi BT Naskh BT Ryadh BT Symbol SWA Symbol SWM More WingBats SWM Ding Dings SWA OCR A OCR B Code3-9 EAN/UPC Symbol set names Arabic8 (8V) PC-864, Arabic (10V) HPWARA (9V) Symbol (19M) Wingdings (579L) ZapfDingbats (14L) OCR A (0O) OCR B (1O) OCR B Extension (3Q) Code3-9 (0Y) EAN/ - Epson WorkForce Pro WF-R5190 | User Manual - Page 231
Symbol set Attribute Font classification name *1 *2 *3 *4 *5 ISO 8859-2 78 Latin 2 -- ISO Spanish 83 -- Roman-9 149 -- PS Math 173 -- ISO 8859-9 174 Latin 5 -- Windows 3.1 180 Latin 5 -- Microsoft 202 Publishing -- ISO 8859/10 206 Latin 6 -- DeskTop 234 -- Math-8 269 -- - Epson WorkForce Pro WF-R5190 | User Manual - Page 232
Symbol set Attribute Font classification name *1 *2 *3 *4 *5 PC-850 405 -- PcEur858 437 -- Pi Font 501 -- PC852 565 -- Unicode 3.0 590 -- WBALT 620 -- Windows 3.1 629 Latin 1 -- PC-755 853 -- Wingdings 18540 --- - Symbol 621 --- - ZapfDigbats 460 --- -- PC-866, - Epson WorkForce Pro WF-R5190 | User Manual - Page 233
Symbol set Attribute Font classification name *1 *2 *3 *4 *5 Hebrew7 8 -- -- ISO 8859/8 232 Hebrew -- -- Hebrew8 264 -- -- PC-862, 488 --- -- Hebrew Arabic8 278 --- -- HPWARA 310 --- -- PC-864, Arabic 342 --- -- Parent topic: Technical Specifications *6 *7 - - - - Epson WorkForce Pro WF-R5190 | User Manual - Page 234
Safety Instructions Before using your Epson product, read and follow these safety instructions. General Printer Safety Instructions Ink Pack Safety Instructions LCD Screen Safety Instructions Wireless Connection Safety Instructions Parent topic: Notices General Printer Safety Instructions • Be - Epson WorkForce Pro WF-R5190 | User Manual - Page 235
are fuses in the plug, make sure you replace them with fuses of the correct size and rating. • Leave the ink cartridges installed. Removing the cartridges can dehydrate the print head and may prevent the printer from printing. • Before transporting the printer, make sure that the print head is in - Epson WorkForce Pro WF-R5190 | User Manual - Page 236
the printer, do not tilt it, stand it on its side, or turn it upside down; otherwise ink may leak. Parent topic: Important Safety Instructions Ink Pack Safety Instructions • Keep ink packs out of the reach of children and do not drink the ink. • Be careful when you handle used ink packs; there - Epson WorkForce Pro WF-R5190 | User Manual - Page 237
members at the facility, and follow all posted warnings and directions on the device to avoid causing an accident. Parent topic: Important Safety Instructions FCC Compliance Statement For United States Users This equipment has been tested and found to comply with the limits for a Class B digital - Epson WorkForce Pro WF-R5190 | User Manual - Page 238
the license agreements of each open source software program for more details, which are described in OSS.pdf on the Epson support site. 4. OpenSSL toolkit This printer product includes software developed by the OpenSSL project for use in the OpenSSL Toolkit (http://www.openssl.org/). This product - Epson WorkForce Pro WF-R5190 | User Manual - Page 239
source software program "Bonjour " which applies the terms and conditions provided by owner of the copyright to the "Bonjour ". Net-SNMP license This printer product includes the open source software program "Net-SNMP" which applies the terms and conditions provided by owner of the copyright to the - Epson WorkForce Pro WF-R5190 | User Manual - Page 240
of the copyright to the " MD5 ". AES license This printer product includes the open source software program "AES" which EPSON® and Supplies Central® are registered trademarks, EPSON Exceed Your Vision is a registered logomark, and Epson ConnectTM is a trademark of Seiko Epson Corporation. Epson - Epson WorkForce Pro WF-R5190 | User Manual - Page 241
system, or transmitted in any form or by any means, electronic, mechanical, photocopying, recording, or otherwise, without the prior written permission of Seiko Epson Epson Corporation's operating and maintenance instructions. Seiko Epson Corporation shall not be liable for any damages or problems - Epson WorkForce Pro WF-R5190 | User Manual - Page 242
people assume. Contact your legal advisor for any questions regarding copyright law. Parent topic: Copyright Notice Default Delay Times for Power Management for Epson Products This product will enter sleep mode after a period of nonuse. This is to ensure that the product meets Energy Star standards
-
 1
1 -
 2
2 -
 3
3 -
 4
4 -
 5
5 -
 6
6 -
 7
7 -
8
-
9
-
10
-
11
-
12
-
13
-
14
-
15
-
16
-
17
-
18
-
19
-
20
-
21
-
22
-
23
-
24
-
25
-
26
-
27
-
28
-
29
-
30
-
31
-
32
-
33
-
34
-
35
-
36
-
37
-
38
-
39
-
40
-
41
-
42
-
43
-
44
-
45
-
46
-
47
-
48
-
49
-
50
-
51
-
52
-
53
-
54
-
55
-
56
-
57
-
58
-
59
-
60
-
61
-
62
-
63
-
64
-
65
-
66
-
67
-
68
-
69
-
70
-
71
-
72
-
73
-
74
-
75
-
76
-
77
-
78
-
79
-
80
-
81
-
82
-
83
-
84
-
85
-
86
-
87
-
88
-
89
-
90
-
91
-
92
-
93
-
94
-
95
-
96
-
97
-
98
-
99
-
100
-
101
-
102
-
103
-
104
-
105
-
106
-
107
-
108
-
109
-
110
-
111
-
112
-
113
-
114
-
115
-
116
-
117
-
118
-
119
-
120
-
121
-
122
-
123
-
124
-
125
-
126
-
127
-
128
-
129
-
130
-
131
-
132
-
133
-
134
-
135
-
136
-
137
-
138
-
139
-
140
-
141
-
142
-
143
-
144
-
145
-
146
-
147
-
148
-
149
-
150
-
151
-
152
-
153
-
154
-
155
-
156
-
157
-
158
-
159
-
160
-
161
-
162
-
163
-
164
-
165
-
166
-
167
-
168
-
169
-
170
-
171
-
172
-
173
-
174
-
175
-
176
-
177
-
178
-
179
-
180
-
181
-
182
-
183
-
184
-
185
-
186
-
187
-
188
-
189
-
190
-
191
-
192
-
193
-
194
-
195
-
196
-
197
-
198
-
199
-
200
-
201
-
202
-
203
-
204
-
205
-
206
-
207
-
208
-
209
-
210
-
211
-
212
-
213
-
214
-
215
-
216
-
217
-
218
-
219
-
220
-
221
-
222
-
223
-
224
-
225
-
226
-
227
-
228
-
229
-
230
-
231
-
232
-
233
-
234
-
235
-
236
-
237
-
238
-
239
-
240
-
241
-
242
 |
 |

WF-R5190 User's Guide