Eureka AirSpeed ONE AS2001TIS Owner's Guide
Eureka AirSpeed ONE AS2001TIS Manual
 |
View all Eureka AirSpeed ONE AS2001TIS manuals
Add to My Manuals
Save this manual to your list of manuals |
Eureka AirSpeed ONE AS2001TIS manual content summary:
- Eureka AirSpeed ONE AS2001TIS | Owner's Guide - Page 1
manual eureka.com/airspeed instructions at www.eureka.com or call the customer service helpline at 1-800-282-2886. Maintenance Schedule Make sure vacuum cleaner is turned off and power cord is unplugged when performing any maintenance. For maintenance information, see maintenance section in this guide - Eureka AirSpeed ONE AS2001TIS | Owner's Guide - Page 2
hay niños. • Utilícela únicamente como se describe en este manual. Utilice solamente los accesorios que recomienda el fabricante. • No la utilice si fácil Para ver nuestra demostración sobre "Cómo ensamblar", visite www.eureka.com/ airspeed/assembly STEP STEP STEP STEP 1 2 3 4 Fig. 1
-
 1
1 -
 2
2
 |
 |
© 2013 Electrolux Home Care Products, Inc. Printed in China PN 090211_rev3
© 2013 Electrolux Home Care Products, Inc. Printed in China PN 090211_rev3
IMPORTANT SAFEGUARDS
When using an electrical appliance, basic precautions should
always be followed, including the following:
READ ALL INSTRUCTIONS BEFORE USING THIS
VACUUM CLEANER.
WARNING
To reduce the risk of fire, electric shock, or injury:
• Do not use outdoors or on wet surfaces.
• Do not leave vacuum cleaner when plugged in. Turn off the
switch and unplug the electrical cord when not in use and
before servicing.
• Do not allow to be used as a toy. Close attention is
necessary when used by or near children.
• Use only as described in this manual. Use only
manufacturer’s recommended attachments.
• Do not use with damaged cord or plug. If vacuum cleaner is
not working as it should, has been dropped, damaged, left
outdoors, or dropped into water, return it to a service center
before using.
• Do not pull or carry by cord, use cord as a handle, close a
door on cord, or pull cord around sharp edges or corners.
Do not run vacuum cleaner over cord. Keep cord away from
heated surfaces.
• Do not use extension cords or outlets with inadequate
current carrying capacity.
• Turn off all controls before unplugging.
• Do not unplug by pulling on cord. To unplug, grasp the plug,
not the cord.
• Do not handle plug or vacuum cleaner with wet hands.
• Do not put any object into openings. Do not use with any
opening blocked; keep free of dust, lint, hair, and anything
that may reduce airflow.
• This vacuum cleaner creates suction. Keep hair, loose
clothing, fingers, and all parts of body away from openings
and moving parts.
• Do not place vacuum on furniture or stairs as the brush roll
may cause damage.
•
Use extra care when cleaning on stairs. Do not place
vacuum at top of stairs.
•
Use extra care when cleaning area rugs as the brush roll
may cause damage.
•
Unplug before connecting turbo nozzle (if supplied) or other
attachments. Place vacuum on floor with the handle in
upright position while using attachments.
• Do not pick up anything that is burning or smoking, such as
cigarettes, matches, or hot ashes.
• Do not use without dust cup or filter(s) in place.
• Do not use to pick up flammable or combustible liquids such
as gasoline, or use in areas where they may be present.
• Store your vacuum indoors in a cool, dry area.
• Keep your work area well lighted.
• Unplug electrical appliances before vacuuming them.
• Brush roll could suddenly restart. Unplug before servicing.
www.eureka.com
www.eureka.com
AS2000-AS2039 Series
OWNER’S GUIDE
Registration
To register your product visit www.eureka.com and click on the ‘Register Your Product’ link in the top right
corner.
Eureka Limited Warranty
For full warranty details, please refer to the additional instructions at www.eureka.com or call the customer
service helpline at
1-800-282-2886.
Maintenance Schedule
Make sure vacuum cleaner is turned off and power cord is unplugged when performing
any maintenance.
For maintenance information, see maintenance section in this guide, see backside of dust cup
or visit
www.eureka.com.
Maintenance not described must be performed by an authorized
dealer.
DUST CUP –
Empty after each use
FILTER DCF26 –
Replace or clean regularly to maintain suction
U BELT –
Check and replace if worn, cut or out of shape
BRUSHROLL –
Clean monthly
Thermal Cutoff
This vacuum cleaner has a special thermostat that protects the vacuum in case of motor
overheating.
If the vacuum suddenly shuts off
proceed as follows:
1) Push the on/off switch off (l) and unplug the vacuum.
2) Check the vacuum for a possible source of overheating such as a full dust cup, a blocked hose or
clogged filter. If these conditions are found, fix them and wait at least 30 minutes before attempting to use
the vacuum.
3) After the 30 minute period, plug the vacuum back in and push the on/off switch on (l). If the vacuum still
does not work, call the Eureka customer service helpline.
Problem Solving
For questions and problems related to your vacuum, please visit www.eureka.com
or call the Customer
Service Helpline:
1-800-282-2886.
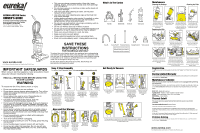
What’s In The Carton
For detailed vacuum information including FAQs
please visit eureka.com or call the Customer
Service Helpline: 1-800-282-2886.
8 a.m. to 7:30 p.m. (CST), Monday - Friday
10 a.m. to 6:30 p.m. (CST), Saturday - Sunday
Dust Cup (D)
Base (A)
Handle (C)
Backbone (B)
Hose (E)
Turbo nozzle (I)
Dusting Brush (H)
SAVE THESE
INSTRUCTIONS
FOR HOUSEHOLD USE ONLY
To reduce the risk of electric shock, this appliance has a polarized plug
(one blade is wider than the other). This plug will fit in a polarized outlet
only one way. If the plug does not fit fully into the outlet, reverse the plug.
If it still does not fit, contact a qualified electrician to install the proper
outlet. Do not change the plug in any way.
Do not oil the motor or brush roll at any time, the bearings are
permanently lubricated and sealed.
Maintenance
Cleaning the Dustcup
Cleaning the Filter
Replacing the Belt
Hold dust cup handle in one
hand and the bottom of dust
cup in the other, turn dust cup
counter clockwise to unlock the
cup from the lid.
Hold dust cup handle in one
hand and the bottom of dust
cup in the other, line up arrow
on dust cup with unlock icon
on backside of dust cup. Turn
clockwise to lock the cup
to the lid.
Pull dust cup latch to release
dust cup. Remove filter
and wash. Allow to air dry
thoroughly (24 hours) before
placing back in dust cup
Empty the dust cup into
the trash container. Wipe
debris off screen.
Latch
Dustcup
Screen
Unplug vacuum.
Recline cleaner
back. Using Philips screwdriver,
remove 4 screws from hood.
Remove belt from the brushroll and
motor shaft. Loop new belt over
motor shaft and brushroll, onto grey
belt pulley.
Using thumbs, push down on height
adjust knob, while pulling up on
inside hood edges with fingers. Lift
and remove hood.
Lift left side of brushroll out of
grooves. Then lift right side of
brushroll out of grooves.
Line up corners of hood and put
hood tab inside the front of cleaner.
From front to back, push hood
onto base, keeping hood in base
grooves, and line up 4 screw holes.
Replace 4 screws.
Grip the brushroll and belt as shown.
Stretch belt and push the right side of
brushroll into grooves. Lower left side of
brushroll into grooves making sure both
sides are secure by pushing down. Rotate
the brushroll with hands to make sure belt is
in center of gray pulley.
To view our “How to Assemble” demo, visit
www.eureka.com/airspeed/assembly
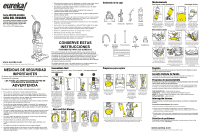
Easy 4 Step Assembly
Get Ready to Vacuum
To vacuum floors, turn
air path knob to
‘floors.’
Adjust height for
carpet or bare floors.
Step on foot graphic
on hood and pull back
on handle to recline
vacuum. Step on
power switch to turn
on; step on again to
turn off.
If desired, route cord
through cord clips
before storing on
hooks
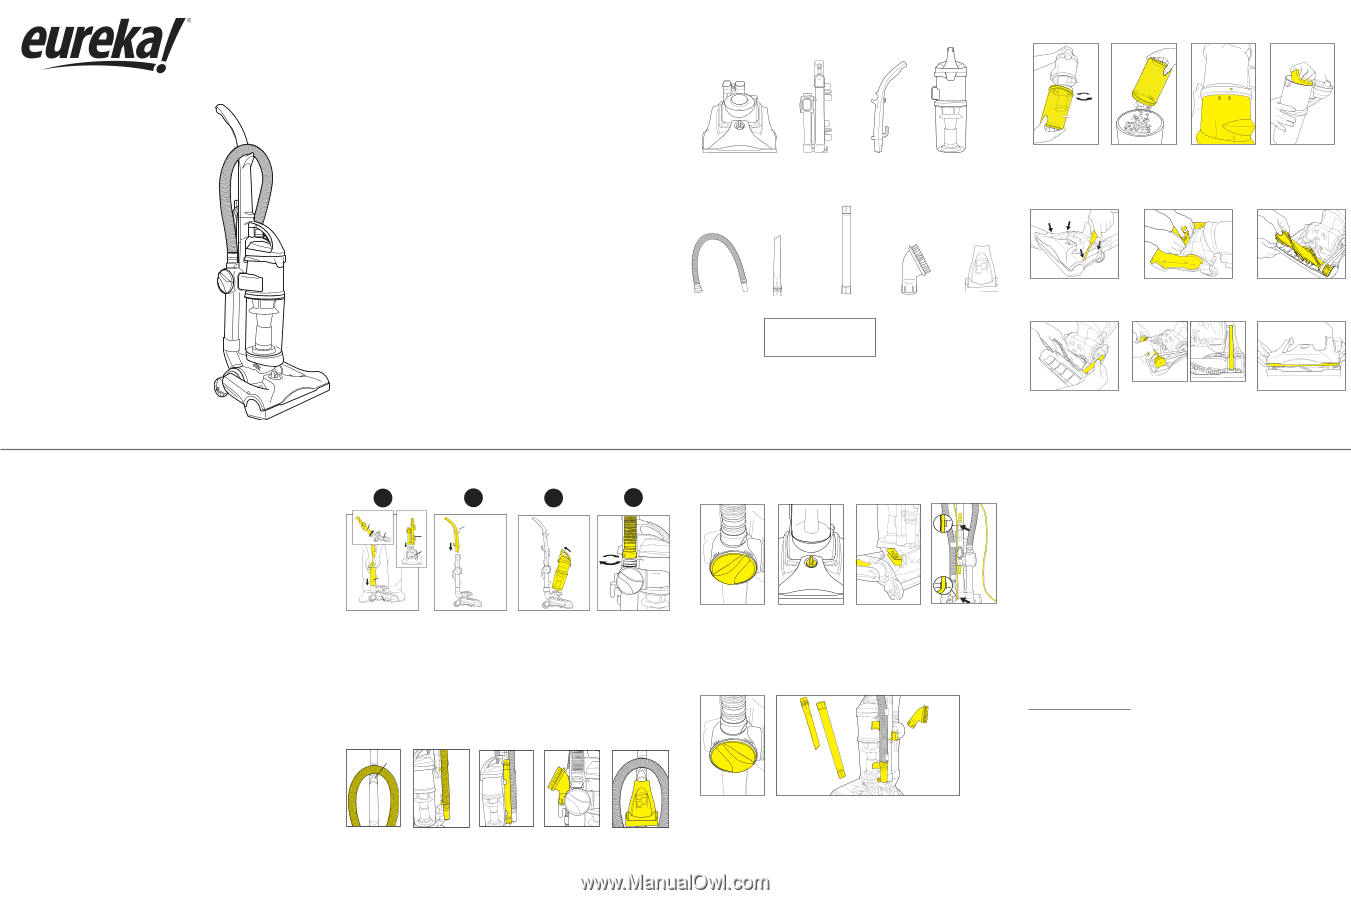
For hose cleaning turn air path knob to “tools”. Attach tools to end of wand. To replace,
store crevice tool inside extension wand and store this, dusting brush and turbo nozzle
(for some models) in clips.
Crevice Tool (F)
Extension Wand (G)
Note: Remove Crevice Tool (F) and
Extension Wand (G) from inside of
Backbone (B) hole before assembly.
Hose Retainer
C
B
Fig 1:
With the back-
bone (B) loosely on
the base (A), rotate the
backbone forward until
the vaccum is locked in
the upright position.
Fig 2:
stand as shown
and push down on
backbone (B) valve to
snap into place. Pull up
to ensure the backbone
has locked properly.
Align so that the hose
retainer on the handle
(C) is facing the vacuum
front. Lower the handle
(C) onto the backbone
(B). Push down to snap
into place. Pull up to
ensure the handle has
locked properly.
Put dust cup (D) into
place on base. Push
cup handle toward
backbone (B) to snap
into place.
To attach hose con-
nector, align tabs
and lower hose onto
connector. Turn
clockwise to lock.
Route hose (E)
through hose
retainer on front
of handle (C).
Put hose end (E)
into hook at base
of tool clips. Then
push hose into
clips.
Slide crevice tool
(F) into top of
extension wand
end (G). Place
into clips on
the
side of the
vacuum.
Store dusting
brush (H) on
back of vacuum.
On some models:
Attach turbo
nozzle (I) to clip
on handle (C).
E
Hose
Retainer
E
C
G
H
I
Hose and Tool Storage
A
B
B
A
Alternate View
Fig. 1
Fig. 2
B
A
STEP
2
STEP
3
STEP
4
STEP
1