Fantec CL-35B2 User Manual
Fantec CL-35B2 Manual
 |
View all Fantec CL-35B2 manuals
Add to My Manuals
Save this manual to your list of manuals |
Fantec CL-35B2 manual content summary:
- Fantec CL-35B2 | User Manual - Page 1
running iOS or Android with iSharing App. 1.1.1 Supported USB Devices USB printers (all-in-one printers are not supported). USB hard drives or USB flash password: admin 1.4 About this Manual Firmware, images and descriptions may slightly vary between this manual and the actual product you have - Fantec CL-35B2 | User Manual - Page 2
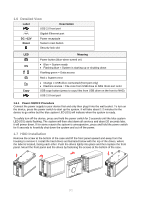
port DC +12V Power receptacle Reset System reset button Security lock slot LED drive to NAS (front port only) USB copy button (press to copy files from USB drive on the front to NAS) USB starts flashing. The system will then shut down all services and about 20 seconds later, it will power down. - Fantec CL-35B2 | User Manual - Page 3
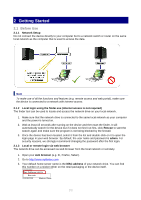
2 Getting Started 2.1 Before Use 2.1.1 Network Setup Do not connect the device directly to your computer but to a network switch or router on the same local network as the computer that is used to access the data. Note To make use of all the functions and features (e.g. remote access and web portal - Fantec CL-35B2 | User Manual - Page 4
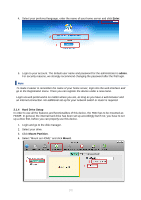
4. Select your preferred language, enter the name of your home server and click Enter. 1 2 3 5. Login to your account. The default user name and password for the administrator is admin. For security reasons, we strongly recommend changing the password after the first login. Note To make it easier - Fantec CL-35B2 | User Manual - Page 5
Servername: [Use the MAC address] Benutzername des Administrators: admin Voreingestelltes Passwort: admin 1.4 Über diese Anleitung Zwischen der Firmware und den Beschreibungen in dieser Anleitung und Ihrem tatsächlichen Produkt können leichte Abweichungen vorliegen. 1.5 Marken Microsoft und - Fantec CL-35B2 | User Manual - Page 6
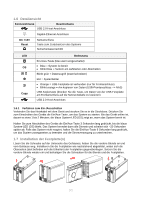
USB 2.0-Host-Anschluss Gigabit-Ethernet-Anschluss DC +12V Reset Netzanschluss Taste zum Zurücksetzen des Systems Sicherheitssperrschlitz LED für Frontanschluss) Blinkt orange = Am kopieren von Daten (USB-Frontanschluss --> NAS) USB-Kopiertaste (drücken Sie die Taste, um Daten von der USB- - Fantec CL-35B2 | User Manual - Page 7
2 Vorbereitung 2.1 Vor der Benutzung 2.1.1 Einrichten des Netzwerks Das Gerät darf nicht direkt mit dem Computer verbunden werden, sondern muss mit einem Netzwerk-Switch oder Router verbunden werden, der sich in demselben lokalen Netzwerk befindet wie der Computer, der zum Zugreifen auf die Daten - Fantec CL-35B2 | User Manual - Page 8
4. Wählen Sie die gewünschte Sprache, geben Sie den Server-Namen ein und klicken Sie auf Login. 1 2 3 5. Melden Sie sich bei Ihrem Konto an. Der voreingestellte Benutzername und das Passwort des Administrators lauten admin. Aus Sicherheitsgründen empfehlen wir dringend, das Passwort nach dem ersten - Fantec CL-35B2 | User Manual - Page 9
1 Présentation 1.1 Configuration requise Un ou deux disques durs SATA de 3,5 pouces à capacité de 80Go - 3To par DD. Ordinateur ou dispositif réseau, équipé d'un navigateur Internet et d'un accès au réseau. Commutateur ou routeur réseau, avec un port Ethernet disponible (de préférence avec acc - Fantec CL-35B2 | User Manual - Page 10
Port hôte USB 2.0 Port Ethernet Gigabit DC +12V Reset Connecteur d'alimentation Bouton de réinitialisation du système Fente de copie USB (appuyez pour copier des fichiers depuis le lecteur USB à l'avant vers le NAS) Port hôte USB 2.0 1.6.1 Procédure de mise sous / hors tension (ON/OFF) - Fantec CL-35B2 | User Manual - Page 11
2 Pour commencer 2.1 Avant utilisation 2.1.1 Configuration du réseau Ne branchez pas l'appareil directement sur votre ordinateur, mais sur un commutateur ou un routeur réseau placé sur le même réseau local que l'ordinateur utilisé pour accéder aux données. Remarque Pour pouvoir utiliser toutes les - Fantec CL-35B2 | User Manual - Page 12
4. Sélectionnez votre langue préférée. Saisissez le nom de votre serveur domestique, puis cliquez sur Entrée. 1 2 3 5. Connectez-vous à votre compte. Le nom et le mot de passe par défaut de l'utilisateur, pour l'administrateur, est admin. Pour des raisons de sécurité, nous vous recommandons
-
 1
1 -
 2
2 -
 3
3 -
 4
4 -
 5
5 -
 6
6 -
 7
7 -
8
-
9
-
10
-
11
-
12
 |
 |

[1]
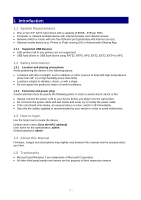
1 Introduction
1.1 System Requirements
One or two 3.5" SATA hard drives with a capacity of 80GB - 3TB per HDD.
Computer or network enabled device with internet browser and network access.
Network switch or router with one free Ethernet port (preferably with internet access).
Optional mobile device (e.g. iPhone or iPad) running iOS or Android with iSharing App.
1.1.1
Supported USB Devices
USB printers (all-in-one printers are not supported).
USB hard drives or USB flash drives using FAT32, NTFS, HFS, EXT2, EXT3, EXT4 or XFS.
1.2 Safety Information
1.2.1
Location and placing precautions
Avoid positioning the device in the following places:
Locations with direct sunlight, next to radiators or other sources of heat with high temperatures
(more than 35° C) or high humidity (more than 90%).
Locations subject to vibration, shock, or with a slope.
Do not expose the product to water or humid conditions.
1.2.2
Electricity and power plug
Careful attention must be paid to the following points in order to avoid electric shock or fire:
Always connect the power cord to your device before you plug it into the wall socket.
Do not touch the power cable with wet hands and never try to modify the power cable.
If the unit should emit smoke, an unusual odour or noise, switch it off immediately.
Use only the cables supplied or recommended by your vendor in order to avoid malfunction.
1.3 How to login
Use the finder tool to locate the device.
Default server name:
[Use the MAC address]
User name for the administrator:
admin
Default password:
admin
1.4 About this Manual
Firmware, images and descriptions may slightly vary between this manual and the actual product
you have.
1.5 Trademarks
Microsoft and Windows 7 are trademarks of Microsoft Corporation.
All other third party brands and names are the property of their respective owners.