Fisher and Paykel DD24SI7 BOOK INSTL VENT FRAME FP USA (English, French) - Page 4
Attach The Hose To The Vent &, Position In Cutout, Secure The External Vent Using, Bracket &
 |
View all Fisher and Paykel DD24SI7 manuals
Add to My Manuals
Save this manual to your list of manuals |
Page 4 highlights
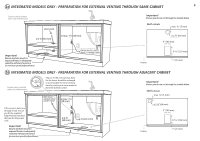
6 ATTACH THE HOSE TO THE VENT & POSITION IN CUTOUT 7 SECURE THE EXTERNAL VENT USING 4 BRACKET & SCREWS Important! Ensure that the venting hose was attached to the fitted elbow at the back of the product (as per main Installation instructions). Insert bracket into vent slot and secure to shelf with screw Screw vent together with the 4 screws 1 After routing the vent hose through and out the hole cutout, attach and secure the vent. 2 Airflow
-
 1
1 -
 2
2 -
 3
3 -
 4
4 -
 5
5 -
 6
6 -
 7
7 -
 8
8 -
 9
9 -
 10
10 -
11
-
12
 |
 |

4
6
7
ATTACH THE HOSE TO THE VENT &
POSITION IN CUTOUT
SECURE THE EXTERNAL VENT USING
BRACKET & SCREWS
2
1
After routing the vent hose
through and out the hole
cutout, attach and secure the
vent.
Insert bracket into vent slot
and secure to shelf with
screw
Screw vent together with
the 4 screws
Airflow
Important!
Ensure that the venting hose was attached to
the fitted elbow at the back of the product (as
per main Installation instructions).