Fluke 180LR User Manual - Page 8
Alignment, New Horizontal or Diagonal Alignment
 |
View all Fluke 180LR manuals
Add to My Manuals
Save this manual to your list of manuals |
Page 8 highlights
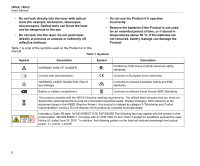
180LR, 180LG Users Manual Item G H I J -- Table 2. Product Features (cont.) Description Accessory mount Optical windows Batter door Holster Soft case (not shown) Alignment New Horizontal or Diagonal Alignment To identify new level and grade marks: Note Use the Product in manual level mode to find diagonal alignment. 1. Put the bottom of the Product on a stable surface. 2. Turn the Product around on its center until the horizontal laser points to the target area. See Figure 2. 3. Put marks at the level or grade point on the target area. Note When the Product is mounted on a tripod, make sure the tripod head is perfectly level. Errors in marks can result if a tripod is out of level. Figure 2. New Horizontal or Diagonal Mark 4
-
 1
1 -
2
-
 3
3 -
 4
4 -
 5
5 -
 6
6 -
 7
7 -
 8
8 -
 9
9 -
 10
10 -
 11
11 -
 12
12 -
 13
13 -
14
-
15
-
16
 |
 |

180LR, 180LG
Users Manual
4
Alignment
New Horizontal or Diagonal Alignment
To identify new level and grade marks:
Note
Use the Product in manual level mode to find
diagonal alignment.
1.
Put the bottom of the Product on a stable surface.
2.
Turn the Product around on its center until the
horizontal laser points to the target area. See Figure 2.
3.
Put marks at the level or grade point on the target area.
Note
When the Product is mounted on a tripod, make sure
the tripod head is perfectly level. Errors in marks can
result if a tripod is out of level.
Figure 2. New Horizontal or Diagonal Mark
G
Accessory mount
H
Optical windows
I
Batter door
J
Holster
--
Soft case (not shown)
Table 2. Product Features (cont.)
Item
Description