Foxconn H67MXV User manual
Foxconn H67MXV Manual
 |
View all Foxconn H67MXV manuals
Add to My Manuals
Save this manual to your list of manuals |
Foxconn H67MXV manual content summary:
- Foxconn H67MXV | User manual - Page 1
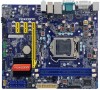
H61MXV/H67MXV Series Motherboard User's Manual - Foxconn H67MXV | User manual - Page 2
of their respective owners. Version: User's Manual V1.2 for H61MXV/H67MXV Series motherboard. Symbol description: ! Caution: refers to important information that can help you to use motherboard better, and tells you how to avoid problems. WA RN ING! Warning: indicating a potential - Foxconn H67MXV | User manual - Page 3
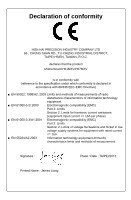
HAI PRECISION INDUSTRY COMPANY LTD 66 , CHUNG SHAN RD., TU-CHENG INDUSTRIAL DISTRICT, TAIPEI HSIEN, TAIWAN, R.O.C. declares that the product Motherboard H61MXV/H67MXV is in conformity with (reference to the specification under which conformity is declared in accordance with 89/336 EEC-EMC Directive - Foxconn H67MXV | User manual - Page 4
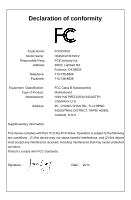
Responsible Party: Address: Telephone: Facsimile: FOXCONN H61MXV/H67MXV PCE Industry Inc. 458 E. Lambert Rd. Fullerton, CA 92835 714-738-8868 714-738-8838 Equipment Classification: Type of Product: Manufacturer: Address: FCC Class B Subassembly Motherboard HON HAI PRECISION INDUSTRY COMPANY LTD - Foxconn H67MXV | User manual - Page 5
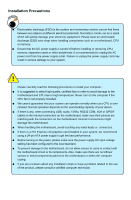
system can operate normally when your CPU is over clocked. Normal operation depends on the overclocking capacity of your device. ■ If there is any, when connecting USB, audio, 1394a, RS232 COM, IrDA or S/PDIF cables to the internal connectors on the motherboard, make sure their pinouts are matching - Foxconn H67MXV | User manual - Page 6
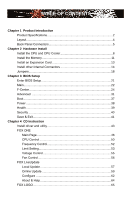
Security 40 Save Exit. Chapter 4 CD Instruction Install driver and utility 43 FOX ONE Main Page 46 CPU Control 50 Frequency Control 52 Limit Setting 53 Voltage Control 55 Fan Control 56 FOX LiveUpdate Local Update 57 Online Update 59 7 . Configure 6 About & Help 6 FOX - Foxconn H67MXV | User manual - Page 7
: http://www.foxconnchannel.com Support Support Website : http://www.foxconnsupport.com Worldwide online contact Support : http://www.foxconnsupport.com/inquiry.aspx CPU Support List : http://www.foxconnsupport.com/cpusupportlist.aspx Memory, VGA Compatibility List : http://www.foxconnsupport - Foxconn H67MXV | User manual - Page 8
Foxconn H61MXV/H67MXV Series motherboard. Foxconn products are engineered to maximize computing power, providing only what you need for break-through performance. With advanced overclocking capability and a range of connectivity features for today multi-media computing requirements, H61MXV/ H67MXV - Foxconn H67MXV | User manual - Page 9
Memory Expansion Slots Storage LAN Audio USB Internal Connectors Support Intel® Ivy Bridge/Sandy Bridge LGA 1155 CPU, Max processor power up to 95W For the latest CPU information, please visit: http://www.foxconnsupport.com/cpusupportlist.aspx Intel® H61(H61MXV) Intel® H67(H67MXV) 2 x 240-pin DDR3 - Foxconn H67MXV | User manual - Page 10
port 1 x PS/2 Mouse port 1 x VGA port 1 x DVI-D port 1 x serial port 6 x USB 2.0 ports 1 x RJ-45 LAN port 3 ports audio jacks System voltage detection CPU/System temperature detection CPU/System fan speed detection CPU overheating warning CPU/System fan speed control Support PCI Express Gen2 5GT - Foxconn H67MXV | User manual - Page 11
4. Clear CMOS Jumper 5. PCI Express x1 Slot 6. CD_IN Connector 7. Front Audio Connector 8. Buzzer (Speaker Connector) 9. SPDIF_OUT Connector 10. Front USB Connectors 21. CPU_FAN Header 22. LGA1155 CPU Socket Note : The above motherboard layout is for reference only, please refer to the physical - Foxconn H67MXV | User manual - Page 12
DVI-D Port 4 VGA Port 6 USB 2.0 Ports 7 Audio Ports 1. PS/2 Mouse Port Use the upper port (green) to connect a PS/2 mouse. 2. PS/2 Keyboard Port Use the lower port (purple) to connect a PS/2 keyboard. 3. DVI-D Port The DVI-D port supports DVI-D specification. Connect a monitor that supports DVI - Foxconn H67MXV | User manual - Page 13
1 8. RJ-45 LAN Port The Ethernet LAN port provides Internet connection at up to 10/100/1000Mb/s data rate. LAN Type 100M 1000M Left: Active Status Description Off No Link Green Data Activity Blinking Off No Link Green Data Activity Blinking Status Off Orange Off - Foxconn H67MXV | User manual - Page 14
Card ■ Install other Internal Connectors ■ Jumpers Please visit the following website for more supporting information about your motherboard. CPU Support List: http://www.foxconnsupport.com/cpusupportlist.aspx Memory, VGA Compatibility List: http://www.foxconnsupport.com/complist.aspx - Foxconn H67MXV | User manual - Page 15
is optimized for HT Technology ■ A BIOS that supports HT Technology and has it enabled Install the CPU Locate the alignment keys on the motherboard CPU socket and the notches on the CPU. LGA1155 CPU Socket Alignment Key Pin-1 corner of the CPU Socket Notch LGA1155 CPU Pin-1 triangle marking of - Foxconn H67MXV | User manual - Page 16
, make sure to turn off the computer and unplug the power cord from the power outlet to prevent damage to the CPU. 1. Release the CPU socket lever. 2. Lift the metal cover on the CPU socket. 3. Remove protective socket cover. 4. Check pin one marking (triangle) with the pin one corner of the - Foxconn H67MXV | User manual - Page 17
, the push pin should be fixed as depicted in the picture. 4. Attach the 4-wire CPU cooler connector to the CPU FAN header on the motherboard . 3 2 1 Release bolts of CPU cooler from motherboard : 1.Turning the push pin (bolt) along with the direction of arrow (counterclockwise). 2. Pull the - Foxconn H67MXV | User manual - Page 18
Dual Channel Memory Configuration This motherboard provides two DDR3 memory sockets and supports Dual Channel Technology. When memory is installed, the BIOS will automatically check the memory in your system. Two DDR3 memory sockets are divided into two channels: Channel 0 : DIMM1, Channel - Foxconn H67MXV | User manual - Page 19
computer and unplug the power cord from the power outlet to prevent damage to the memory module. Be sure to install DDR3 DIMMs on this motherboard. Notch If you take a look at front side of memory module, it has asymmetric pin counts on both sides separated by a notch in the middle - Foxconn H67MXV | User manual - Page 20
Expansion Card ! ■ Make sure the motherboard supports the expansion card. Carefully read the manual that came with your expansion card. ■ . If necessary, go to BIOS Setup to make any required BIOS changes for your expansion card(s). 7. Install the driver provided with the expansion card in - Foxconn H67MXV | User manual - Page 21
that the power supply cable and pins are properly aligned with the connector on the motherboard. Firmly plug the power supply cable into the connector and make sure it is secure to PWR2 and provides power to the CPU. +12V 3 1 4 2 PWR2 GND Pin # 1 2 3 4 Definition GND GND +12V - Foxconn H67MXV | User manual - Page 22
/ DVD audio cable. Audio Connector : F_AUDIO The audio connector supports HD Audio standard. It provides the Front Audio output choice on the rear panel, this product also provides 10-pin USB headers on its motherboard. By connecting through USB cables with them, user can quickly expand another USB - Foxconn H67MXV | User manual - Page 23
than using the power supply button. 12 + + HDD-LED - PWR-LED - RESET-SW PWR-SW NC EMPTY 9 10 FP1 COM Connector : COM2 This motherboard supports one serial RS232 COM port for legacy compatibility. User must purchase another RS232 cable with a 9-pin D-sub connector at one end to connect - Foxconn H67MXV | User manual - Page 24
There are two main fan headers on this motherboard. The fan speed can be controlled and monitored in "Health" section of the BIOS Setup. These GND POWER SENSE CONTROL CPU_FAN/SYS_FAN1 LPT Connector : LPT The connector supports parallel port which can be connected to a printer or a scanner - Foxconn H67MXV | User manual - Page 25
ESD (Electrical Static Discharge) problem. Jumper Diagram Definition Description 1 1 1 1-2 Set Pin 1 and Pin 2 closed 2-3 Set Pin 2 and Pin 3 closed Clear CMOS Jumper: CLR_CMOS The motherboard uses CMOS RAM to store the basic hardware information (such as BIOS data, date, time information - Foxconn H67MXV | User manual - Page 26
2 Intel® ME Jumper: PCH_ME_ENABLE This motherboard uses PCH_ME_ENABLE jumper to enable or disable Intel® Management Engine function. 1 Enable 2 (Default) 3 1 Disable 2 3 PCH_ME_ENABLE ! Before flashing BIOS ROM, you need to set PCH_ME_ENABLE jumper to pins 2-3 first. CAUTION 19 - Foxconn H67MXV | User manual - Page 27
CMOS settings. This chapter includes the following information : ■ Enter BIOS Setup ■ Main ■ F-Center ■ Advanced ■ Boot ■ Power ■ Health ■ Security ■ Save & Exit Since BIOS could be updated some other times, the BIOS information described in this manual is for reference only. We do not guarantee the - Foxconn H67MXV | User manual - Page 28
BIOS Setup The BIOS is the communication bridge between hardware and software, correctly setting up the BIOS is explained below: Main It displays the basic system configuration, such as CPU Name, memory size, less memory ...etc.), still, it may cause problem if you have more memory or I/O cards - Foxconn H67MXV | User manual - Page 29
Name ME Version BIOS Version Build Date and Time Administrator H61MXV/H61MXV-LE/H67MXV 8.0.2.1410 C12F1P01 03/13/2012 14:42:07 Halt On [All, but keyboard] CPU Brand Name: Intel(R) Core(TM) i5-3450S CPU 0 @ 2.80GHz → ←: Select Screen Total Memory 2048 MB (DDR3 1333) ↑ ↓: Select - Foxconn H67MXV | User manual - Page 30
halt. [No Errors]: No error can result in system halt. [All, but keyboard]: All errors but keyboard can result in system halt. ► CPU Brand Name It displays the current CPU name. ► Total Memory This item displays the total memory size. The size is depending on how many memory modules are installed in - Foxconn H67MXV | User manual - Page 31
Protect To protect the system BIOS, there is a BIOS write-protection mechanism provided to prevent BIOS FLASH tool being improperly used to update BIOS or the vicious virus(such as CHI,etc) rewriting BIOS setup. ► Smart BIOS/Fox Intelligent Stepping/CPU Configuration/Performance Tuning Press - Foxconn H67MXV | User manual - Page 32
3 ► Smart Power LED Smart Power LED is a feature built on your motherboard to indicate different states during Power-On Self-Test (POST). The LED is located at the front panel, and it displays POST state by different - Foxconn H67MXV | User manual - Page 33
Power Technology" to [Custom]) This item is used to enable or disable CPU C3 (ACPI C2) report to OS. ► CPU C6 report This item is used to enable or disable CPU C6 State. ► Hyper-Threading (Appears only when CPU supports) This item is used to enable/disable the Hyper-Threading Technology feature. 26 - Foxconn H67MXV | User manual - Page 34
F4: Save & Exit ESC: Exit Version 2.14.1219. Copyright (C) 2012 American Megatrends, Inc. ► CPU Configuration/North Bridge Configuration Press to go to relative submenu. CPU Configuration Aptio Setup Utility - C opyright (C) 2012 American Megatrends, Inc. F-Center EIST Turbo Mode - Foxconn H67MXV | User manual - Page 35
be met, including CPU, chipset, motherboard, BIOS and operation system Bridge Configuration Aptio Setup Utility - C opyright (C) 2012 American Megatrends, Inc. F-Center Memory Multiplier Configuration Performance Memory Profiles XMP Profile 1 XMP Profile 2 [Automatic] Not Supported Not Supported - Foxconn H67MXV | User manual - Page 36
XMP Profile 1 XMP Profile 2 [Manual] Not Supported Not Supported The selection of Performance Memory Profiles which The value that BIOS programs into the memory controller is a function of the target clock frequency. The target clock frequency is determined from the supported CAS latencies - Foxconn H67MXV | User manual - Page 37
3 Internal READ Command to PRECHARGE Command delay ► Four Active Window (tFAWmin) This item allows you to specify the time window in which four activates are allowed the same rank. 30 - Foxconn H67MXV | User manual - Page 38
Bridge Configuration Memory Information Total Memory 1024 MB (DDR3 1333) Memory Slot1 Not Present Memory Slot2 1024 MB (DDR3 1333) Keep IGD enabled based on the setup options. Memory Configuration Integrated Graphics UMA Frame buffer Size Initate Graphic Adapter VT-d IGD Multi-Monitor - Foxconn H67MXV | User manual - Page 39
a static amount of page-locked graphics memory is allocated during driver initialization. This fixed amount of memory will provide the user with devices in virtualized environment. ► IGD Multi-Monitor This item is used to enable or disable the IGD Multi-Monitor by internal graphics device. ► DVMT/ - Foxconn H67MXV | User manual - Page 40
Aptio Setup Utility - C opyright (C) 2012 American Megatrends, Inc. Advanced Onboard Device Configuration Onboard LAN Controller Onboard LAN PXE OpROM Onboard USB Controller Legacy USB Support Azalia HD Audio controller [Enabled] [Disabled] [Enabled] [Enabled] [Enabled] Enable/Disable Onboard - Foxconn H67MXV | User manual - Page 41
advanced features including SATA features, but some SATA drives may not support AHCI, unless they are labeled with AHCI support in its specification. If your motherboard supporting AHCI, and you have a SATA device, which also supports AHCI, then you can select IDE option to have fair performance - Foxconn H67MXV | User manual - Page 42
TPM (Trusted Platform Module) device function. Default option is [Disabled]. If you want to support TPM, first you need to install a TPM device on the motherboard and set this item to [Enabled], then save changing and reset your computer, otherwise the operation system can not show the relative - Foxconn H67MXV | User manual - Page 43
3 Super IO Configuration Aptio Setup Utility - C opyright (C) 2012 American Megatrends, Inc. Advanced Super IO Configuration Super IO Chip IT8728 Set Parameters of Serial Port 0 (COMA) ▶ Serial Port 0 Configuration → ←: Select Screen ↑ ↓: Select Item Enter: Select +/-: Change Opt. F1: - Foxconn H67MXV | User manual - Page 44
Boot Aptio Setup Utility - C opyright (C) 2012 American Megatrends, Inc. Main F-Center Advanced Boot Power Health Security Save & Exit Boot Configuration Bootup Numlock State [On] Select the keyboard NumLock state Quiet Boot Interrupt 19 Capture [Enabled] [ - Foxconn H67MXV | User manual - Page 45
Main F-Center Advanced Boot Power Health Security Save & Exit ACPI Sleep State Resume By PS2 KB/Mouse Resume By USB Device(s) Resume By PCIE Device(s) Resume By Modem Ring Resume By Onboard LAN reduce the power consumption of motherboard. Enabled: S1/S3/S4 is normal, S5 wake up only by pressing the - Foxconn H67MXV | User manual - Page 46
motherboard will send out warning information. ► CPU Shutdown Temperature This item is used to set the system temperature upper limit. When the temperature exceeds the set value, the system will shut down automatically. This function works only when your operating system is supporting ACPI. ► CPU - Foxconn H67MXV | User manual - Page 47
3 Security Aptio Setup Utility - C opyright (C) 2012 American Megatrends, Inc. Main F-Center Advanced Boot Power Health SSeeccuurriittyy Save & Exit Security Configuration Administrator Password User Password Administrator Password Not Installed Not Installed Set Administrator Password. If - Foxconn H67MXV | User manual - Page 48
the main menu. ► Restore Defaults Optimal defaults are the best settings of this motherboard. Always load the Optimal defaults after updating the BIOS or supported by your hardware devices (for example, too many expansion cards were installed), the system might fail to work. ► Boot Override BIOS - Foxconn H67MXV | User manual - Page 49
The utility CD that came with the motherboard contains useful software and several utility drivers that enhance the motherboard features. This chapter includes the following information: ■ Install driver and utility ■ FOX ONE ■ FOX LiveUpdate ■ FOX LOGO ■ FOX DMI ■ Smart Charger Note : Because each - Foxconn H67MXV | User manual - Page 50
4 Install driver and utility This motherboard comes with one DVD, after installing the Operating System, you can simply put it into your DVD-ROM drive, and the main menu will be displayed on your PC screen to guide you how to install. 1. Driver Use these options to install all the drivers for your - Foxconn H67MXV | User manual - Page 51
4 CAUTION 2. Utility Use these options to install additional software programs. And click "User's Manual" button to view the product manual. ! The Driver and Utility items displayed above represent a Windows 7 based system. The appearance may change with different Operating Systems. 44 - Foxconn H67MXV | User manual - Page 52
means the feature is supported. ■ Voltage Monitoring is supported only in FOX ONE Premium & Deluxe products. ■ Fox Intelligent Stepping is supported only in FOX ONE Deluxe products. Supporting Operating Systems : ■ Windows 2000 ■ ■ Windows 2003 (32-bit and 64-bit) ■ Windows 7 (32-bit and 64 - Foxconn H67MXV | User manual - Page 53
1. Main Page Show CPU Information Toolbar Alert Lamp 4 Switch Button Skin Button Exit Minimum Configuration Homepage Monitor Frequency/Voltage/Fan speed/ you can drag this bar to any place on your screen to help you monitoring system status. Exit FOX ONE Click here to go back to FOX ONE full screen - Foxconn H67MXV | User manual - Page 54
Apply the changes Cancel the changes Exit Click this button to exit the program. Minimum Click this button to drop the FOX ONE to Windows system tray located at the lower right corner of your screen. Homepage Click this button to visit Foxconn motherboard website : http://www.foxconnchannel.com 47 - Foxconn H67MXV | User manual - Page 55
Configuration This menu allows you to configure : 1). Monitor interval (ms) : This is to define the select which message of system settings are to be displayed in the Simple Mode. Messages such as CPU frequency, voltage...etc., they can be displayed one by one in Simple Mode. 3). F.I.S. Calibration - Foxconn H67MXV | User manual - Page 56
is collected, it will ask you to restart your computer now. Later on, when the FOX ONE program is activated, and F.I.S. feature (in CPU Page) is also enabled, FOX ONE will automatically adjust your CPU clock according to your system loadings. (Loadings are like Power Gaming, Data Mining...etc.) 49 - Foxconn H67MXV | User manual - Page 57
system. When system restarts, run FOX ONE again, it will display a recommended highest CPU clock for you, click to apply it. Go to CPU page Adjust by manual Press Auto button to let FOX ONE check the highest CPU clock you can use. 4 Reset the changes FIS Features : Apply the Select the - Foxconn H67MXV | User manual - Page 58
of your system to restart the computer. Run FOX ONE program again, it will inform you the previous test found that 255MHz is the recommended CPU clock for your system. Click Yes to apply it to your system. Now, your system is running at - Foxconn H67MXV | User manual - Page 59
defined in the FIS Calibration option of Configuration menu. Select Auto, CPU will automatically adjust its clock according to current system loading. 4 PCI Express frequencies by manual. Go to Freq. page Close this page Select the option you want to set Adjust by manual Reset the changes Apply - Foxconn H67MXV | User manual - Page 60
limit temperature and enable the alert function. Go to Limit Show current CPU Setting page temperature value Enable alert function when the CPU temperature is higher than high limit value Show current high limit value of the CPU temperature 4 Set high limit by dragging the lever 4.2 Limit Setting - Foxconn H67MXV | User manual - Page 61
runs slower than the low limit rpm value Show current low limit rpm value of CPU fan 4 Set low limit rpm by dragging the lever 4.4 Limit Setting - System Fan This page lets you to set system fan low limit rpm and - Foxconn H67MXV | User manual - Page 62
low limit rpm value of FAN1 fan Set low limit rpm by dragging the lever 5. Voltage Page - Voltage Control (Optional) This page lets you set CPU voltage, memory voltage and North Bridge voltage manually. CPU voltage can be stepped up/down by a unit of 12.5mV, while memory is 0.05V/step, and North - Foxconn H67MXV | User manual - Page 63
4 6. Fan Page - Fan Control This page lets you enable Smart Fan function or set the fan speed by manual. When Smart Fan is selected, you must use a 4-pin CPU cooler in your system. Go to Fan page Enable or disable smart fan function Set fan speed by dragging the lever Apply the changes 56 - Foxconn H67MXV | User manual - Page 64
4 FOX LiveUpdate FOX LiveUpdate is a useful utility to backup and update your system BIOS, drivers and utilities by local or online. Supporting Operating Systems : ■ Windows 2000 ■ Windows XP (32-bit and 64-bit) ■ Windows 2003 (32-bit and 64-bit) ■ Windows 7 (32-bit and 64-bit) ! Please set the - Foxconn H67MXV | User manual - Page 65
\My Documents" in Windows XP . Make sure you can remember the file name together with the directory which it is stored, prevented that you may need them to recover your BIOS later. Key in a BIOS name Click here 1-3 Local Update - Update This page helps you to update your BIOS from a local file - Foxconn H67MXV | User manual - Page 66
the wizard to finish the update operation. Click here 4 Current information Select BIOS to update Search new BIOS from Internet Browse detailed information Update BIOS Close the window 2-2 Online Update - Update Driver This page lets you update your system drivers from Internet. Click "start - Foxconn H67MXV | User manual - Page 67
the driver to update Browse detailed information Install the selected driver Close the window 2-3 Online Update - Update Utility This page lets you update utilities from Internet. Click "start", it will search the new utilities from Internet. Then follow the wizard to finish the update operation - Foxconn H67MXV | User manual - Page 68
will search all new BIOS/drivers/utilities from Internet. Then follow the wizard to finish the update operation. Click here Current information Search all new BIOS/ drivers/utilities from Internet Close the window Browse detailed BIOS information Browse detailed driver information Browse detailed - Foxconn H67MXV | User manual - Page 69
3. Configure 3-1 Configure - option This page lets you set auto search options. After you enable the auto search function, FOX LiveUpdate will start its searching from Internet and if any qualified item found, it will pop out a message on the task bar to inform you to do the next step. Click here - Foxconn H67MXV | User manual - Page 70
new FOX LiveUpdate 3-2 Configure - System This page lets you set the backup BIOS location and determine if the FOX LiveUpdate can auto run when the system starts up. Click here Set the location of download files or auto backup BIOS Determine if the FOX LiveUpdate can auto run when the system starts - Foxconn H67MXV | User manual - Page 71
protective, and you must make sure the flash process is continuous and without any interruption. Click here Select which BIOS ROM to flash(Only available to motherboard with backup BIOS ROM ) Select to flash Boot Block Select to clear CMOS Apply the changes Reset to default value ! We recommend - Foxconn H67MXV | User manual - Page 72
displayed if you enable the BIOS "Quiet Boot" setting in "Advanced BIOS Features" menu. Supporting Operating Systems : ■ Windows 2000 ■ Windows XP (32-bit and 64-bit) ■ Windows 2003 (32-bit and 64-bit) ■ Windows 7 (32-bit and 64-bit) Using FOX LOGO: Main Page Main screen Backup Change Delete Exit - Foxconn H67MXV | User manual - Page 73
Dump. With DMI information, system maker can easily analyze and troubleshoot your motherboard if there is any problem occurred. Supporting Operating Systems : ■ Windows 2000 ■ Windows XP (32-bit and 64-bit) ■ Windows 2003 (32-bit and 64-bit) ■ Windows 7 (32-bit and 64-bit) Using FOX DMI: Please
-
 1
1 -
 2
2 -
 3
3 -
 4
4 -
 5
5 -
 6
6 -
 7
7 -
8
-
9
-
10
-
11
-
12
-
13
-
14
-
15
-
16
-
17
-
18
-
19
-
20
-
21
-
22
-
23
-
24
-
25
-
26
-
27
-
28
-
29
-
30
-
31
-
32
-
33
-
34
-
35
-
36
-
37
-
38
-
39
-
40
-
41
-
42
-
43
-
44
-
45
-
46
-
47
-
48
-
49
-
50
-
51
-
52
-
53
-
54
-
55
-
56
-
57
-
58
-
59
-
60
-
61
-
62
-
63
-
64
-
65
-
66
-
67
-
68
-
69
-
70
-
71
-
72
-
73
 |
 |

H61MXV/H67MXV
Series Motherboard
User’s Manual