Frigidaire FAQE7011KW Installation Instructions (All Languages) - Page 20
Reassembling the door
 |
UPC - 012505379925
View all Frigidaire FAQE7011KW manuals
Add to My Manuals
Save this manual to your list of manuals |
Page 20 highlights
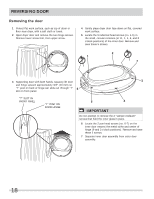
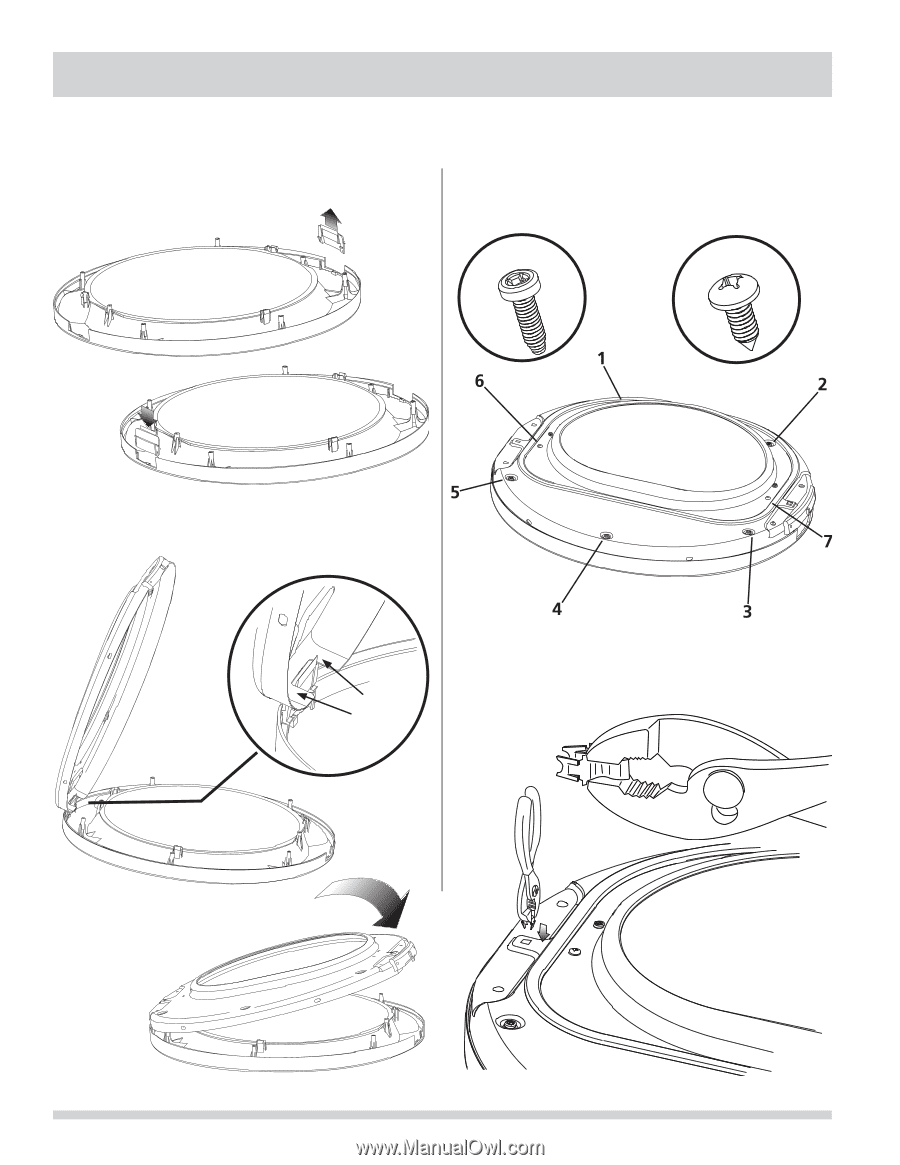
REVERSING DOOR Reassembling the door 1 Locate and remove the hinge cutout gate from the outer door assembly. Rotate and move it to the opposite hole in the outer door. 3 Replace indented head screws (no. 1-5) removed earlier. Take care not to strip out the plastic holes. 4 Replace pan head screws (no. 6-7) removed earlier. Take care not to strip out the plastic holes. no. 1-5 no. 6-7 2 Rest the opening of the inner door at a 90 degree angle on the "shoulders" of the hinge cutout gate. Pivot the inner door down onto the outer door. 5 Locate new metal strike supplied with dryer manuals. Grip new strike with pliers as shown below. Firmly insert the strike so it is oriented vertically. 20
-
 1
1 -
2
-
3
-
4
-
5
-
6
-
7
-
8
-
9
-
10
-
11
-
12
-
13
-
14
-
 15
15 -
 16
16 -
 17
17 -
 18
18 -
 19
19 -
 20
20 -
 21
21 -
 22
22 -
 23
23 -
 24
24 -
 25
25 -
26
-
27
-
28
-
29
-
30
-
31
-
32
-
33
-
34
-
35
-
36
-
37
-
38
-
39
-
40
-
41
-
42
-
43
-
44
-
45
-
46
-
47
-
48
 |
 |
20
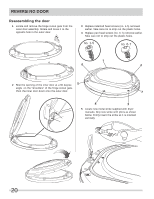
REVERSING DOOR
Reassembling the door
no. 6-7
no. 1-5
1
Locate and remove the hinge cutout gate from the
outer door assembly. Rotate and move it to the
opposite hole in the outer door.
2
Rest the opening of the inner door at a 90 degree
angle
on the “shoulders” of the hinge cutout gate.
Pivot the inner door down onto the outer door.
3
Replace indented head screws (no. 1-5) removed
earlier. Take care not to strip out the plastic holes.
4
Replace pan head screws (no. 6-7) removed earlier.
Take care not to strip out the plastic holes.
5
Locate new metal strike supplied with dryer
manuals. Grip new strike with pliers as shown
below. Firmly insert the strike so it is oriented
vertically.