Frigidaire FCFE2425AW Installation Instructions - Page 2
Important Safety Instructions
 |
View all Frigidaire FCFE2425AW manuals
Add to My Manuals
Save this manual to your list of manuals |
Page 2 highlights
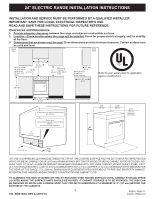
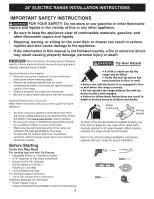
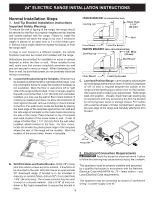
24" ELECTRIC RANGE INSTALLATION INSTRUCTIONS IMPORTANT SAFETY INSTRUCTIONS FOR YOUR SAFETY: Do not store or use gasoline or other flammable vapors and liquids in the vicinity of this or any other appliance. • Be sure to keep the appliance clear of combustible materials, gasoline, and other flammable vapors and liquids. • Stepping, leaning, or sitting on the oven door or drawer can result in serious injuries and also cause damage to the appliance. • If the information in this manual is not followed exactly, a fire or electrical shock may result causing property damage, personal injury or death. If the information in this manual is not followed exactly, a fire or electrical shock may result causing property damage, personal injury or death. Important Notes to the Installer: • Read all instructions contained in these installation instructions before installing range. • Remove all packing material from the oven compartments before connecting the gas & electrical supply to the range. • Observe all governing codes and ordinances. • Be sure to leave these instructions with the consumer. Important Notes to the Consumer: Keep these instructions with your owner's guide for future reference. • As when using any appliance generating heat, there are certain safety precautions you should follow. These are listed in the Use & Care Guide, read it carefully. • Be sure your range is installed and grounded properly by a qualified installer or service technician. • Make sure the wall coverings around the range can withstand the heat generated by the range. • To eliminate the need to reach over the surface elements, cabinet storage space above the elements should be avoided. Before Starting Tools You May Need For leveling legs and Anti-Tip Bracket: • Adjustable wrench or channel lock pliers • 5/16" Nutdriver or Flat Head Screwdriver • Electric Drill & 1/8" Diameter Drill Bit (Masonry Drill Bit if installing in concrete) • Level & Measuring Tape For electrical supply connection: • 1/4" & 3/8" Socket driver or Nutdriver Additional Materials You Will Need: • Power Supply Cord or • Copper Electrical Wiring & Metal Conduit (for hard wiring) 2 Tip Over Hazard • A child or adult can tip the range and be killed. • Verify the anti-tip device has been installed to floor or wall. • Ensure the anti-tip device is re-engaged to floor or wall when the range is moved. • Do not operate the range without the anti-tip device in place and engaged. • Failure to follow these instructions can result in death or serious burns to children and adults. Range leveling leg Anti-tip bracket To check if the anti-tip bracket is installed properly, use both arms to grasp the rear edge of the range back. Carefully attempt to tilt range forward. When properly installed, the range should not tilt forward. Refer to the anti-tip bracket installation instructions supplied with your range for proper installation.
-
 1
1 -
 2
2 -
 3
3 -
 4
4 -
 5
5 -
 6
6 -
 7
7 -
 8
8 -
9
-
10
-
11
-
12
-
13
-
14
 |
 |
