Frigidaire FFFU16F2VW Complete Owners Guide - Page 8
Door Removal/Reversal, x4
 |
View all Frigidaire FFFU16F2VW manuals
Add to My Manuals
Save this manual to your list of manuals |
Page 8 highlights
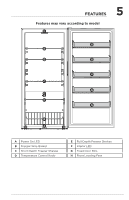
8 DOOR REMOVAL/REVERSAL IMPORTANT Before you begin, turn the appliance temperature control to "off" and remove the electrical power cord from the wall outlet. Remove any food from door shelves. 1. Using an 8 mm socket with a ratchet (not supplied), remove the right top hinge cover and unsnap the alarm board; leave the alarm board and wiring attached to the unit. Remove the top hinge from the right side. Remove the decorative hinge on the left side. 4. Remove the door and lay flat on a padded surface. Remove the door stop plate at the bottom of the door, and reinstall on the opposite side of door. 2. Remove the hinge pin from the right side hole and reinstall it on the left side hole on the top hinge using an adjustable wrench. Bottom 5. Lay freezer on its back on a padded surface. 6. Unscrew the right adjustable leveling foot (A). Remove the 4 screws (B) holding the bottom hinge (C) to the cabinet with an 8 mm socket with ratchet. Screw the adjustable leveling foot back into the cabinet hole (D). Bottom of Unit 3. With a flat head screwdriver gently pry upward on hinge pin bearing to remove from the door. Reinstall on the opposite side of the door. BottoA m of UxB4nit C D
-
 1
1 -
2
-
 3
3 -
 4
4 -
 5
5 -
 6
6 -
 7
7 -
 8
8 -
 9
9 -
 10
10 -
 11
11 -
 12
12 -
 13
13 -
14
-
15
-
16
-
17
-
18
 |
 |
