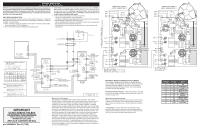
Frigidaire FGIC3066TB Wiring Diagram - Page 2
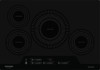
UI Display Error Codes, Left Induction Module, Setting Displays, Right Induction Module, Hidden - lowes
 |
View all Frigidaire FGIC3066TB manuals
Add to My Manuals
Save this manual to your list of manuals |
Page 2 highlights
ERROR CODES UI Display Error Description E0 Wrong configuration of the induction module E1 Wrong configuration of the user interface E3 Over or under voltage E4 Failure occurs after heating up an empty pan with level "P" or A pot has a large pan bow, which is causing an over temperature at the coil temperature sensor. The failure disappears after 15 min. E4 Temperature sensor defect or wrong mounting. E6 Defective induction module E7 Fan defect. E8 Communication/wiring between induction generator and user interface interrupted. Center wire of MACS connector defect OR induction generator defect OR no main power supply. (always if only both right zones with error) E9 User interface touch system defect. Corrective Action Disconnect power to the appliance for 30 seconds. If error still occurs: 1) Replace the user interface. 2) If replacing the UI does not fix the error, replace the faulty induction module(s). The letter E will show in the setting display(s) for the faulty module(s). Disconnect power to the appliance for 30 seconds. If the error still occurs, replace the user interface. 1) Check 208-240 volt AC between L1 and L2 connectors. See the connection label on the bottom of the appliance. Operate the appliance with cookware for 1 min. 2) If the supply is okay, replace the faulty induction module(s). The letter E will show in the setting display(s) for the faulty module(s). This is normal behavior. The reason for the over temperature is the air gap between the pot bottom and the ceramic cooktop, which causes the slower reaction time for the sensor. 1) Check connector at induction module. 2) Check the coil sensor, it should be placed even in the silicon carrier. 3) For appliances with 3 zones, is the "Dummy" temperature sensor at the 2nd terminal mounted? 4) Replace coil with sensor. 5) If above is without success, replace the faulty induction module(s). The letter E will show in the setting display(s) for the faulty module(s). Disconnect the appliance from the mains for 30 sec. If error still occurs after 1 min operation, replace the faulty induction module(s). The letter E will show in the setting display(s) for the faulty module(s). 1) Operate 1 zone on high power level for 1 min. Fan should start running. If not, check for blocking of fan and connector at induction module. 2) Replace fan. Attention: this is not possible on all induction modules. 3) If this is without success, replace the faulty induction module. The letter E will show in the setting display(s) for the faulty module(s). 1) If only both right zones with error: check 208-240 volt AC between L1 and L2 connectors. See connection label on bottom of appliance. 2) If okay check wiring between induction module and the user interface (center wire) or short circuit in MACS connector, if necessary replace. 3) Replace the faulty induction module(s). The letter E will show in the setting display(s) for the faulty module(s). 4) If above without success, replace user interface. Disconnect the appliance from the mains for 30 sec. If the alarm still occurs after 1 min of operation, replace the user interface. If the error still occurs, replace the UI carrier. Enter/Exit Menu mode: 1. Touch and hold the Main Power key. The cooktop will beep and turn on when you first touch the key, and it will beep again and turn off after 3 seconds. 2. Touch the hidden service key (just right of the right rear cooking zone indicator on a five-zone cooktop) for three seconds. The cooktop will beep when you first touch the key and again after 3 seconds. 3. The cooktop will enter Menu mode, and a code will appear in the timer display. The code may be "d", "do", "S", or "E". 4. To exit Menu mode, do not touch any control for 20 seconds. The cooktop will exit Menu mode. Deactivate Demo mode: 1. Enter Menu mode, and a code will appear in the timer display. 2. Touch the Timer key to cycle through the options until "do" displays. If "do" is not an option, the cooktop is not in Demo mode. 3. Press the + key to deactivate Demo mode. The code in the display will change from "do" to "d". Enter/Exit Service mode: 1. Enter Menu mode, and a code will appear in the timer display. 2. Touch the Timer key to cycle through the options until "S" displays. 3. Touch the + key to enter Service mode. Enter/Exit Error mode: 1. Enter Menu mode, and a code will appear in the timer display. 2. Touch the Timer key to cycle through the options until "E" displays. 3. Touch the + key to enter Error mode. 4. The last 5 error codes will display for 5 seconds each. If the display shows only "E", there are no errors in the appliance's memory. Left Induction Module Setting Displays 1 P 1 P 1 Hidden Service Key UI Display (Error Codes) Right Induction Module Setting Displays P 1 P ADDITIONAL ERROR (FAULT) CONDITIONS Symptom or failure Control Display Cannot activate or operate the cooktop Pan does not heat up. Normal operation. Setting indicator flashes. Power setting flashes for all zones of a single induction generator with different pots No power to any cook zone Flashing number Normal operation Possible cause or condition Power is not connected properly. Suggested Corrective Action Make sure the cooktop is correctly connected to the power supply. Circuit-breaker tripped or fuse blown Make sure that that the breaker is closed or the fuse is good. Pan too small for proper pan detec- Use larger pan or this pan on a smaller cooking zone. Refer to tion and only works with low power. owner's guide for proper pan selection. Pan not detected. Check whether the pots or pans are suitable for induction. Refer to owners guide for proper pan selection. Induction coil not correctly connected or induction coil open. Check the coil wire terminal connections. Ensure that they are properly connected and tightened. Test continuity of coil (should be less than 1 ohm). Distance between coil and glass ceramic too large. Check whether the coil is properly positioned and touching the glass cooktop surface. Defective induction generator or missing mains supply See E8 defective induction module Demo mode activated Deactivate Demo mode. See separate box. Single keys are not operable Individual cooking zones cannot be used or cannot always be used. Cooking power too low or shuts down prematurely. None. Normal operation H in display when cooking "H" zone is cold and switched off. Buzzer defect Single segments of the display are defective User interface not correct pressed to ceramic or defect. Test cables & connections. User interface defective. Check build in position of the user interface and correct if necessary. The LED should be central above the main switch. If some keys or cooking levels are difficult to operate or unstable. 1) Disconnect the appliance from the mains for 30 sec. and try again. 2) If the problem is still there, probably the user interface is either pressed too little or not close enough to the ceramic glass. Check if there is a cable between the user interface and the carrier. Check if the carrier of the user interface is correctly positioned and all spring elements are present. Also the coils have to be correctly assembled, so the distance between the support plate and the ceramic is correct. Otherwise: appliances with carrier, replace the carrier; appliances with silicon element, put a metal sheet with a thickness of 1-1.5mm underneath the silicon element in the area of the keys that are not working. If these solutions do not help, replace the user interface. 1. Follow instructions for proper use of touch controls. 2. Replace user interface. Ventilation slots obstructed. Unsuitable pots ( bottom bent). Distance between coil and glass ceramic too large. Temperature sensor defect. User interface defect User interface defect Clear vent openings. Follow owner's guide for proper pan selection. Check whether the glass ceramic was pushed down when being screwed in position and the coil has been correctly positioned. 1. Test coil sensor; it should be approximately 100K ohms at room temperature. Replace coil if resistance is incorrect. 2. Replace power generator board. Replace user interface Replace user interface
-
 1
1 -
 2
2 -
 3
3 -
 4
4
 |
 |
