Frigidaire FRA123PT1 Complete Owner's Guide (English) - Page 5
Installation Instructions - hose
 |
UPC - 012505274442
View all Frigidaire FRA123PT1 manuals
Add to My Manuals
Save this manual to your list of manuals |
Page 5 highlights
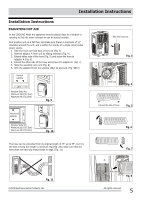
Installation Instructions Installation Instructions EXAUSTING HOT AIR In the COOLING Mode the appliance must be placed close to a window or opening so that the warm exhaust air can be ducted outside. First position unit on a flat floor and make sure there's a minimum of 12" clearance around the unit, and is within the vicinity of a single circuit outlet power source. 1. Take the hose out from back of the unit (Fig. 3). 2. Remove adaptor A from unit by sliding sideways (Fig. 4 ). 3. Extend either side of the hose (Fig. 5) and screw the hose to adaptor A (Fig. 6) . 4. Extend the other side of the hose and screw it to adaptor B (Fig. 7). 5. Slide the assembly onto unit (Fig. 8). 6. Affix the adaptor B into the window slider kit and seal. (Fig. 9&10) Vertical window Window Slider Kit Minimum:26.6"(67.5cm) Maxmum:48.5"(123cm) Fig. 9 Horizontal window Take the hose out Fig. 3 Slide out Fig. 4 Extend the side of hose Fig. 5 Window Slider Kit Minimum:26.6"(67.5cm) Maxmum:48.5"(123cm) Fig. 10 Fig. 6 The hose can be extended from its original length of 15" up to 55", but it is the best to keep the length to minimum required. Also make sure that the hose does not have any sharp bends or sags. (Fig. 11) Fig. 7 Fig. 11 2009 Electrolux Home Products, Inc. Slide onto Fig. 8 All rights reserved. 5
-
 1
1 -
 2
2 -
 3
3 -
 4
4 -
 5
5 -
 6
6 -
 7
7 -
 8
8 -
 9
9 -
 10
10 -
 11
11 -
12
 |
 |
