Fujitsu 6010N Getting Started Guide - Page 9
Changing the Administrator, Password, Setting the Scanner Name, Setting the Region/Timezone, Setting - used
 |
UPC - 097564307683
View all Fujitsu 6010N manuals
Add to My Manuals
Save this manual to your list of manuals |
Page 9 highlights
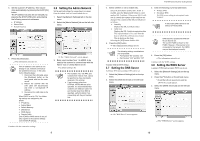
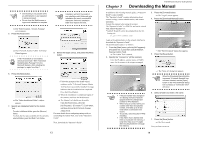
5. Enter the password. Password is case sensitive. Enter "password" here. 6. Press the [Login] button. ⇒ If the administrator name and password are valid, the "System Settings" screen appears. 3.2 Changing the Administrator Password ATTENTION If you change the password, save the new password in a safe location. If you lose the password, contact your FUJITSU scanner dealer or an authorized FUJITSU scanner service provider. This may incur a cost to reset the scanner. The administrator password can be changed. 1. Select the [System Settings] tab on the top menu. 2. Press the [ ] button on the left side menu. ⇒ Scroll the left side menu down until the [Admin Password] tab appears. 3. Select the [Admin Password] tab on the left side menu. 4. Enter the "Current Password", "New Password", and "Confirm New Password". Passwords must be between 7 and 127 characters long. Alphanumeric characters (case sensitive) and symbols may be entered. 5. Press the [OK] button. ⇒ The new admin password is set. 3.3 Setting the Scanner Name A scanner name may be set to provide a network alias for the device. ATTENTION Do not use a name that is already being used in the network. Name duplication will cause a network connection error. 1. Select the [System Settings] tab on the top menu. 2. Select the [Scanner Name] tab on the left side menu. ⇒ The "Scanner Name" screen appears. 3. Enter a scanner name. Scanner names may be up to 15 characters long. Use only alphanumeric characters (case sensitive) and hyphens. Scanner names cannot consist of numerical characters only. A hyphen cannot be used as the first character of a scanner name. The scanner can be setup to be a HINT workgroup or domain member. ⇒ The "Admin Password" screen appears. 7 4. Press the [OK] button. ⇒ The restart confirmation screen appears. 5. Press the [Later] button. fi-6010N Network Scanner Getting Started 3. Press the [List] button for the "Timezone" input field. The default timezone is "(GMT+09:00) Osaka, Sapporo, Tokyo". ⇒ A list of timezones appears. 4. Select a timezone. ⇒ The current scanner name, or changed scanner name after next restart, is displayed. If the scanner name is the same as HINT one already in use, network communi- cation problems will occur. In this case, try the following steps: 1. Disconnect the LAN cable, press the [Shutdown] button on the touch panel, and turn the scan- ner off. 2. Reboot the scanner with the LAN cable disconnected, and enter a non-duplicate scanner name. 3. Reboot the scanner again. 4. Re-connect the LAN cable to the scanner. Restart may be performed after all necessary settings have been completed. Continue with the Region/Timezone settings. 3.4 Setting the Region/Timezone 1. Select the [System Settings] tab on the top menu. 2. Select the [Region/Timezone] tab on the left side menu. 5. Select whether "Daylight Savings Time" should be on or off. This option is not shown for timezones where daylight savings time is not used. 6. Press the [OK] button. ⇒ The Region/Timezone is set. Continue with IP address/DHCP settings. 3.5 Setting the IP Address/DHCP An IP address must be set in order to connect the scanner to a network. ATTENTION Do not use an IP address that already exists in the network. IP address duplication will cause an error during setup. 1. Select the [Network Settings] tab on the top menu. 2. Select the [IP Address] tab on the left side menu. ⇒ The "Region/Timezone" screen appears. ⇒ The IP address/DHCP screen appears. 8
-
 1
1 -
2
-
3
-
 4
4 -
 5
5 -
 6
6 -
 7
7 -
 8
8 -
 9
9 -
 10
10 -
 11
11 -
 12
12 -
 13
13 -
 14
14 -
15
-
16
-
17
-
18
-
19
-
20
-
21
 |
 |
