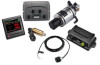
Garmin Compact Reactor 40 Hydraulic Autopilot with GHC 20 and Shadow Drive Pack - Page 3
Autotune Gain Values, Setting North, Setting the Fine Heading Adjustment, Testing and Adjusting
 |
View all Garmin Compact Reactor 40 Hydraulic Autopilot with GHC 20 and Shadow Drive Pack manuals
Add to My Manuals
Save this manual to your list of manuals |
Page 3 highlights
4 If the Autotune procedure is not successful, select an option: • If the Autotune procedure is not successful and you have not reached maximum cruising speed, increase the speed, select Run Normal Autotune on a helm control or Run Standard Autotune on a chartplotter, and repeat steps 1 through 3 until the Autotune procedure completes successfully. • If the Autotune procedure is not successful and you have reached maximum cruising speed, reduce your speed to the initial Autotune speed, and select Run Alternate Autotune to begin an alternate procedure. • If the Autotune fails immediately and you are traveling in a circle instead of performing zigzag motions, select Reverse Steering Dir. > Run Normal Autotune on a helm control or Switch Direction > Run Standard Autotune on a chartplotter, and repeat steps 1 through 3 until the Autotune procedure completes successfully. When the Autotune procedure is complete, gain values are displayed. You can use these values to determine the quality of the Autotune procedure. Autotune Gain Values After the Autotune procedure is complete, you can review the gain values provided on the helm control. You can record these numbers for reference if you want to run the autotune procedure at a later time or if you want to manually adjust the gain settings (not recommended) (Adjusting the Autopilot Gain Settings, page 4). Gain: Sets how tightly the autopilot holds the heading and how aggressively it makes turns. Counter Gain: Sets how aggressively the autopilot adjusts any over-steering after making a turn. Setting North Before you can begin this procedure, you must have a large stretch of open water available. This procedure appears if the autopilot is connected to an optional GPS device, and the device has acquired a GPS position. During this procedure, the autopilot aligns the compass heading with the Course over Ground (COG) information from the GPS device. If you do not have a GPS device connected, you are prompted to set the fine heading adjustment instead (Setting the Fine Heading Adjustment, page 3). 1 Drive your boat at in a straight line at cruising speed, downwind, and in the same direction as the current. 2 Select an option: • If you are performing this procedure as part of the Sea Trial Wizard, select Begin. • If you are performing this procedure outside of the Sea Trial Wizard on a helm control, from the heading screen, select Menu > Setup > Dealer Autopilot Setup > Compass Setup > Set North > Begin. • If you are performing this procedure outside of the Sea Trial Wizard on a chartplotter, select Settings > My Vessel > Autopilot Installation Setup > Compass Setup > Set North > Begin. 3 Continue to drive the boat in a straight line at cruising speed, downwind, in the same direction as the current, and follow the on-screen instructions. 4 Select an option: • If the calibration completes successfully, select Done. • If the calibration is not successful, repeat steps 1 through 3. Setting the Fine Heading Adjustment This procedure appears only if you do not have an optional GPS device connected to the autopilot. If the autopilot is connected to a GPS device that has acquired a GPS position, you are prompted to set north instead (Setting North, page 3). 1 Select an option: • If you are performing this procedure as part of the Sea Trial Wizard, proceed to step 3. • If you are performing this calibration outside of the Sea Trial Wizard on a helm control, from the heading screen, select Menu > Setup > Dealer Autopilot Setup > Compass Setup > Fine Heading Adjustment. • If you are performing this calibration outside of the Sea Trial Wizard on a chartplotter, select Settings > My Vessel > Autopilot Installation Setup > Compass Setup > Fine Heading Adjustment > Begin. 2 Adjust the fine heading setting until it shows the correct heading as determined by a trusted heading indicator, such as the ship compass or a handheld compass. 3 Select Back. Testing and Adjusting the Configuration NOTICE Test the autopilot at a slow speed. After the autopilot has been tested and adjusted at a slow speed, test it at a higher speed to simulate normal operating conditions. 1 Drive the boat in one direction with the autopilot engaged (heading hold). The boat may oscillate slightly, but it should not oscillate significantly. 2 Turn the boat in one direction using the autopilot and observe the behavior. The boat should turn smoothly, not too quickly or too slowly. When you turn the boat using the autopilot, the boat should approach and settle on the desired heading with minimal overshoot and oscillation. 3 Select an option: • If the boat turns too quickly or too sluggishly, adjust the autopilot acceleration limiter (Adjusting the Acceleration Limiter Settings, page 3). • If the heading hold oscillates significantly or the boat does not correct when turning, adjust the autopilot gain (Adjusting the Autopilot Gain Settings, page 4). • If the boat turns smoothly, the heading hold oscillates only slightly or not at all, the boat adjusts the heading correctly, the configuration is correct. No further adjustments are necessary. Adjusting the Acceleration Limiter Settings 1 On a helm control, enable Dealer Mode (Enabling Dealer Configuration on the Helm Control, page 4). 2 Select an option: • On a helm control, from the heading screen, select Menu > Setup > Dealer Autopilot Setup > Autopilot Tuning > Acceleration Limiter. • On a chartplotter, select Settings > My Vessel > Autopilot Installation Setup > Autopilot Tuning > Accel. Limiter. 3 Select an option: • Increase the setting if the autopilot turns too quickly. • Decrease the setting if the autopilot turns too slowly. When you manually adjust the acceleration limiter, make relatively small adjustments. Test the change before making additional adjustments. 3
-
 1
1 -
 2
2 -
 3
3 -
 4
4 -
 5
5 -
 6
6
 |
 |
