Garmin Compact Reactor 40 Hydraulic Autopilot with GHC 20 and Shadow Drive Pack - Page 8
Tack and Gybe, Adjusting the Autopilot Response, User Autopilot Settings, Configuring the Remote
 |
View all Garmin Compact Reactor 40 Hydraulic Autopilot with GHC 20 and Shadow Drive Pack manuals
Add to My Manuals
Save this manual to your list of manuals |
Page 8 highlights
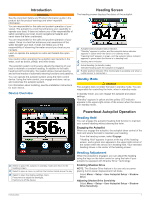
Tack and Gybe You can set the autopilot to perform a tack or gybe while heading hold or wind hold is engaged. Tacking and Gybing from Heading Hold 1 Engage heading hold (Engaging the Autopilot, page 1). 2 Select Menu > Tack/Gybe. 3 Select or to choose a direction. The autopilot steers your boat through a tack or gybe, and "Tacking" displays on the heading screen until the maneuver is complete. Tacking and Gybing from Wind Hold Before you can engage wind hold, you must have a wind sensor installed. 1 Engage wind hold (Engaging Wind Hold, page 3). 2 Select Menu > Tack/Gybe. 3 Select Tack or Gybe. The autopilot steers your boat through a tack or gybe, and information about the progress of the tack or gybe appears on the screen. Setting a Tack and Gybe Delay The tack and gybe delay allows you to delay steering a tack and gybe after you initiate the maneuver. 1 Select Menu > Setup > User Autopilot Setup > Sailing Configuration > Tack/Gybe Delay. 2 Select the length of the delay. 3 If necessary, select Done. Enabling the Gybe Inhibitor NOTE: The gybe inhibitor does not prevent you from manually performing a gybe using the helm or step steering. The gybe inhibitor prevents the autopilot from performing a gybe. 1 Select Menu > Setup > User Autopilot Setup > Sailing Configuration > Gybe Inhibitor. 2 Select Enabled. Adjusting the Autopilot Response When in sailboat mode, the Response setting allows you to adjust the rudder gain quickly to account for varying wind conditions. 1 From the autopilot screen, select Menu > Response. 2 Adjust the rudder response. If you need the rudder to be more responsive and move quicker, increase the value. If the rudder is moving too much, decrease the value. Device Configuration User Autopilot Settings Select Menu > Setup > User Autopilot Setup. Power Mode: Sets the device power mode to normal or economy mode. Economy power mode allows you to set the percentage of power used to run the autopilot. Power Saver: Controls the aggressiveness of the autopilot. The autopilot makes fewer adjustments in power saver mode. Wind Limiter: Slows the rate of turn as the wind direction approaches the stern, when in sailboat mode during a gybe. If the rate of turn is too slow, decrease this value. If the rate of turn is too fast, increase this value. Configuring the Remote Control NOTE: The Garmin quatix® watch can be configured to act as a remote control for the helm control. See the instructions that came with the watch for more information. You can connect one optional remote control to the helm control. Select Menu > Setup > Remote. Searching for a Remote Control Select Menu > Setup > Remote > Search for Remote. Pairing a Remote 1 Search for a remote control (Searching for a Remote Control, page 4). 2 Begin pairing the remote control according to the instructions that came with that accessory. A message appears on the helm control after the remote has been paired successfully. 3 Select Connect. Assigning Remote Button Actions CAUTION If you assign a pattern to a button on the remote control, remember that you are responsible for the safe operation of your boat. Do not begin a pattern until you are certain the water is clear of obstacles. NOTE: If you assign direction control functionality to a button on the remote, the autopilot must be in standby mode to change the direction (forward or reverse). 1 Select Menu > Setup > Remote. 2 Select a remote button to assign an action to. 3 Select a button action. 4 If necessary, repeat steps 2 and 3 for the remaining buttons. Disconnecting a Remote Control 1 Select Menu > Setup > Remote. 2 Select Disconnect Remote. Display Settings Select Menu > Setup > Display. Color Mode: Sets the device to display day or night colors. Configure Colors: Sets the color configuration for each color mode. For day color mode, you can select a full color or high contrast color configuration. For night color mode, you can select a full color, red and black, or green and black color configuration. Backlight: Sets the backlight level. Network Sharing: Allows you to share color mode, color configuration, and backlight settings with other devices across the NMEA 2000 network. System Settings Select Menu > Setup > System. Units: Sets the units of measure. Heading: Sets the reference used in calculating heading information. Variance: Adjusts the variance from true north. This setting is only available when the heading is set to True. Beeper: Sets if and when audible sounds are used. Auto Power: Enables the device to turn on automatically when the NMEA 2000 network turns on. 4 Device Configuration
-
 1
1 -
2
-
 3
3 -
 4
4 -
 5
5 -
 6
6 -
 7
7 -
 8
8 -
 9
9 -
 10
10 -
 11
11 -
 12
12
 |
 |
