Garmin GHP 10 Marine Autopilot System Installation Instructions - Page 20
Operating the Shutoff Valve, To connect the pump to the hydraulic lines - troubleshooting
 |
View all Garmin GHP 10 Marine Autopilot System manuals
Add to My Manuals
Save this manual to your list of manuals |
Page 20 highlights
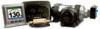
Pump/motor body Upper fittings Lower fittings Pump manifold To connect the pump to the hydraulic lines: 1. Consult the hydraulic layout diagrams starting on page 9 to find the correct place to connect the pump to your hydraulic system. 2. Prepare to disconnect the hydraulic lines in your boat as specified by the manufacturer of your boat or steering system. 3. Disconnect the hydraulic lines from the steering system where appropriate. 4. Add additional hose where necessary, and add the included t-connectors in the hydraulic lines. 5. Add hydraulic hose from the t-connectors to the pump, using the included fittings to attach the hose to the pump. 6. Add hydraulic hose from the return connector at the back of the helm to the pump, using the included fittings. 7. Connect the hoses to the upper fittings, the lower fittings, or a combination of both fittings on the pump. Do not connect more than three hoses to the pump (port, starboard, and return). 8. Insert, tighten, and seal the included plugs in the three unused pump fittings. 9. You will eventually need to bleed the hydraulic system, but not until the Shadow Drive is installed. See page 34 for more information. Note: The pump may vibrate the hydraulic lines and cause noise when the autopilot is running. To eliminate the noise, tie the hydraulic lines to a solid surface. Operating the Shutoff Valve The 2.0 L and the 1.2 L pumps feature a shutoff valve for troubleshooting and repairing the system. To engage the shutoff valve and isolate the pump from the hydraulic system, fully tighten the three brass screws near the lower hydraulic connectors. To disengage the shutoff valve, loosen the three brass screws until they stop. Socket-headed cap screws Brass shutoff screws Socket-headed cap screws notice Do not force the three brass screws past the stopping point when disengaging the shutoff valve. Forcing the screws past the stopping point may permanently damage the manifold. 20 GHP 10 Marine Autopilot System Installation Instructions
-
 1
1 -
2
-
3
-
4
-
5
-
6
-
7
-
8
-
9
-
10
-
11
-
12
-
13
-
14
-
 15
15 -
 16
16 -
 17
17 -
 18
18 -
 19
19 -
 20
20 -
 21
21 -
 22
22 -
 23
23 -
 24
24 -
 25
25 -
26
-
27
-
28
-
29
-
30
-
31
-
32
-
33
-
34
-
35
-
36
-
37
-
38
-
39
-
40
-
41
-
42
-
43
-
44
-
45
-
46
-
47
-
48
 |
 |
