Garmin GMR 18 HD3 Installation Instructions - Page 8
Wiring and Connection Considerations
 |
View all Garmin GMR 18 HD3 manuals
Add to My Manuals
Save this manual to your list of manuals |
Page 8 highlights
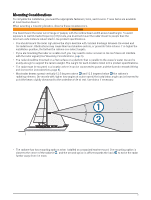
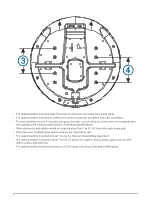
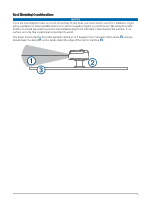
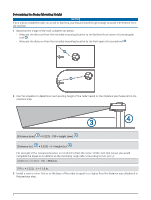
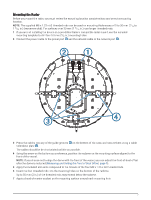
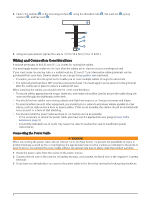
8 Fasten the radome to the mounting surface using the threaded rods , flat washers , spring washers , and hex nuts . 9 Using a torque wrench, tighten the nuts to 13.7 to 18.6 N-m (10 to 14 lbf-ft.). Wiring and Connection Considerations It may be necessary to drill 32 mm (11/4 in.) holes for routing the cables. You must apply marine sealant to the hole after the cables are in place to ensure a waterproof seal. If you must make the routing hole in a visible location, 32 mm (11/4 in.) decorative cable grommets can be purchased from your local Garmin dealer, or you can go to buy.garmin.com (optional). • If needed, you can trim the grommet to enable you to route multiple cables through the same hole. • The optional grommet does NOT provide a waterproof seal. You must apply marine sealant to the grommet after the cables are in place to ensure a waterproof seal. When installing the cables, you should observe these considerations. • To ensure safety, appropriate tie-wraps, fasteners, and sealant should be used to secure the cable along the route and through any bulkheads or the deck. • You should not run cables near moving objects and high-heat sources, or through doorways and bilges. • To avoid interference with other equipment, you should not run network and power cables parallel to other cables, such as radio antenna lines or power cables. If this is not possible, the cables should be shielded with metal conduit or a form of EMI shielding. • You should install the power cable as close to the battery source as possible. ◦ If it is necessary to extend the power cable, you must use the appropriate wire gauge (Power Cable Extensions, page 9). ◦ Incorrectly extended runs of cable may cause the radar to malfunction due to insufficient power transmission. Connecting the Power Cable WARNING When connecting the power cable, do not remove the in-line fuse holder. To prevent the possibility of injury or product damage caused by fire or overheating, the appropriate fuse must be in place as indicated in the product specifications. Connecting the power cable without the appropriate fuse in place voids the product warranty. 1 Route the power cable from the device to the power source. 2 Connect the red wire to the positive (+) battery terminal, and connect the black wire to the negative (-) battery terminal. 3 If you have not already done so, connect the power cable to the device by turning the locking ring clockwise. 8
-
 1
1 -
2
-
 3
3 -
 4
4 -
 5
5 -
 6
6 -
 7
7 -
 8
8 -
 9
9 -
 10
10 -
 11
11 -
 12
12 -
 13
13 -
14
 |
 |
