Garmin Montana 700 Marine Mount Instructions - Page 2
Marine Mount Instructions, Tools Needed, Mounting Considerations, Mounting the Bracket Assembly
 |
View all Garmin Montana 700 manuals
Add to My Manuals
Save this manual to your list of manuals |
Page 2 highlights
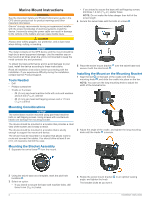
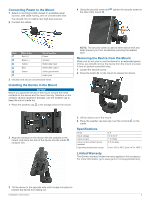
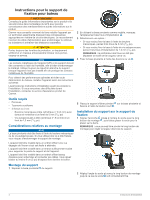
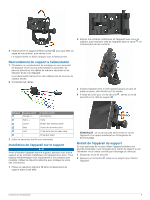
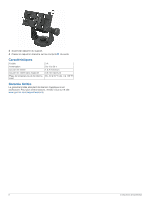
Marine Mount Instructions WARNING See the Important Safety and Product Information guide in the GPS device product box for product warnings and other important information. Garmin® strongly recommends having an experienced installer with the proper knowledge of electrical systems install the device. Incorrectly wiring the power cable can result in damage to the vehicle or the battery and can cause bodily injury. • If you intend to secure the base with self-tapping screws, drill three 1.5 mm (1/16 in.) starter holes. NOTE: Do not make the holes deeper than half of the screw length. 4 Secure the swivel base with the bolts or screws . CAUTION Always wear safety goggles, ear protection, and a dust mask when drilling, cutting, or sanding. NOTICE The metal contacts on the GPS device and the mount should be kept dry to avoid equipment damage. Use the weather cap on the mount at all times when the unit is not mounted to keep the metal contacts dry and protected. To obtain the best performance and to avoid damage to your boat, install the device according to these instructions. Read all installation instructions before proceeding with the installation. If you experience difficulty during the installation, contact Garmin Product Support. Tools Needed • Drill • Phillips screwdriver • 3 bolts or 3 screws: ◦ #8 (4 mm) pan-head machine bolts with nuts and washers and a 5 mm (5/32 in.) drill bit ◦ #8 (4 mm) pan-head self-tapping screws and a 1.5 mm (1/16 in.) drill bit Mounting Considerations 5 Place the swivel mount bracket over the swivel base and secure it with the short knob . Installing the Mount on the Mounting Bracket 1 Align the slot on the back of the cradle with the long mounting knob , and slide the cradle into place on the bar. NOTE: You can turn the long mounting knob to adjust the width of the bracket arms. NOTICE The swivel base must be mounted using pan-head machine bolts or self-tapping screws. Using screws with countersunk heads can damage the mounting bracket. The device should be mounted in a location that provides a clear view of the screen and is easy to reach. The device should be mounted in a location that is sturdy enough to support the mount and device. The device must be mounted in a location that allows room to route and connect the cables. You should allow at least 8 cm (3 in.) of clearance behind the case. 2 Adjust the angle of the cradle, and tighten the long mounting knob until the cradle is secure. Mounting the Bracket Assembly 1 Separate the swivel base from the mount. 2 Using the swivel base as a template, mark the pilot hole locations . 3 Select an option: • If you intend to secure the base with machine bolts, drill three 5 mm (5/32 in.) holes. 2 3 Rotate the swivel mount bracket angle, and tighten the knob. The bracket clicks as you turn it. to an optimal viewing Installation Instructions
-
 1
1 -
 2
2 -
 3
3 -
 4
4 -
 5
5 -
 6
6 -
 7
7 -
 8
8 -
9
-
10
-
11
-
12
-
13
-
14
-
15
-
16
-
17
-
18
-
19
-
20
-
21
-
22
-
23
-
24
-
25
-
26
-
27
-
28
-
29
-
30
 |
 |
