Garmin Montana 700 Marine Mount Instructions - Page 3
Connecting Power to the Mount, Installing the Device in the Mount, Removing the Device from the Mount - accessories
 |
View all Garmin Montana 700 manuals
Add to My Manuals
Save this manual to your list of manuals |
Page 3 highlights
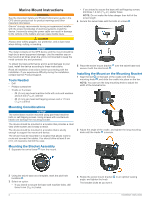
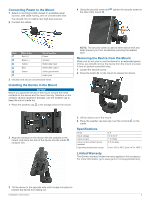
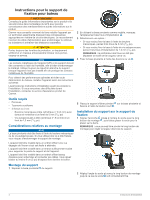
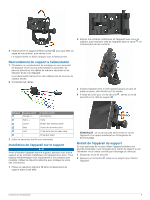
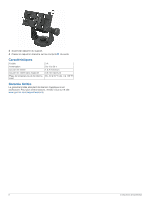
Connecting Power to the Mount 1 Select a mounting location based on available power sources, safe cable routing, and an unobstructed view. You should not run cables near high-heat sources. 2 Connect the cables. 4 Using the security screw tool , tighten the security screw on the side of the mount . Item Wire Color Red (+) Wire Function Power Black (-) Ground Yellow Serial data input Blue Serial data output Green Serial ground wire Audio jack 3 Insulate and secure unconnected wires. Installing the Device in the Mount NOTICE Before you place the device in the mount, ensure the metal contacts on the device and the mount are dry. Moisture on the contacts causes equipment damage. Use the weather cap to keep the mount cradle dry. 1 Place the weather cap in the storage area on the mount. NOTE: The security screw is used to deter device theft and helps prevent you from accidentally pressing the release latch. Removing the Device from the Mount When you do not plan to use the device for an extended period of time, you should remove the device from the mount or power it from an ignition-controlled relay. 1 Loosen the security screw. 2 Press the button on the mount to release the device. 2 Align the contacts on the device with the contacts in the mount, and place the side of the device into the cradle , contacts first. 3 Lift the device out of the mount. 4 Place the weather cap securely over the contacts cradle. on the Specifications Fuse Input voltage Input current Input current without device installed Operating temperature range 3 A 10 to 30 V 1.5 A Max. 0.5 mA Max. From -20º to 60ºC (from -4º to 140ºF) Limited Warranty The Garmin standard limited warranty applies to this accessory. For more information, go to www.garmin.com/support/warranty. 3 Tilt the device to the opposite side until it snaps into place to prevent the device from falling out. Installation Instructions 3
-
 1
1 -
 2
2 -
 3
3 -
 4
4 -
 5
5 -
 6
6 -
 7
7 -
 8
8 -
 9
9 -
10
-
11
-
12
-
13
-
14
-
15
-
16
-
17
-
18
-
19
-
20
-
21
-
22
-
23
-
24
-
25
-
26
-
27
-
28
-
29
-
30
 |
 |
