Gateway C-140S 8512714 - Gateway Notebook Reference Guide R5 for Windows XP - Page 60
Memory card types, Inserting a memory card, Using a memory card, Removing a memory card
 |
View all Gateway C-140S manuals
Add to My Manuals
Save this manual to your list of manuals |
Page 60 highlights
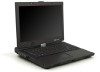
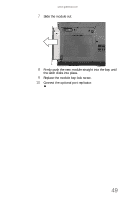
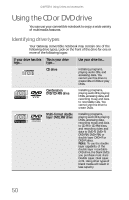
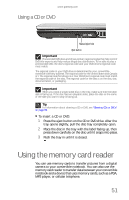
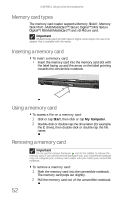
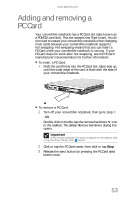
CHAPTER 4: Using Drives and Accessories Memory card types The memory card reader supports Memory Stick®, Memory Stick Pro®, MultiMediaCard™, Secure Digital™, Mini Secure Digital™, RS-MultiMediaCard™, and xD-Picture card. Important RS-Multimedia Card and Mini Secure Digital cards require the use of an adapter that is available with the media. Inserting a memory card To insert a memory card: • Insert the memory card into the memory card slot with the label facing up and the arrow on the label pointing towards the convertible notebook. Using a memory card To access a file on a memory card: 1 Click or tap Start, then click or tap My Computer. 2 Double-click or double-tap the drive letter (for example, the E: drive), then double-click or double-tap the file name. Removing a memory card Important Do not use the remove hardware icon in the taskbar to remove the memory card. If you use the remove hardware icon, your convertible notebook may not recognize your memory card reader until you restart your convertible notebook. To remove a memory card: 1 Push the memory card into the convertible notebook. The memory card pops out slightly. 2 Pull the memory card out of the convertible notebook. 52
-
 1
1 -
2
-
3
-
4
-
5
-
6
-
7
-
8
-
9
-
10
-
11
-
12
-
13
-
14
-
15
-
16
-
17
-
18
-
19
-
20
-
21
-
22
-
23
-
24
-
25
-
26
-
27
-
28
-
29
-
30
-
31
-
32
-
33
-
34
-
35
-
36
-
37
-
38
-
39
-
40
-
41
-
42
-
43
-
44
-
45
-
46
-
47
-
48
-
49
-
50
-
51
-
52
-
53
-
54
-
 55
55 -
 56
56 -
 57
57 -
 58
58 -
 59
59 -
 60
60 -
 61
61 -
 62
62 -
 63
63 -
 64
64 -
 65
65 -
66
-
67
-
68
-
69
-
70
-
71
-
72
-
73
-
74
-
75
-
76
-
77
-
78
-
79
-
80
-
81
-
82
-
83
-
84
-
85
-
86
-
87
-
88
-
89
-
90
-
91
-
92
-
93
-
94
-
95
-
96
-
97
-
98
-
99
-
100
-
101
-
102
-
103
-
104
-
105
-
106
-
107
-
108
-
109
-
110
-
111
-
112
-
113
-
114
-
115
-
116
-
117
-
118
-
119
-
120
-
121
-
122
-
123
-
124
-
125
-
126
-
127
-
128
-
129
-
130
-
131
-
132
-
133
-
134
-
135
-
136
-
137
-
138
-
139
-
140
-
141
-
142
-
143
-
144
-
145
-
146
-
147
-
148
-
149
-
150
-
151
-
152
 |
 |