Gateway M500 Gateway M500 Notebook User's Guide - Page 17
Left, Insert an SD Secured Digital memory card
 |
View all Gateway M500 manuals
Add to My Manuals
Save this manual to your list of manuals |
Page 17 highlights
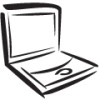
Left Left # Item 1 Hard drive bay Icon Description The hard drive is located in this bay. 2 PC Card slot 3 PC Card eject button 4 SD memory card slot 5 Kensington™ lock slot Insert one Type II 16-bit PC Card or 32-bit CardBus PC Card into this slot. Press to remove the PC Card from the PC card slot. Insert an SD (Secured Digital) memory card into this slot. Secure your notebook to an object by connecting a Kensington cable lock to this slot. www.gateway.com 11
-
 1
1 -
2
-
3
-
4
-
5
-
6
-
7
-
8
-
9
-
10
-
11
-
 12
12 -
 13
13 -
 14
14 -
 15
15 -
 16
16 -
 17
17 -
 18
18 -
 19
19 -
 20
20 -
 21
21 -
 22
22 -
23
-
24
-
25
-
26
-
27
-
28
-
29
-
30
-
31
-
32
-
33
-
34
-
35
-
36
-
37
-
38
-
39
-
40
-
41
-
42
-
43
-
44
-
45
-
46
-
47
-
48
-
49
-
50
-
51
-
52
-
53
-
54
-
55
-
56
-
57
-
58
-
59
-
60
-
61
-
62
-
63
-
64
-
65
-
66
-
67
-
68
-
69
-
70
-
71
-
72
-
73
-
74
-
75
-
76
-
77
-
78
-
79
-
80
-
81
-
82
-
83
-
84
-
85
-
86
-
87
-
88
-
89
-
90
-
91
-
92
-
93
-
94
-
95
-
96
-
97
-
98
-
99
-
100
-
101
-
102
-
103
-
104
-
105
-
106
-
107
-
108
-
109
-
110
-
111
-
112
-
113
-
114
-
115
-
116
-
117
-
118
-
119
-
120
 |
 |

11
Left
www.gateway.com
Left
#
Item
Icon
Description
1
Hard drive bay
The hard drive is located in this bay.
2
PC Card slot
Insert one Type II 16-bit PC Card or 32-bit
CardBus PC Card into this slot.
3
PC Card eject button
Press to remove the PC Card from the PC card
slot.
4
SD memory card slot
Insert an SD (Secured Digital) memory card
into this slot.
5
Kensington™ lock slot
Secure your notebook to an object by
connecting a Kensington cable lock to this slot.