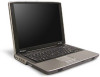
Gateway MX6708 8511340 - Gateway Notebook Hardware Reference
Gateway MX6708 Manual
 |
View all Gateway MX6708 manuals
Add to My Manuals
Save this manual to your list of manuals |
Gateway MX6708 manual content summary:
- Gateway MX6708 | 8511340 - Gateway Notebook Hardware Reference - Page 1
HARDWARE REFERENCE Gateway Notebook - Gateway MX6708 | 8511340 - Gateway Notebook Hardware Reference - Page 2
- Gateway MX6708 | 8511340 - Gateway Notebook Hardware Reference - Page 3
information 3 Chapter 2: Checking Out Your Gateway Notebook 5 Identifying features 6 Front 6 Left 7 Right 8 Back 9 Bottom 10 Keyboard area 11 Connecting the AC adapter 12 Protecting from power source problems 13 Connecting the dial-up modem 13 Connecting to a cable or DSL modem or to an - Gateway MX6708 | 8511340 - Gateway Notebook Hardware Reference - Page 4
34 Recalibrating the battery 35 Ordering accessories 36 Chapter 3: Maintaining and Upgrading Your Notebook 37 Preventing static electricity discharge 38 Adding or replacing memory modules 38 Replacing the hard drive kit 41 Replacing the keyboard 44 Removing the keyboard 44 Installing the - Gateway MX6708 | 8511340 - Gateway Notebook Hardware Reference - Page 5
CHAPTER 1 About this reference • About this guide • Accessing the online User Guide • Gateway contact information • Microsoft Certificate of Authenticity • For more information 1 - Gateway MX6708 | 8511340 - Gateway Notebook Hardware Reference - Page 6
instructions that are specific to your model of Gateway notebook. For all other notebook information, see your online User Guide. Accessing the online User Guide In addition to this guide, the online User Guide has been included on your hard drive. The User Guide is an in-depth, easy-to-read manual - Gateway MX6708 | 8511340 - Gateway Notebook Hardware Reference - Page 7
found on the bottom of your notebook includes the product key code for your operating system. For more information For more information about your notebook, visit Gateway's Support page at support.gateway.com or the Web address shown on your notebook's label. The Support page also has links to - Gateway MX6708 | 8511340 - Gateway Notebook Hardware Reference - Page 8
CHAPTER 1: About this reference www.gateway.com 4 - Gateway MX6708 | 8511340 - Gateway Notebook Hardware Reference - Page 9
(rebooting) your notebook • Using the status indicators • Using the keyboard • Using the EZ Pad touchpad • Adjusting the volume • Turning your wireless radio on or off • Using the CD or DVD drive • Using the memory card reader • Adding and removing a PC Card • Changing batteries • Recalibrating the - Gateway MX6708 | 8511340 - Gateway Notebook Hardware Reference - Page 10
Out Your Gateway Notebook Identifying features Front www.gateway.com Speaker LCD panel release latch Headphone jack Battery charge Microphone jack indicator Power indicator Speaker Component Icon Speakers LCD panel release latch Battery charge indicator Power indicator Microphone - Gateway MX6708 | 8511340 - Gateway Notebook Hardware Reference - Page 11
so air vents are not obstructed. Do not use the notebook on a bed, sofa, rug, or other similar surface. Use this bay for a secondary battery, a CD drive, DVD/CD-RW drive, recordable DVD drive, a diskette drive, or a second hard drive. For more information, see "Changing modules" on page 27. To - Gateway MX6708 | 8511340 - Gateway Notebook Hardware Reference - Page 12
Gateway Notebook Right www.gateway.com PC Card slot Memory card reader USB ports IEEE 1394 port Ethernet jack USB ports Modem jack Component Icon Description PC Card slot IEEE 1394 port Insert one Type II PC Card into this slot. For more information, see "Adding and removing a PC Card - Gateway MX6708 | 8511340 - Gateway Notebook Hardware Reference - Page 13
www.gateway.com Back Identifying features Power connector Component Power connector Monitor port Monitor port Icon Description Plug the AC adapter cable into this connector. Plug an analog VGA monitor or projector into this port. For more information, see "Viewing the display on a projector or - Gateway MX6708 | 8511340 - Gateway Notebook Hardware Reference - Page 14
Out Your Gateway Notebook Bottom Battery latch Docking port Battery Customer Care label Hard drive bay Website: Online Support: Tech Support Phone: Hours: www.gateway.com Battery lock Memory bay System label Modular bay latch Component Icon Docking port Battery Battery lock Memory bay System - Gateway MX6708 | 8511340 - Gateway Notebook Hardware Reference - Page 15
power button mode, see "Changing Power-Saving Settings" in the online User Guide. Provides all the features of a full-sized, computer keyboard. For more information, see "Using the keyboard Inform you when a drive is in use or when a button has been pressed that affects how the keyboard is used. For - Gateway MX6708 | 8511340 - Gateway Notebook Hardware Reference - Page 16
-serviceable parts inside. The AC adapter has dangerous voltages that can cause serious injury or death. Contact Gateway about returning defective AC adapters. Caution Make sure that you use the AC adapter that came with your notebook or one of the same type purchased from Gateway. Replace the power - Gateway MX6708 | 8511340 - Gateway Notebook Hardware Reference - Page 17
www.gateway.com Connecting the dial-up modem 4 When you finish using your notebook for the first time, turn off your notebook and leave your notebook connected to AC power until the battery charge indicator turns blue. Protecting from power source problems Warning High voltages can enter your - Gateway MX6708 | 8511340 - Gateway Notebook Hardware Reference - Page 18
CHAPTER 2: Checking Out Your Gateway Notebook www.gateway.com Connecting to a cable or DSL modem or to an Ethernet network Your notebook has a network jack that you can use to connect to a cable or DSL modem or to an Ethernet network. To connect to a cable or DSL modem or to an Ethernet network: 1 - Gateway MX6708 | 8511340 - Gateway Notebook Hardware Reference - Page 19
Guide. To start your notebook: 1 Slide the latch on the front of your notebook, then lift the LCD panel. 2 Press the power button located above the keyboard. 3 If you are starting your notebook for the first time, follow the on-screen instructions to set up your notebook. Waking up your notebook - Gateway MX6708 | 8511340 - Gateway Notebook Hardware Reference - Page 20
, complete the following steps until the notebook turns off: 1. Press and hold the power button for about five seconds, then release it. 2. Unplug the power cord and remove the battery for more than 10 seconds. If your notebook does not respond to keyboard, touchpad, or mouse input, you may - Gateway MX6708 | 8511340 - Gateway Notebook Hardware Reference - Page 21
has been pressed that affects how the keyboard is used. The status indicators are located below the touchpad. Wireless network Caps lock Hard drive Module Num lock Indicator Icon Wireless network (optional) Caps lock A Num lock 1 Module Hard drive Description ■ LED on - wireless IEEE 802.11 - Gateway MX6708 | 8511340 - Gateway Notebook Hardware Reference - Page 22
Gateway Notebook www.gateway.com Using the keyboard Tips & Tricks You can attach an external keyboard to the notebook using a USB port. You do not need to shut down the notebook to connect a USB keyboard. Your notebook features a full-size keyboard FN key to perform specific actions. For more - Gateway MX6708 | 8511340 - Gateway Notebook Hardware Reference - Page 23
that provide wireless communication. Enter Standby mode. Press the power button to leave Standby mode. For more information, see "Changing Power-Saving Settings" in your online User Guide. Toggle the notebook display in the following order: ■ The LCD ■ An external monitor or projector (a monitor or - Gateway MX6708 | 8511340 - Gateway Notebook Hardware Reference - Page 24
CHAPTER 2: Checking Out Your Gateway Notebook www.gateway.com Press and hold FN, then press this system key... To... Increase the brightness of the display. Decrease the brightness of the display. Mute the sound. Press the key combination again to restore the sound. For more information, see " - Gateway MX6708 | 8511340 - Gateway Notebook Hardware Reference - Page 25
EZ Pad touchpad Tips & Tricks For instructions on how to adjust the double-click speed, pointer speed, right-hand or left-hand configuration, and other touchpad settings, see "Changing the mouse or touchpad settings" in the online User Guide. Tips & Tricks You received your notebook with the EZ Pad - Gateway MX6708 | 8511340 - Gateway Notebook Hardware Reference - Page 26
2: Checking Out Your Gateway Notebook To... Move the pointer on the screen. Do this... Select an object on the screen. Start a program or open a file or folder. Access a shortcut menu or find more information about an object on the screen. Move an object on the screen. www.gateway.com Move your - Gateway MX6708 | 8511340 - Gateway Notebook Hardware Reference - Page 27
.com Using the optional EZ Point pointing device Using the optional EZ Point pointing device Important Your notebook was sent from Gateway with the pointing device turned on. For instructions on how to turn the pointing device on or off, see "Turning the touchpad or pointing device on or off - Gateway MX6708 | 8511340 - Gateway Notebook Hardware Reference - Page 28
or damaged, remove the cap from the stick and replace it with one of the spares included with your notebook. If you need to purchase additional caps, visit the Accessory Store at accessories.gateway.com. Turning the touchpad or pointing device on or off Tips & Tricks Both the touchpad and pointing - Gateway MX6708 | 8511340 - Gateway Notebook Hardware Reference - Page 29
or Disable. Adjusting the volume Tips & Tricks For instructions on how to adjust the volume in Windows, see "Adjusting the Volume" in the online User Guide. You can use the volume control to adjust the overall volume of your notebook. To adjust the overall volume level using hardware controls - Gateway MX6708 | 8511340 - Gateway Notebook Hardware Reference - Page 30
Gateway Notebook www.gateway of interference to other devices or services is harmful or perceived as harmful wireless device. Your Gateway notebook may have a factory-installed wireless networking mini-PCI card. To turn the notebook on a wireless network, see "Wireless Networking" in the online User - Gateway MX6708 | 8511340 - Gateway Notebook Hardware Reference - Page 31
www.gateway.com Changing modules Changing modules Your notebook's modular bay supports different bay modules, such as a CD drive, combination DVD/CD-RW drive, DVD±RW/CD-RW drive, a second hard drive, a diskette drive, or a secondary battery. Modular bay Modular bay latch Important If the remove - Gateway MX6708 | 8511340 - Gateway Notebook Hardware Reference - Page 32
Out Your Gateway Notebook www.gateway.com 6 Remove the security screw if your notebook has notebook has one. 11 Turn your notebook over. 12 Reconnect the optional port replicator. 13 Open the LCD panel. 14 If your notebook is on, click OK to continue working on your notebook. - OR If your notebook - Gateway MX6708 | 8511340 - Gateway Notebook Hardware Reference - Page 33
.com Using the CD or DVD drive Using the CD or DVD drive You can use your notebook to enjoy a wide variety of multimedia features. Identifying drive types Your Gateway notebook may contain one of the following drive types. Look on the front of the drive for one or more of the following logos - Gateway MX6708 | 8511340 - Gateway Notebook Hardware Reference - Page 34
Gateway Notebook Inserting a CD or DVD [ www.gateway.com Important When you place a single-sided disc in the tray, make sure that the label side is facing up. If the disc has two playable sides, place the disc so the name of the side you want to play is facing up. Eject button Manual - Gateway MX6708 | 8511340 - Gateway Notebook Hardware Reference - Page 35
www.gateway.com Using the memory card reader Using the memory card reader You can use memory cards to transfer pictures from a digital camera to your notebook. You can also use the memory card reader to transfer data between your notebook and a device that uses memory cards, such as a PDA, MP3 - Gateway MX6708 | 8511340 - Gateway Notebook Hardware Reference - Page 36
2: Checking Out Your Gateway Notebook www.gateway.com Adding and removing a PC Card Your notebook has a PC Card slot (also known as a PCMCIA card slot). This slot accepts one Type II card. You do not need to restart your notebook when changing most cards because your notebook supports hot-swapping - Gateway MX6708 | 8511340 - Gateway Notebook Hardware Reference - Page 37
Changing batteries 3 Eject the PC Card by pressing the eject button again. Changing batteries Replacing the main battery Warning Danger of explosion if battery is incorrectly replaced. Replace only with a battery specifically manufactured for your Gateway notebook. Discard used batteries according - Gateway MX6708 | 8511340 - Gateway Notebook Hardware Reference - Page 38
replicator. 11 Open the LCD panel and press the power button. Installing a secondary battery Warning Danger of explosion if battery is incorrectly replaced. Replace only with a battery specifically manufactured for your Gateway notebook. Discard used batteries according to local hazardous material - Gateway MX6708 | 8511340 - Gateway Notebook Hardware Reference - Page 39
hours. When the recalibration has finished, the message "Press [Esc] key to exit" appears. 7 Press ESC. The battery charge indicator now displays an accurate battery charge. If the battery charge indicator does not show an accurate charge, contact Gateway Customer Care at support.gateway.com. 35 - Gateway MX6708 | 8511340 - Gateway Notebook Hardware Reference - Page 40
should, try adding more memory. See "Adding or replacing memory modules" on page 38 for more information. Modules The modular bay provides an easy way to expand the features of your notebook. You can add a recordable drive, a diskette drive, or a second hard drive to your notebook by swapping it for - Gateway MX6708 | 8511340 - Gateway Notebook Hardware Reference - Page 41
CHAPTER 3 Maintaining and Upgrading Your Notebook • Preventing static electricity discharge • Adding or replacing memory modules • Replacing the hard drive kit • Replacing the keyboard 37 - Gateway MX6708 | 8511340 - Gateway Notebook Hardware Reference - Page 42
Maintaining and Upgrading Your Notebook www.gateway.com Preventing static electricity discharge Warning To avoid exposure to dangerous electrical voltages and moving parts, turn off your notebook, unplug the power cord, modem cable, and network cable, and remove the batteries before opening the - Gateway MX6708 | 8511340 - Gateway Notebook Hardware Reference - Page 43
connected to the notebook and remove any PC cards. 6 Turn your notebook over so the bottom is facing up, then remove the main battery and optional secondary battery. For more information, see "Changing batteries" on page 33. 7 Remove the keyboard screw. Screw 8 Loosen the six memory bay cover - Gateway MX6708 | 8511340 - Gateway Notebook Hardware Reference - Page 44
CHAPTER 3: Maintaining and Upgrading Your Notebook www.gateway.com 10 If you are removing a module, gently press outward on the clip at each end of the memory module until the module tilts upward. 11 Pull the memory module out of the slot. 40 - Gateway MX6708 | 8511340 - Gateway Notebook Hardware Reference - Page 45
Replace the memory bay cover, then tighten the cover screws. 14 Replace the keyboard screw. 15 Insert the battery(ies), then turn your notebook over. 16 Connect the optional port replicator. -OR- Connect the power adapter, modem cable, and network cable. Replacing the hard drive kit Tools Required - Gateway MX6708 | 8511340 - Gateway Notebook Hardware Reference - Page 46
to the notebook and remove any PC cards. 9 Turn your notebook over so the bottom is facing up, then remove the main battery and optional secondary battery. For more information, see "Changing batteries" on page 33. 10 Remove the two hard drive bay cover screws. 11 Slide the old hard drive bay cover - Gateway MX6708 | 8511340 - Gateway Notebook Hardware Reference - Page 47
that secure the hard drive kit to the notebook. 18 Insert the battery(ies), then turn your notebook over. 19 Connect the optional port replicator. -ORConnect the power adapter, modem cable, and network cable 20 Turn on your notebook. 21 For instructions on installing Windows, your drivers, and your - Gateway MX6708 | 8511340 - Gateway Notebook Hardware Reference - Page 48
connected to the notebook and remove any PC cards. 6 Turn your notebook over so the bottom is facing up, then remove the main battery and optional secondary battery. For more information, see "Changing batteries" on page 33. 7 Remove the keyboard screw. Screw 8 Turn the notebook over so the - Gateway MX6708 | 8511340 - Gateway Notebook Hardware Reference - Page 49
gateway.com 9 Remove the two keyboard cover screws. Replacing the keyboard Screw Screw 10 Insert the small flat-blade screwdriver or non-marring tool under the bottom of the keyboard cover over each LCD and keyboard will help prevent damage to the notebook... 11 Carefully open the LCD panel - Gateway MX6708 | 8511340 - Gateway Notebook Hardware Reference - Page 50
and Upgrading Your Notebook www.gateway.com 14 Gently lift the back edge of the keyboard. ■ If the keyboard does not lift, go to Step 15. ■ If the keyboard lifts, go to Step 20. 15 Close the LCD panel, turn your notebook over so the bottom is facing up, then loosen the six memory bay cover screws - Gateway MX6708 | 8511340 - Gateway Notebook Hardware Reference - Page 51
www.gateway.com Important Depending on the keyboard features, one of both of these screws may be absent. 18 Remove the two optional keyboard screws. Replacing the keyboard Screw Screw 19 Turn your notebook over so the top is facing up, then open the LCD panel to the fully opened position. 20 - Gateway MX6708 | 8511340 - Gateway Notebook Hardware Reference - Page 52
3: Maintaining and Upgrading Your Notebook www.gateway.com 22 Lift the black keyboard connector clip and optional EZ Point clip, then remove the cables. Be careful not to touch or damage any other components. 23 Lift the old keyboard away from the notebook. The keyboard is now completely detached - Gateway MX6708 | 8511340 - Gateway Notebook Hardware Reference - Page 53
removed the memory bay cover in Step 16, replace it, then tighten the screws. 11 Replace the keyboard screw you removed in Step 7. 12 Insert the battery(ies), then turn your notebook over. 13 Connect the optional port replicator. -OR- Connect the power adapter, modem cable, and network cable. 49 - Gateway MX6708 | 8511340 - Gateway Notebook Hardware Reference - Page 54
CHAPTER 3: Maintaining and Upgrading Your Notebook www.gateway.com 50 - Gateway MX6708 | 8511340 - Gateway Notebook Hardware Reference - Page 55
APPENDIX A Safety, Regulatory, and Legal Information • Important safety information • Regulatory compliance statements • Environmental information • Notices 51 - Gateway MX6708 | 8511340 - Gateway Notebook Hardware Reference - Page 56
line cord. Your Gateway notebook is designed and tested batteries according to the manufacturer's instructions. ■ When the notebook is turned off, a small amount of electrical current still flows through the notebook. To avoid electrical shock, always unplug all power cables and modem cables - Gateway MX6708 | 8511340 - Gateway Notebook Hardware Reference - Page 57
www.gateway.com ■ Unplug the notebook from the wall outlet and refer servicing to qualified personnel if: ■ The power cord or plug is damaged. ■ Liquid has been spilled into the notebook. ■ The notebook does not operate properly when the operating instructions are followed. ■ The notebook was - Gateway MX6708 | 8511340 - Gateway Notebook Hardware Reference - Page 58
are in place and the notebook is fully assembled. Caution Wireless devices are not user serviceable. Do not modify them in any way. Modification to a wireless device will void the authorization to use it. Please contact Gateway for service. Caution Only use drivers approved for the country in - Gateway MX6708 | 8511340 - Gateway Notebook Hardware Reference - Page 59
Gateway for service. Caution The transmitting device embedded in this notebook may not be used with any antenna other than the one provided with the notebook notebook. Federal Communications Commission (FCC) Intentional emitter per FCC Part 15 Low power the instructions, may shielded video cable when - Gateway MX6708 | 8511340 - Gateway Notebook Hardware Reference - Page 60
Responsible party: Gateway Companies, Inc. 610 Gateway Drive, North Sioux City, SD 57049 (605) 232-2000 Fax: (605) 232-2023 Product: ■ Gateway E-8000 series ■ Gateway M460 ■ Gateway M465 ■ Gateway MX6000 series ■ Gateway NX550 ■ Gateway S-7500N series This device complies with Part 15 of the - Gateway MX6708 | 8511340 - Gateway Notebook Hardware Reference - Page 61
Contact Gateway for service. Caution The transmitting device embedded in this notebook may not be used with any antenna other than provide with the notebook. Caution The IEEE 802.11 or Bluetooth radio your notebook may have been equipped with operates in the same frequency range as high power radar - Gateway MX6708 | 8511340 - Gateway Notebook Hardware Reference - Page 62
Legal Information www.gateway.com Warning To , the inside wiring associated with a single-line individual service may be extended by means of a certified connector assembly own protection, that the electrical ground connections of the power utility, telephone lines, and internal metallic water pipe - Gateway MX6708 | 8511340 - Gateway Notebook Hardware Reference - Page 63
the unit ever need servicing, contact an authorized service location. EPA ENERGY STAR ENERGY STAR As an ENERGY STAR® Partner, Gateway has determined that this product meets the ENERGY STAR guidelines for energy efficiency when used with a computer equipped with a Display Power Management System - Gateway MX6708 | 8511340 - Gateway Notebook Hardware Reference - Page 64
7565 Irvine Center Drive Irvine, CA 92618 USA All Rights Reserved This publication is protected by copyright and all rights are reserved. No part of it may be reproduced or transmitted by any means or in any form, without prior consent in writing from Gateway. The information in this manual has been - Gateway MX6708 | 8511340 - Gateway Notebook Hardware Reference - Page 65
www.gateway.com Macrovision statement If your notebook has a DVD drive and an analog TV Out port, the following paragraph applies: This product incorporates copyright protection technology that is protected by U.S. patents and other intellectual property - Gateway MX6708 | 8511340 - Gateway Notebook Hardware Reference - Page 66
APPENDIX A: Safety, Regulatory, and Legal Information www.gateway.com 62 - Gateway MX6708 | 8511340 - Gateway Notebook Hardware Reference - Page 67
7, 27 second hard drive 7, 27 secondary battery 7, 27, 34 BIOS Setup utility 35 Bluetooth 19 brightness adjusting 20 system keys 20 C cable lock 7 cable modem 8, 14 Caps Lock indicator 17 cards inserting memory card 31 inserting PC Card 32 memory card slot 8 memory cards supported 31 PC Card slot - Gateway MX6708 | 8511340 - Gateway Notebook Hardware Reference - Page 68
33, 34 bay modules 27 CD drive 27 diskette drive 27 drives 27 DVD drive 27 hard drive 41 memory 38 PC Card 32 second hard drive secondary battery 27 27, 34 J jacks See connections K Kensington cable lock lock slot 7 key combinations 19 keyboard buttons 18 connecting 18 features 18 locating - Gateway MX6708 | 8511340 - Gateway Notebook Hardware Reference - Page 69
notebook 15 programs 22, 23 static electricity 38 status indicators battery charge 6 Caps Lock 17 CD drive 17 diskette drive 17 drive activity 17 DVD drive 17 hard drive 17 location 11 modular drive 17 numeric keypad 17 Pad Lock 17 power 6 toggle on or off 19 surge protector 13 Suspend 19 S-Video - Gateway MX6708 | 8511340 - Gateway Notebook Hardware Reference - Page 70
Index video monitor port 9 projector port 9 S-Video out jack 7 VGA port 9 volume adjusting 20, 25 controls 25 muting 20, 25 system keys 20 W waking up notebook 15 Windows key 18 Product Key Code 3 wireless network button 19 turning off 26 turning on 26 www.gateway.com 66 - Gateway MX6708 | 8511340 - Gateway Notebook Hardware Reference - Page 71
- Gateway MX6708 | 8511340 - Gateway Notebook Hardware Reference - Page 72
MAN MYSTIQUE C HW REF R1 2/06
-
 1
1 -
 2
2 -
 3
3 -
 4
4 -
 5
5 -
 6
6 -
 7
7 -
8
-
9
-
10
-
11
-
12
-
13
-
14
-
15
-
16
-
17
-
18
-
19
-
20
-
21
-
22
-
23
-
24
-
25
-
26
-
27
-
28
-
29
-
30
-
31
-
32
-
33
-
34
-
35
-
36
-
37
-
38
-
39
-
40
-
41
-
42
-
43
-
44
-
45
-
46
-
47
-
48
-
49
-
50
-
51
-
52
-
53
-
54
-
55
-
56
-
57
-
58
-
59
-
60
-
61
-
62
-
63
-
64
-
65
-
66
-
67
-
68
-
69
-
70
-
71
-
72
 |
 |

HARDWARE REFERENCE
Gateway Notebook