GE AEE08AP User Manual - Page 11
Install The Air Conditioner, In The Case Cont., In The Case
 |
View all GE AEE08AP manuals
Add to My Manuals
Save this manual to your list of manuals |
Page 11 highlights
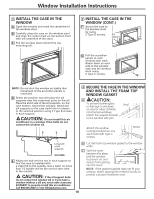
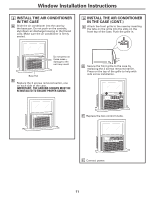
Window Installation Instructions 9 INSTALL THE AIR CONDITIONER IN THE CASE A Slide the air conditioner into the case by the base pan. Do not push on the controls, styrofoam air discharge housing or the finned coils. Make sure the air conditioner is firmly seated. 9 INSTALL THE AIR CONDITIONER IN THE CASE (CONT.) C Attach the front grille to the case by inserting the tabs on the grille into the slots on the front top of the case. Push the grille in. Do not press on these areas- damage to the unit may result Base Pan B Replace the 2 screws removed earlier, one on each side of the case. IMPORTANT: THE GROUND SCREWS MUST BE REINSTALLED TO ENSURE PROPER GOUND. D Secure the front grille to the case by replacing the 2 screws removed earlier. Press on the top of the grille to help with side screw installation. E Replace the two control knobs. F Connect power. 11
-
 1
1 -
2
-
3
-
4
-
5
-
 6
6 -
 7
7 -
 8
8 -
 9
9 -
 10
10 -
 11
11 -
 12
12 -
 13
13 -
 14
14 -
 15
15 -
 16
16 -
17
-
18
-
19
-
20
-
21
-
22
-
23
-
24
-
25
-
26
-
27
-
28
-
29
-
30
-
31
-
32
-
33
-
34
-
35
-
36
-
37
-
38
-
39
-
40
-
41
-
42
-
43
-
44
-
45
-
46
-
47
-
48
-
49
-
50
-
51
-
52
 |
 |
