GE GTS18FBSCC Use and Care Manual - Page 5
About the temperature control dial., About the fresh food compartment shelves., Consumer Support - model
 |
UPC - 084691125280
View all GE GTS18FBSCC manuals
Add to My Manuals
Save this manual to your list of manuals |
Page 5 highlights
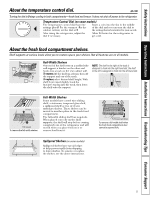
Safety Instructions Operating Instructions Installation Instructions Troubleshooting Tips Consumer Support About the temperature control dial. ge.com Turning the dial to 0 stops cooling in both compartments-fresh food and freezer. It does not shut off power to the refrigerator. Temperature Control Dial (on some models) The temperature control dial has nine settings plus 0. 1 is the warmest. 9 is the coldest. At first, set the dial at 5. Insert a coin into the slot in the middle of the dial and you can turn the dial to the setting that is best suited to your needs. After using the refrigerator, adjust the Allow 24 hours for the refrigerator to dial if necessary. get cold. About the fresh food compartment shelves. Shelf supports at various levels allow you to custom-space your shelves. Not all features are on all models. 2 Lift up and out 1 Tilt up Half-Width Shelves One end of the shelf rests on a molded sidewall support; a bracket on the other end hooks into a track on the rear cabinet wall. To remove, lift the shelf up at front, then off the support and out of the track. To replace, select desired shelf height. With shelf front raised slightly, hook the bracket's top lug into the track, then lower the shelf onto the support. NOTE: The shelf to the right of the track is designed to hook into the right-hand slot; the shelf to the left is designed to hook into the left-hand slot. Lift rear Pull forward To remove the full-width shelves Full-Width Shelves Some models have a steel wire sliding shelf, a stationary tempered glass shelf, a spillproof shelf or two steel wire stationary shelves. These shelves can be moved to another place in the fresh food compartment. The full-width sliding shelf has stop-locks. When placed correctly on the shelf supports, the shelf will stop before coming completely out of the refrigerator and will not tilt when you place food on it or remove food from it. Lift rear Pull forward and down To remove a full-width shelf when the fresh food compartment door cannot be opened fully Spillproof Shelves (on some models) Spillproof shelves have special edges to help prevent spills from dripping to lower shelves. To remove or replace the shelves, see the above instructions. 5
-
 1
1 -
 2
2 -
 3
3 -
 4
4 -
 5
5 -
 6
6 -
 7
7 -
 8
8 -
 9
9 -
 10
10 -
 11
11 -
12
-
13
-
14
-
15
-
16
-
17
-
18
-
19
-
20
-
21
-
22
-
23
-
24
 |
 |
