GE GTS18JCPCC Use and Care Manual
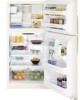
GE GTS18JCPCC - 18.0 cu. Ft. Top-Freezer Refrigerator Manual
 |
UPC - 084691080282
View all GE GTS18JCPCC manuals
Add to My Manuals
Save this manual to your list of manuals |
GE GTS18JCPCC manual content summary:
- GE GTS18JCPCC | Use and Care Manual - Page 1
and Cleaning 8, 9 Replacing the Light Bulbs 9 Installation Instructions Preparing to Install the Refrigerator 10 Reversing the Door Swing 14-18 Water Line Installation 11-14 Troubleshooting Tips 19-21 Normal Operating Sounds 19 Consumer Support Consumer Support Back Cover Performance Data - GE GTS18JCPCC | Use and Care Manual - Page 2
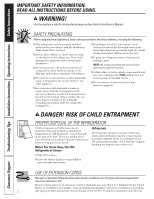
Consumer Support Troubleshooting Tips Installation Instructions Operating Instructions Safety Instructions IMPORTANT SAFETY INFORMATION. READ ALL INSTRUCTIONS BEFORE USING. WARNING! Use this appliance only for its intended purpose as described in this Owner's Manual. SAFETY PRECAUTIONS When using - GE GTS18JCPCC | Use and Care Manual - Page 3
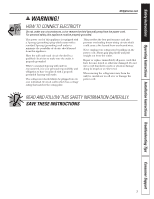
Safety Instructions Operating Instructions Installation Instructions Troubleshooting Tips Consumer Support GEAppliances.com WARNING! HOW TO CONNECT ELECTRICITY Do not, under any circumstances, cut or remove the third (ground) prong from the power cord. For personal safety, this appliance must be - GE GTS18JCPCC | Use and Care Manual - Page 4
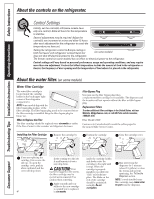
Consumer Support Troubleshooting Tips Installation Instructions Operating Instructions Safety Instructions About the controls on the refrigerator. Control Settings Initially, set the control(s) at 5 (some models have only one control). Allow 24 hours for the temperature to stabilize. Several - GE GTS18JCPCC | Use and Care Manual - Page 5
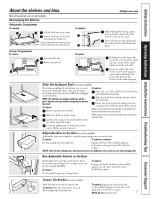
Safety Instructions Operating Instructions Installation Instructions Troubleshooting Tips Consumer Support About the shelves and bins. Not all features are on all models. Rearranging the Shelves Refrigerator Compartment To remove: Tilt the shelf up at the front. Lift the shelf up at the back and - GE GTS18JCPCC | Use and Care Manual - Page 6
Support Troubleshooting Tips Installation Instructions Operating Instructions Safety Instructions About the crispers and pans. Not all features are on all models out. In some cases, when you roll the refrigerator out, you will need to move the refrigerator to the left or right as you roll it out - GE GTS18JCPCC | Use and Care Manual - Page 7
Installation Instructions Troubleshooting Tips Consumer Support About the automatic icemaker. A newly-installed refrigerator may take 12-24 hours to begin making ice. GEAppliances.com There are 2 types of icemakers: Power Switch Icemaker Green Power Light Feeler Arm Power switch model - GE GTS18JCPCC | Use and Care Manual - Page 8
Consumer Support Troubleshooting Tips Installation Instructions Operating Instructions Safety Instructions Care and cleaning of the refrigerator. Cleaning the Outside The door handles and trim. Clean with a cloth dampened with soapy water. Dry with a soft cloth. Keep the outside clean. Wipe with a - GE GTS18JCPCC | Use and Care Manual - Page 9
Safety Instructions Operating Instructions Installation Instructions Troubleshooting Tips Consumer Support GEAppliances.com Preparing for Vacation For long vacations or absences, remove food and unplug the refrigerator. Move the refrigerator control to the 0 (off) position and clean the interior - GE GTS18JCPCC | Use and Care Manual - Page 10
to Installer - Be sure to leave these instructions with the Consumer. • Note to Consumer - Keep these instructions for future reference. • Skill level - Installation of this appliance requires basic mechanical skills. • Completion time - Refrigerator Installation 15 minutes Reversing the Door Swing - GE GTS18JCPCC | Use and Care Manual - Page 11
Installation Instructions INSTALLING THE WATER LINE (ON SOME MODELS) BEFORE YOU BEGIN Recommended copper water supply kits are WX8X2, WX8X3 or WX8X4, depending on the amount of tubing you need. Approved plastic water supply lines are GE SmartConnect™ Refrigerator Tubing (WX08X10006, WX08X10015 and - GE GTS18JCPCC | Use and Care Manual - Page 12
Instructions INSTALLING THE WATER LINE (CONT.) Install the shutoff valve on the nearest frequently used drinking water line. 1 SHUT OFF THE MAIN WATER SUPPLY AND UNPLUG REFRIGERATOR nut securely. For plastic tubing from a GE SmartConnect™ Refrigerator Tubing kit, insert the molded end of - GE GTS18JCPCC | Use and Care Manual - Page 13
Instructions 7 CONNECT THE TUBING TO THE REFRIGERATOR NOTES: • Before making the connection to the refrigerator, be sure the refrigerator a GE SmartConnect™ Refrigerator Tubing REFRIGERATOR (CONT.) One of the illustrations below will look like the connection on your refrigerator. Icemaker Models - GE GTS18JCPCC | Use and Care Manual - Page 14
the instructions all the way through before starting. • Handle parts carefully to avoid scratching paint. • Set screws down by their related parts to side, follow these same instructions and reverse all references to left and right. Unplug the refrigerator from its electrical outlet. Empty all door - GE GTS18JCPCC | Use and Care Manual - Page 15
Instructions the door on a non-scratching surface with the inside up. 2 REMOVE REFRIGERATOR DOOR Tape the door shut with masking tape. Remove the center hinge pin stuck to the bottom of the door. Plastic Washer Hinge Bracket For models with a base grille, before replacing the base grille, remove the - GE GTS18JCPCC | Use and Care Manual - Page 16
Instructions be used when installing the hinge on the other side. On some models, you will need to remove the colormatched caps from the screw heads right side and move the plug button to the left side of the refrigerator door. 3 Plug Button After removing the handle: Move the small plug - GE GTS18JCPCC | Use and Care Manual - Page 17
Instructions 7 TRANSFER REFRIGERATOR the left side. 3 Plug Button 2 Stainless steel handle (on some models): Remove the two screws holding the handle to the bottom of the door ). Transfer the fastener to the right side and move the GE badge to the left side of the freezer door. Remove - GE GTS18JCPCC | Use and Care Manual - Page 18
steel handle 1 (on some models): Attach the handle to the fastener and tighten with the 3/32″ Allen wrench (supplied). Line up the handle with the screw holes in 2 the bottom of the door and tighten the screws. 9 RE-HANG THE REFRIGERATOR DOOR Lower the refrigerator door onto the bottom - GE GTS18JCPCC | Use and Care Manual - Page 19
the About the automatic icemaker section. Before you call for service... Troubleshooting Tips Save time and money! Review the charts on the following pages first and you may not need to call for service. Problem Freezer door pops open when refrigerator door is closed Door does not close by itself - GE GTS18JCPCC | Use and Care Manual - Page 20
Support Troubleshooting Tips Installation Instructions Operating Instructions Safety Instructions Before you call for service... Problem Motor operates for long periods or cycles on and off frequently (Modern refrigerators to refrigerator. Interior needs cleaning. No power at outlet. Light bulb - GE GTS18JCPCC | Use and Care Manual - Page 21
than the refrigerator door bins. Some models do not have a freezer light. Light bulb burned out or loose. Some models do not have lighted controls. Refrigerator light bulb burned system. 21 Safety Instructions Operating Instructions Installation Instructions Troubleshooting Tips Consumer Support - GE GTS18JCPCC | Use and Care Manual - Page 22
Consumer Support Troubleshooting Tips Installation Instructions Operating Instructions Safety Instructions Notes. 22 - GE GTS18JCPCC | Use and Care Manual - Page 23
Please place in envelope and mail to: Veuillez mettre dans une enveloppe et envoyez à : OWNERSHIP REGISTRATION P.O. BOX 1780 MISSISSAUGA, ONTARIO L4Y 4G1 (FOR CANADIAN CONSUMERS ONLY) ✁ Cut here 23 - GE GTS18JCPCC | Use and Care Manual - Page 24
✁ Cut here 24 - GE GTS18JCPCC | Use and Care Manual - Page 25
GE and All Other Brands: One (1) Year One (1) Year TERMS AND CONDITIONS: This warranty applies only for single family domestic use in Canada when the Refrigerator has been properly installed according to the instructions supplied by Mabe and is connected to an adequate and proper utility service - GE GTS18JCPCC | Use and Care Manual - Page 26
Consumer Support Troubleshooting Tips Installation Instructions Operating Instructions Safety Instructions Refrigerator Warranty. (For customers in the United States) All warranty service provided by our Factory Service Centers, or an authorized Customer Care® technician. To schedule service, - GE GTS18JCPCC | Use and Care Manual - Page 27
General Installation/Operation/Maintenance Requirements ■ Flush new cartridge at full flow for 3 minutes to purge out trapped air. ■ Replace cartridge when flow becomes too slow. Special Notices ■ Installation instructions, parts and service : General Electric Company, Louisville, KY 40225 NSF® 27 - GE GTS18JCPCC | Use and Care Manual - Page 28
State of California Department of Health Services Water Treatment Device Certificate Number 03 - 1559 Date Issued: April 28, 2003 Trademark/Model Designation GE GSWF Manufacturer: General Electric Consumer Products Replacement Elements GSWF The water treatment device(s) listed on this certificate - GE GTS18JCPCC | Use and Care Manual - Page 29
placer votre réfrigérateur, conformément aux Instructions d'installation avant de l'utiliser. ■ Ne Nous vous recommandons fortement de faire accomplir tout service par un technicien qualifié. ■ Vous ne coupez dégelé. DANGER! RISQUE DE PRISE AU PIÈGE D'ENFANT BONNE MISE AU REBUT DE VOTRE RÉFRIG - GE GTS18JCPCC | Use and Care Manual - Page 30
IMPORTANTES DE SÉCURITÉ. LISEZ TOUTES LES INSTRUCTIONS AVANT D'UTILISER VOTRE RÉFRIGÉRATEUR. AVERTISSEMENT! BRANCHEMENT ÉLECTRIQUE Ne coupez ou n' . LISEZ ET SUIVEZ SOIGNEUSEMENT CES MESURES DE SÉCURITÉ. CONSERVEZ CES INSTRUCTIONS Installation Conseils de dépannage Soutien au consommateur 30 - GE GTS18JCPCC | Use and Care Manual - Page 31
de filtre. Filtres de remplacement Pour commander des cartouches de filtre supplémentaires aux États-Unis, visitez notre site Web, GEAppliances.com, ou appelez le service de pièces et d'accessoires GE au numéro 1.800.661.1616. Modèle de filtre GSWF Au Canada, nos clients trouveront le centre de - GE GTS18JCPCC | Use and Care Manual - Page 32
Mesures de sécurité Les clayettes et les bacs. Tous les modèles n'ont pas toutes ces caractéristiques. Disposition des clayettes Fonctionnement Installation Compartiment réfrigération Enlèvement : Soulevez la clayette à l'avant. Soulevez la clayette à l'arrière et faites-la sortir. Certains - GE GTS18JCPCC | Use and Care Manual - Page 33
, puis le cadre. Quand vous remettez en place le verre, poussez l'arête devant fort dans le cadre. Soulevez l'arrière du couvercle des supports, faites glisser le couvercle à l'arrière, basculez-le et enlevez-le. Pour enlever le cadre : Soulevez l'avant du cadre, tirez-le vers l'avant, basculez - GE GTS18JCPCC | Use and Care Manual - Page 34
Précisez le numéro de pièce WR97X0214. Cette trousse a des instructions complètes d'installation. L'installation se fait à l'aide du tuyau d'eau en matière plastique approuvés par GE sont ceux qui sont fournis dans les trousses GE SmartConnect™ Refrigerator Tubing. N'utilisez jamais un autre tuyau - GE GTS18JCPCC | Use and Care Manual - Page 35
d'eau de javel ou des produits contenant chlore pour les portes et les poignées en acier inoxydable. Pour de meilleurs résultats, GE recommande l'utilisation du nettoyant pour acier inoxydable PM10X311 avec le chiffon à lustrer WX10X307 ou encore, par commodité, les lingettes nettoyantes pour acier - GE GTS18JCPCC | Use and Care Manual - Page 36
Mesures de sécurité Fonctionnement Installation Soins et nettoyage de votre réfrigérateur. Préparation de départ en vacances Pour de longues vacances ou absences, enlevez tous vos aliments et débranchez votre réfrigérateur. Mettez le bouton de réglage du compartiment congé - GE GTS18JCPCC | Use and Care Manual - Page 37
d'eau froide. Vous pouvez acheter une trousse d'alimentation d'eau GE (contenant la tuyauterie, le robinet d'arrêt, les joints et les instructions) chez votre revendeur ou en vous adressant à notre site Web à l'adresse www.electromenagersge.ca ou à notre service de Pièces et accessoires au numéro de - GE GTS18JCPCC | Use and Care Manual - Page 38
CE DONT VOUS AUREZ BESOIN • Tuyaux en cuivre ou trousse GE SmartConnect™ Refrigerator Tubing, diamètre extérieur de 0,63 cm (1/4″) pour alimentation d'eau GE (contenant un tuyau, un robinet d'arrêt et les joints énumérés ci-dessous) chez votre distributeur local ou en le commandant au service de pi - GE GTS18JCPCC | Use and Care Manual - Page 39
Instructions d'installation Installez le robinet d'arrêt sur la canalisation d'eau potable le robinet. Serrez fort l'écrou de compression. Pour le tuyau en matière plastique d'une trousse GE SmartConnect™ Refrigerator Tubing, insérez l'extrémité moulée du tuyau dans le robinet d'arrêt et serrez l'é - GE GTS18JCPCC | Use and Care Manual - Page 40
Instructions d'installation INSTALLATION DE LA CONDUITE D'EAU (SUITE) 7 BRANCHEZ LE TUYAU À le tuyau, serrez le raccord. Si vous utilisez un tuyau en matière plastique d'une trousse GE SmartConnect™ Refrigerator Tubing, insérez l'extrémité moulée du tuyau dans le robinet d'arrêt et serrez l'é - GE GTS18JCPCC | Use and Care Manual - Page 41
Instructions d'installation 9 BRANCHEZ VOTRE RÉFRIGÉRATEUR Disposez la spirale de tuyau en cuivre de manière à ce qu'elle ne vibre pas contre l'arrière de - GE GTS18JCPCC | Use and Care Manual - Page 42
Instructions d'installation INVERSION DU SENS D'OUVERTURE DES PORTES (SUITE) 1 ENLEVEZ LA et en tirant son bas directement vers vous. À l'aide du tournevis à tête de force, faites passer le support de la charnière inférieure et la rondelle en matière plastique du côté droit au côté gauche. NOTE : - GE GTS18JCPCC | Use and Care Manual - Page 43
Instructions d'installation 5 FAITES PASSER LE SUPPORT DE CHARNIÈRE CENTRALE À GAUCHE Enlevez le support de charnière centrale en dévissant les trois vis dynamométriques. NOTE : Conservez ces vis avec le support de charnière. Ce sont de longues vis que vous utiliserez pour mettre la charnière de l' - GE GTS18JCPCC | Use and Care Manual - Page 44
Instructions d'installation INVERSION DU SENS D'OUVERTURE DES PORTES (SUITE) 7 à six pans de 3/16 po (fournie). Faites passer la fixation jusqu'au côté droit et amenez l'insigne GE jusqu'au côté gauche de la porte du compartiment congélation. Enlevez le papier qui recouvre l'envers adhésif - GE GTS18JCPCC | Use and Care Manual - Page 45
Instructions d'installation 8 FAITES PASSER LA POIGNÉE DE PORTE DU COMPARTIMENT CONGÉLATION À DROITE ( de la charnière inférieure. Rondelle en matière plastique Redressez la porte et alignez-la au support de la charnière centrale. Montez à nouveau l'axe de la charnière centrale avec le tourne-écrou - GE GTS18JCPCC | Use and Care Manual - Page 46
Mesures de sécurité Bruits normaux de fonctionnement. Fonctionnement Les réfrigérateurs plus récents font des bruits différents de ceux des anciens. Les réfrigérateurs modernes présentent plus de fonctions et sont plus avancés sur le plan technologique. Entendez-vous ce que j'entends ? Ces bruits - GE GTS18JCPCC | Use and Care Manual - Page 47
Mesures de sécurité www.electromenagersge.ca Fonctionnement Installation Problème Vibrations ou bruits de casse (une petite vibration est normale) Le moteur fonctionne pendant de longues périodes ou se met en marche et s'arrête fréquemment (Les réfrigérateurs modernes, qui ont davantage d'espace - GE GTS18JCPCC | Use and Care Manual - Page 48
Mesures de sécurité Fonctionnement Avant d'appeler un réparateur... En cas de panne Problème Le réfrigérateur sent De l'humidité se forme à l'intérieur (quand il fait humide, l'air transporte de l'humidité à l'intérieur du réfrigérateur quand vous ouvrez les portes) La lumière de compartiment ré - GE GTS18JCPCC | Use and Care Manual - Page 49
Mesures de sécurité Fonctionnement Problem La lumière du compartiment congélation ne s'allume réfrigération et attendez 24 heures. Si l'eau ne coule pas du distributeur près 24 heures, appelez le service. La conduite d'eau ou le robinet d'arrêt est bouché. • Appelez un plombier. Le filtre à eau - GE GTS18JCPCC | Use and Care Manual - Page 50
GE et toutes autre marques : Un (1) an Un (1) an Un (1) an Un (1) an TERMES ET CONDITIONS : La présente garantie ne s'applique qu'à l'utilisation domestique par une seule famille au Canada, lorsque le réfrigérateur a été installé conformément aux instructions pour obtenir un service dans le cadre - GE GTS18JCPCC | Use and Care Manual - Page 51
Cartouche GSWF du système de Filtration d'eau GE SmartWater Ce système a été essayé selon éciaux ■ Les directives d'installation, la disponibilité de pièces et de service ainsi que la garantie standard sont expédiées avec le produit. ■ pour : General Electric Company, Louisville, KY 40225 NSF® 51 - GE GTS18JCPCC | Use and Care Manual - Page 52
par Internet au site www.electromenagersge.ca 24 heures par jour, tous les jours de l'année. Service de réparations Service de réparations GE est tout près de vous. Pour faire réparer votre électroménager GE, il suffit de nous téléphoner. 1.800.561.3344 Studio de conception réaliste Sur demande - GE GTS18JCPCC | Use and Care Manual - Page 53
fin para el cual fue diseñado como se describe en este Manual del propietario. PRECAUCIONES DE SEGURIDAD Al usar aparatos eléctricos, se evite el contacto con las partes en movimiento del mecanismo eyector, o con el elemento calefactor localizado en la parte inferior del dispositivo para hacer - GE GTS18JCPCC | Use and Care Manual - Page 54
Información de seguridad Instrucciones de operación IMPORTANTE INFORMACIÓN DE SEGURIDAD. LEA TODAS LAS INSTRUCCIONES ANTES DE SU USO. ¡ADVERTENCIA! CÓMO CONECTAR LA ELECTRICIDAD Bajo ninguna circunstancia, no corte ni retire la tercera pata (conexión a tierra) del cable de electricidad. Por - GE GTS18JCPCC | Use and Care Manual - Page 55
ón de bypass del filtro. Filtros de reemplazo Para ordenar cartuchos en Estados Unidos, visite nuestra Web, GEAppliances.com, o llame al Departamento de partes y accesorios de GE al 1.800.661.1616. Modelo del filtro GSWF Los clientes en Canadá deben consultar las páginas amarillas para su Centro de - GE GTS18JCPCC | Use and Care Manual - Page 56
pestañas estén por encima del marco del estante. Continúe halando el estante hacia adelante hasta que se pueda retirar. Para reemplazarlo: Coloque la parte posterior del estante en el marco del estante detrás de la barra frontal. Deslice el estante hacia atrás hasta que las pestañas estén encima - GE GTS18JCPCC | Use and Care Manual - Page 57
posterior de la cubierta de los soportes, deslice la cubierta hacia atrás, inclínela y retírela. Para retirar el marco: Levante la parte delantera del marco, tire el marco hacia adelante, inclínelo y retírelo. Sobre las características adicionales. No todas las características están presentes - GE GTS18JCPCC | Use and Care Manual - Page 58
de hielos que está disponible por un costo adicional. Revise en la parte posterior del refrigerador en busca del kit para la máquina de hielos espec que está incluida en su kit de tubería para el refrigerador SmartConnect™ de GE. Cuando use una tubería plástica, se debe ordenar un pedazo de tubería - GE GTS18JCPCC | Use and Care Manual - Page 59
y manijas de acero inoxidable. Para obtener los mejores resultados, GE le recomienda el uso del producto de limpieza para acero inoxidable de la rejilla entre en cada uno de los orificios ovalados. Luego empuje la parte de abajo de la rejilla hacia adelante hasta que alcance su lugar. Cómo limpiar - GE GTS18JCPCC | Use and Care Manual - Page 60
modelos sólo tienen una luz. PRECAUCIÓN: Las bombillas podrían estar calientes. Desconecte el refrigerador. Las bombillas están ubicadas en la parte superior del compartimiento del refrigerador, cerca de la abertura. Reemplácela con una bombilla de electrodomésticos del mismo o de inferior voltaje - GE GTS18JCPCC | Use and Care Manual - Page 61
para la Instalación Modelo 18 Si tiene preguntas, llame al 800.GE.CARES (800.432.2737) o bien visite nuestra página Web: dos patas de nivelación frontales en sentido de las agujas del reloj para levantar la parte frontal del refrigerador y en sentido contrario a las agujas del reloj para bajarla. - GE GTS18JCPCC | Use and Care Manual - Page 62
local de plomería. QUÉ NECESITA (CONT.) • Un kit de suministro de agua de GE (contiene tubería, válvula de cierre y accesorios enumerados abajo) está disponible a un costo adicional en su tienda o por medio de Partes y Accesorios, 1.800.661.1616. • Un suministro de agua fría. La presión del agua - GE GTS18JCPCC | Use and Care Manual - Page 63
horizontal de agua, haga la conexión en la parte superior o al lado, en vez de hacerlo en la parte de abajo, para evitar retirar cualquier sedimento de la de plástico de un kit de tubería para el refrigerador SmartConnect™ de GE, inserte el extremo moldeado de la tubería en la válvula de cierre y - GE GTS18JCPCC | Use and Care Manual - Page 64
instalar un filtro de agua si su suministro de agua tiene arena o partículas que podrían obstruir la malla de la válvula de agua del como se muestra. En el kit de tubería para el refrigerador SmartConnect™ de GE, las tuercas ya vienen armadas con la tubería. Inserte el extremo de la tubería - GE GTS18JCPCC | Use and Care Manual - Page 65
Instrucciones para la instalación 9 CONECTE EL REFRIGERADOR Organice el cable de la tubería de manera que no vibre contra la parte trasera del refrigerador o contra la pared. Empuje el refrigerador hacia la pared. INICIE LA MÁQUINA DE HIELOS En los modelos de interruptor de energía, fije - GE GTS18JCPCC | Use and Care Manual - Page 66
del centro. Ponga la puerta en una superficie que no se raye con la parte exterior hacia arriba. 2 RETIRE LA PUERTA DEL REFRIGERADOR Cierre la puerta y pé los orificios ovalados asegurando que una las pestañas plásticas en la parte posterior de la rejilla entre en cada uno de los orificios ovalados. - GE GTS18JCPCC | Use and Care Manual - Page 67
dos tornillos que 2 Tapa de la manija sostienen la manija con la parte alta de la puerta. 1 Tapa de la manija Manija de acero la manija: Mueva los botones de tapa pequeños del costado superior derecho de la parte superior de la puerta e insértelos en los orificios del lado opuesto. Botones de - GE GTS18JCPCC | Use and Care Manual - Page 68
Manija plástica: 1 Retire los tornillos que sostienen la manija con la parte superior e inferior de la puerta. Retire la manija. Mueva el bot ″ (suministrado). Transfiera el sujetador al lado derecho y mueva el emblema GE al lado izquierdo de la puerta del congelador. Remueva el papel que - GE GTS18JCPCC | Use and Care Manual - Page 69
manija al sujetador y apriete con la llave Allen de 3/32″ (suministrado). Alinee la manija 2 con los agujeros de los tornillos en la parte inferior de la puerta y apriete los tornillos. 9 VUELVA A COLGAR LA PUERTA DEL REFRIGERADOR Baje la puerta del refrigerador al sujetador de la bisagra - GE GTS18JCPCC | Use and Care Manual - Page 70
Información de seguridad Instrucciones de operación Sonidos normales de operación. Los refrigeradores más nuevos producen sonidos diferentes a los modelos más antiguos. Los refrigeradores modernos tienen más funciones y usan tecnología más reciente. ¿Usted escucha lo que yo escucho? Estos sonidos - GE GTS18JCPCC | Use and Care Manual - Page 71
ón Rodillos y patas de nivelación. Instrucciones de operación Instrucciones para la instalación Consejos para la solución de problemas El motor opera con frecuencia por largos periodos o ciclos de forma intermitente (Los refrigeradores modernos con más espacio de almacenamiento y un congelador - GE GTS18JCPCC | Use and Care Manual - Page 72
Información de seguridad Instrucciones de operación Instrucciones para la instalación Antes de llamar a solicitar servicio... Problema Cubos pequeños o huecos La máquina de hielos automática no funciona (en algunos modelos) Los cubos de hielo tienen olor / sabor Congelamiento lento de los cubos - GE GTS18JCPCC | Use and Care Manual - Page 73
un sabor/olor malo El agua en el primer vaso está tibia Posibles causas Qué hacer Motor de enfriamiento normal del flujo del aire. En el proceso de refrigeración, es normal que salga calor de la parte inferior del refrigerador. Algunas cubiertas de piso son sensibles y se decolorarán ante estas - GE GTS18JCPCC | Use and Care Manual - Page 74
Información de seguridad Instrucciones de operación Antes de llamar a solicitar servicio... Consejos para la solución de problemas Problema El dispensador de agua no funciona El agua chorrea del dispensador El agua no es dispensada pero la máquina de hielos está trabajando No sale agua y el - GE GTS18JCPCC | Use and Care Manual - Page 75
Notas. GEAppliances.com Información de seguridad Instrucciones de operación Instrucciones para la instalación Consejos para la solución de problemas Soporte al consumidor 75 - GE GTS18JCPCC | Use and Care Manual - Page 76
Notas. 76 Soporte al consumidor sTorlouCucobinólsenesdjhoeosopptriaonrbgaleTlamipass Instrucciones para la instalación Instrucciones de operación Información de seguridad - GE GTS18JCPCC | Use and Care Manual - Page 77
producto está situado en un área que no dispone de servicio por parte de un proveedor de servicio autorizado de GE, podría tener que hacerse cargo de los costes de envío o consumidor local o la oficina del Attorney General en su localidad. Garante: General Electric Company. Louisville, KY 40225 77 - GE GTS18JCPCC | Use and Care Manual - Page 78
Hoja de Datos de Funcionamiento Sistema de Filtración GE SmartWater Cartucho GSWF Este sistema se ha sometido a cloro, sabor y olor, partículas Clase I, y contra norma 53 para la reducción de quistes, plomo, Lindane, Atrazine y turbidez. Hecho por General Electric, Appliance Park, Louisville, KY - GE GTS18JCPCC | Use and Care Manual - Page 79
GE Appliances 24 horas al día, cualquier día del año! Para mayor conveniencia y servicio más rápido, ya puede descargar los Manuales horas normales de oficina. GE Consumer Home Services estará aún ahí cuando íbanos a: General Manager, Customer Relations GE Appliances, Appliance Park Louisville, - GE GTS18JCPCC | Use and Care Manual - Page 80
Support. GE Appliances Website GEAppliances.com In the U.S.: www.Hotpoint.com Have a question or need assistance with your appliance? Try the GE Appliances Website 24 hours a day, any day of the year! For greater convenience and faster service, you can now download Owner's Manuals, order parts
-
 1
1 -
 2
2 -
 3
3 -
 4
4 -
 5
5 -
 6
6 -
 7
7 -
8
-
9
-
10
-
11
-
12
-
13
-
14
-
15
-
16
-
17
-
18
-
19
-
20
-
21
-
22
-
23
-
24
-
25
-
26
-
27
-
28
-
29
-
30
-
31
-
32
-
33
-
34
-
35
-
36
-
37
-
38
-
39
-
40
-
41
-
42
-
43
-
44
-
45
-
46
-
47
-
48
-
49
-
50
-
51
-
52
-
53
-
54
-
55
-
56
-
57
-
58
-
59
-
60
-
61
-
62
-
63
-
64
-
65
-
66
-
67
-
68
-
69
-
70
-
71
-
72
-
73
-
74
-
75
-
76
-
77
-
78
-
79
-
80
 |
 |
GEAppliances.com
Refrigerators
Top-Freezer
197D3354P013
49-60511-1
05-09 JR
Safety Instructions
. . . . . . . . . . . .
2–3
Operating Instructions
Additional Features . . . . . . . . . . . . . . . . .6
Automatic Icemaker . . . . . . . . . . . . . . . .7
Controls . . . . . . . . . . . . . . . . . . . . . . . . . .4
Crispers and Pans . . . . . . . . . . . . . . . . . .6
Dispenser . . . . . . . . . . . . . . . . . . . . . . . . .7
Shelves and Bins . . . . . . . . . . . . . . . . . . .5
Water Filter . . . . . . . . . . . . . . . . . . . . . . .4
Care and Cleaning
Care and Cleaning
. . . . . . . . . . . . . . .8, 9
Replacing the Light Bulbs . . . . . . . . . . .9
Installation Instructions
Preparing to Install
the Refrigerator . . . . . . . . . . . . . . . . . . .10
Reversing the Door Swing
. . . . . . .14–18
Water Line Installation . . . . . . . . . .11–14
Troubleshooting Tips
. . . . . . .
19–21
Normal Operating Sounds . . . . . . . . . .19
Consumer Support
Consumer Support . . . . . . . . .Back Cover
Performance Data Sheet
. . . . . . . . . . .27
Product Registration
for Canadian Customers . . . . . . . . .23, 24
State of California Water
Treatment Device Certificate . . . . . . . .28
Warranty for
Canadian Customers . . . . . . . . . . . . . . .25
Warranty for U.S. Customers . . . . . . . .26
Réfrigérateurs
Congélateur supérieur
Refrigeradores
Congelador superior
Model 18
Manuel d’utilisation
et d’installation
Owner’s Manual and
Installation Instructions
Manual del propietario
e instalación
La section française commence à la page 29
La sección en español empieza en la página 53
Nota al instalador –
Asegúrese de
dejar estas instrucciones con el consumidor.
Nota al consumidor –
Conserve
estas instrucciones para referencia futura.
Write the model and serial numbers here:
Model #
__________________________
Serial #
__________________________
Find these numbers on the gray label
on the left side, near the top of the
refrigerator compartment.
Refrigerators
Top-Freezer
Note to Installer –
Be sure to leave
these instructions with the Consumer.
Note to Consumer –
Keep these
instructions for future reference.
Note à l’installateur –
Assurez-vous de
laisser ces instructions au consommateur.
Note au consommateur –
Conservez
ces instructions pour référence future.
Instructions de sécurité
. . . .
29–30
Instructions de fonctionnement
Bacs à légumes . . . . . . . . . . . . . . . . .33
Caractéristiques additionnelles . . . .33
Clayettes et bacs . . . . . . . . . . . . . . . .32
Distributeur . . . . . . . . . . . . . . . . . . . .34
Filtre à eau
. . . . . . . . . . . . . . . . . . . .31
Machine à glaçons automatique . . .34
Réglages
. . . . . . . . . . . . . . . . . . . . . .31
Soins et nettoyage
Remplacement des
ampoules électriques . . . . . . . . . . . .36
Soins et nettoyage . . . . . . . . . . . .35, 36
Instructions d’installation
Installation de la
conduite d’eau . . . . . . . . . . . . . .38–41
Inversion du sens
d’ouverture des portes . . . . . . . .41–45
Préparation à l’installation
du réfrigérateur
. . . . . . . . . . . . . . . .37
En cas de panne
. . . . . . . . .
46–49
Bruits normaux
de fonctionnement . . . . . . . . . . . . . .46
Soutien au consommateur
Feuillet de données relatives à la
performance de la cartouche . . . . . . .51
Garantie . . . . . . . . . . . . . . . . . . . . . . .50
Soutien au consommateur . . . . . . . .52
Información de seguridad
. . .
53–54
Instrucciones de operación
Características adicionales . . . . . . . . . . .57
Controles
. . . . . . . . . . . . . . . . . . . . . . . . .55
Dispensador . . . . . . . . . . . . . . . . . . . . . . .58
Estantes y compartimientos . . . . . . .56–57
Filtro de agua . . . . . . . . . . . . . . . . . . . . . .55
Gavetas de almacenamiento . . . . . . . . .57
Máquina de hielos automática . . . . . . .58
Cuidado y limpieza
Cómo reemplazar las bombillas . . . . . .60
Cuidado y limpieza . . . . . . . . . . . . . .59–60
Instrucciones para la instalación
Cómo invertir el vaivén de
la puerta . . . . . . . . . . . . . . . . . . . . . . .65–69
Instalación de la tubería
del agua
. . . . . . . . . . . . . . . . . . . . . . .62–65
Preparación para instalar
el refrigerador . . . . . . . . . . . . . . . . . . . . .61
Consejos para la solución
de problemas
. . . . . . . . . . . . . . .
70–74
Sonidos normales de operación . . . . . .70
Soporte al consumidor
Hoja de datos de funcionamiento . . . .78
Garantía . . . . . . . . . . . . . . . . . . . . . . . . . .77
Soporte al consumidor . . . . . . . . . . . . . .79
Escriba aquí el modelo y el número
de serie:
Modelo
# ________________________________
Serie #
__________________________________
Encuentre estos números en la etiqueta gris en
el lado izquierdo, cerca de la parte superior
del compartimiento del refrigerador.
Écrivez ici le numéro de modèle et le numéro de
série :
Modèle #
______________________________
Série #
________________________________
Vous trouverez ces numéros sur l’étiquette grise
située à gauche, près du haut du compartiment
réfrigérateur.