GE J1250 User Manual (English (5.2 MB)) - Page 87
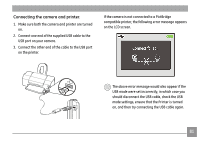
Print without date
 |
UPC - 810027015013
View all GE J1250 manuals
Add to My Manuals
Save this manual to your list of manuals |
Page 87 highlights
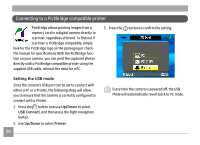
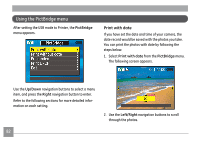
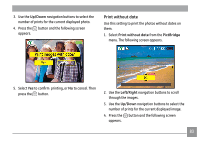
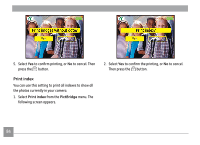
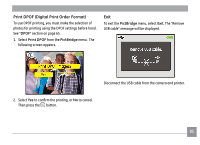
3. Use the Up/Down navigation buttons to select the number of prints for the current displayed photo. 4. Press the button and the following screen appears. Print without date Use this setting to print the photos without dates on them. 1. Select Print without date from the PictBridge menu. The following screen appears. 5. Select Yes to confirm printing, or No to cancel. Then press the button. 2. Use the Left/Right navigation buttons to scroll through the images. 3. Use the Up/Down navigation buttons to select the number of prints for the current displayed image. 4. Press the button and the following screen appears. 83
-
 1
1 -
2
-
3
-
4
-
5
-
6
-
7
-
8
-
9
-
10
-
11
-
12
-
13
-
14
-
15
-
16
-
17
-
18
-
19
-
20
-
21
-
22
-
23
-
24
-
25
-
26
-
27
-
28
-
29
-
30
-
31
-
32
-
33
-
34
-
35
-
36
-
37
-
38
-
39
-
40
-
41
-
42
-
43
-
44
-
45
-
46
-
47
-
48
-
49
-
50
-
51
-
52
-
53
-
54
-
55
-
56
-
57
-
58
-
59
-
60
-
61
-
62
-
63
-
64
-
65
-
66
-
67
-
68
-
69
-
70
-
71
-
72
-
73
-
74
-
75
-
76
-
77
-
78
-
79
-
80
-
81
-
 82
82 -
 83
83 -
 84
84 -
 85
85 -
 86
86 -
 87
87 -
 88
88 -
 89
89 -
 90
90 -
 91
91 -
 92
92 -
93
-
94
-
95
-
96
-
97
-
98
-
99
-
100
-
101
-
102
-
103
-
104
-
105
-
106
-
107
-
108
-
109
-
110
-
111
 |
 |

83
3. Use the
Up/Down
navigation buttons to select the
number of prints for the current displayed photo.
4. Press the
button and the following screen
appears.
5. Select
Yes
to confirm
printing, or
No
to cancel. Then
press the
button.
Print without date
Use this setting to print the photos without dates on
them.
1. Select
Print
without
date
from the
PictBridge
menu. The following screen appears.
2. Use the
Left/Right
navigation buttons to scroll
through the images.
3. Use the
Up/Down
navigation buttons to select the
number of prints for the current displayed image.
4. Press the
button and the following screen
appears.