GE JGBS23 Installation Instructions - Page 37
Seal The Openings, Electrical Connections Cont., Light The Pilots, Current Can/csa Z240/mh Mobile Home
 |
View all GE JGBS23 manuals
Add to My Manuals
Save this manual to your list of manuals |
Page 37 highlights
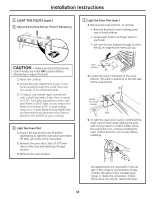
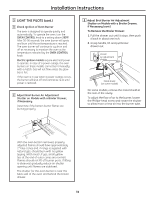
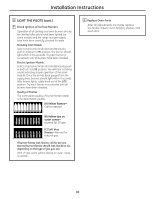
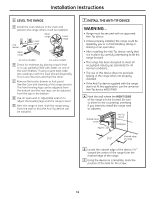
Installation Instructions 3 ELECTRICAL CONNECTIONS (cont.) When disconnecting the power cord from the adapter, always hold the adapter with one hand. If this is not done, the adapter ground terminal is very likely to break with repeated use. Should this happen, DO NOT USE the appliance until a proper ground has again been established. B Usage Situations where Appliance Power Cord will be Disconnected Frequently. Do not use an adapter plug in these situations because disconnecting of the power cord places undue strain on the adapter and leads to eventual failure of the adapter ground terminal. The customer should have the 2-prong wall receptacle replaced with a three-prong (grounding) receptacle by a qualified electrician before using the appliance. The installation of appliances designed for mobile home installation must conform with the Manufactured Home Construction and Safety Standard, Title 24 CFR, Part 3280 (formerly the Federal Standard for Mobile Home Construction and Safety, Title 24, HUD, Part 280) or, when such standard is not applicable, the Standard for Manufactured Home Installations, latest edition (Manufactured Home Sites, Communities and Set-Ups), ANSI A225.1, latest edition, or with local codes. In Canada, mobile home installation must be in accordance with the current CAN/CSA Z240/MH Mobile Home Installation Code. Electric Disconnect • Locate disconnect plug on the range back. • Pinch sides of connector and pull out of range back. 4 SEAL THE OPENINGS Seal any openings in the wall behind the range and in the floor under the range when hookups are completed. 5 LIGHT THE PILOTS (For models equipped with standing pilots. If the range is an electric ignition model, the burners are ignited by electric ignition which eliminates the need for standing pilot lights.) The range should be installed in its permanent position before any pilots are lit or adjusted. CAUTION - Make sure the surface burner control knobs are in the OFF position before attempting to light the pilots. A Light the Surface Burner Pilots 1. Raise the cooktop. 2. Light both pilots with a match. 3. To avoid pilot outage, use caution when closing cooktop after lighting pilots. 5/16″ NOTE: Do not leave standing pilot lit in a newly constructed or remodeled home or apartment that will be unoccupied for more than a month. Each pilot flame was adjusted at the factory to be approximately 5/16″ tall. A tinge of yellow appearing at the upper tip is normal. If you find pilot adjustment is necessary, follow instructions in Step B. 37
-
 1
1 -
2
-
3
-
4
-
5
-
6
-
7
-
8
-
9
-
10
-
11
-
12
-
13
-
14
-
15
-
16
-
17
-
18
-
19
-
20
-
21
-
22
-
23
-
24
-
25
-
26
-
27
-
28
-
29
-
30
-
31
-
 32
32 -
 33
33 -
 34
34 -
 35
35 -
 36
36 -
 37
37 -
 38
38 -
 39
39 -
 40
40 -
 41
41 -
 42
42 -
43
-
44
-
45
-
46
-
47
-
48
-
49
-
50
-
51
-
52
 |
 |
