GE JGRS06BEJBB Installation Instructions - Page 7
Installation Instructions, MAKE THE L.P. GAS CONVERSION
 |
UPC - 084691098799
View all GE JGRS06BEJBB manuals
Add to My Manuals
Save this manual to your list of manuals |
Page 7 highlights
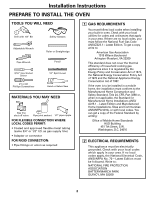
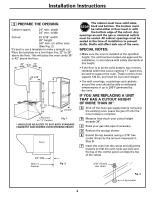
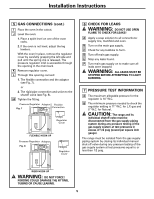
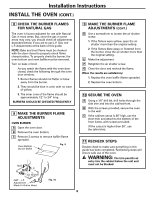
Installation Instructions MAKE THE L.P. GAS CONVERSION WARNING: If you are using L.P. (bottled) gas, all the adjustments described below must be made before you make any burner adjustments or use the oven. WARNING: This conversion must be performed by a qualified installer or gas supplier in accordance with the manufacturer's instructions and all codes and requirements of the authority having jurisdiction. Failure to follow instructions could result in serious injury or property damage. The qualified agency performing this work assumes responsibility for the conversion. NOTE: Disconnect all electrical power and turn off the gas supply at the shut-off valve before beginning the conversion. 2 ADJUST BURNER ORIFICE FROM NATURAL TO L.P. GAS CAUTION: The adjustments in the next column must be made before turning on the burners. Failure to do so could result in serious injury due to high flames and toxic fumes. A Open the oven door. B Remove the oven bottom. C Remove the oven baffle (flame spreader). Oven Bottom Burner Baffle 1 ADJUST PRESSURE REGULATOR FROM NATURAL GAS TO L.P. A Locate and remove regulator cover and wire clip. Pressure Regulator Adaptor Flexible Connection Remove Regulator Cover Remove Wire Clip B Locate the regulator and unscrew the cap. Cap Gasket Spring Retainer NAT. NAT. l..P. L.P. C Turn the retainer over so L.P. is showing on the bottom of the retainer. D Replace the cap. E Replace the regulator cover. 3 ADJUST OVEN BURNER Use a 1/2″ open end or adjustable wrench to turn the orifice hood in the L.P. direction, about 1 1/2 turns, until snug. NAT. L.P. Air Shutter NAT. - L.P. Adjustment Made To Orifice Hood IMPORTANT: Do not overtighten or you may bend the orifice hood or needle. 4 CHECK FLAME SIZE Check the inner cone of the flame. It should be approximately 1/2″ to 3/4″ long for the oven and broil burners. 1/2″ to 3/4″ If the flame size is too long, use a 1/2″ open end Inner Cone wrench or adjustable joint of Flame pliers to adjust the orifice hood, by turning in the natural direction. WARNING: If you attempt to measure the inner cone of the flame, please use caution; burns could result. 7
-
 1
1 -
 2
2 -
 3
3 -
 4
4 -
 5
5 -
 6
6 -
 7
7 -
 8
8 -
 9
9 -
 10
10 -
 11
11 -
 12
12 -
13
-
14
-
15
-
16
 |
 |
