GE PGSS5PJY Owners Manual - Page 20
Remove The Fresh Food, Door Handle, Remove The Top And Bottom, Freezer Drawer Handles, Cont.
 |
View all GE PGSS5PJY manuals
Add to My Manuals
Save this manual to your list of manuals |
Page 20 highlights
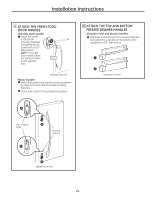
Installation Instructions INSTALLING THE REFRIGERATOR (cont.) 6 REMOVE THE FRESH FOOD DOOR HANDLE (For placement in the installation location or reversal of the handles - on some models) Stainless steel (on some models): A REMOVING THE DOOR HANDLE: Loosen the set screws with the 3/32″ Allen wrench and remove the handle. NOTE: For A Badge Double Door models, follow the same procedure on the opposite door. B Mounting Fasteners (appearance may vary) Plastic handle (on some models): A REMOVING THE DOOR HANDLE: Depress the tab on the underside of the handle and slide the handle up and off of the mounting fasteners. REVERSING THE DOOR HANDLE (on some models): B • Remove the handle mounting fasteners with a Badge 1/4″ Allen wrench and transfer the handle mounting A fasteners to the right side. Mounting • Remove the logo Fasteners badge. • Remove and transfer the plug (appearance may vary) button to the left side of the fresh food door. NOTE: Use a flat plastic edge to prevent damaging the door. Remove any adhesive on the door with a mild detergent. Remove the paper covering on the adhesive backing on the logo badge prior to carefully attaching the badge to the door. 7 REMOVE THE TOP AND BOTTOM FREEZER DRAWER HANDLES Stainless steel and plastic handles: A Loosen the set screws located on the underside of the handle with the 1/8″ Allen wrench and remove the handle. NOTE: If the handle mounting fasteners need to be tightened or removed, use a 1/4″ Allen wrench. A A 20
-
 1
1 -
2
-
3
-
4
-
5
-
6
-
7
-
8
-
9
-
10
-
11
-
12
-
13
-
14
-
 15
15 -
 16
16 -
 17
17 -
 18
18 -
 19
19 -
 20
20 -
 21
21 -
 22
22 -
 23
23 -
 24
24 -
 25
25 -
26
-
27
-
28
-
29
-
30
-
31
-
32
-
33
-
34
-
35
-
36
-
37
-
38
-
39
-
40
-
41
-
42
-
43
-
44
-
45
-
46
-
47
-
48
-
49
-
50
-
51
-
52
-
53
-
54
-
55
-
56
-
57
-
58
-
59
-
60
-
61
-
62
-
63
-
64
-
65
-
66
-
67
-
68
-
69
-
70
-
71
-
72
-
73
-
74
-
75
-
76
-
77
-
78
-
79
-
80
-
81
-
82
-
83
-
84
-
85
-
86
-
87
-
88
-
89
-
90
-
91
-
92
-
93
-
94
-
95
-
96
-
97
-
98
-
99
-
100
-
101
-
102
-
103
-
104
-
105
-
106
-
107
-
108
-
109
-
110
-
111
-
112
-
113
-
114
-
115
-
116
-
117
-
118
-
119
-
120
-
121
-
122
-
123
-
124
 |
 |
