GE PSB1200NWW Installation Instructions - Page 15
Install Mounting Screws, Finalize Installation, Install Bottom Trim, Install Bottom Trim With, - lighting
 |
UPC - 084691188780
View all GE PSB1200NWW manuals
Add to My Manuals
Save this manual to your list of manuals |
Page 15 highlights
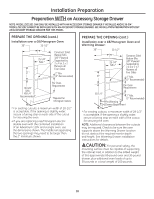
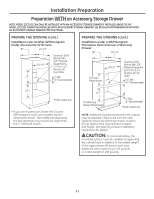
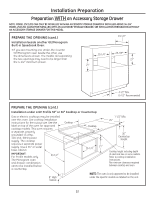
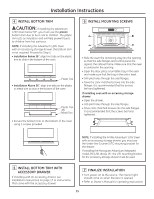
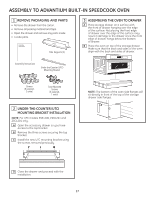
Installation Instructions 4 INSTALL BOTTOM TRIM CAUTION: If installing the Advantium 120V Oven below 36″, you must use the plastic bottom trim due to burn risk to children. The plastic trim acts as insulation and will help prevent burns to children from hot surfaces. NOTE: If installing the Advantium 120V Oven with an accessory storage drawer, the bottom trim is not required. Proceed to Step 5. • Installation Below 36″, align trim tabs on the plastic trim to slots in the bottom of the oven. Plastic Trim • Installation Above 36″, align trim tabs on the plastic or metal trim to slots in the bottom of the oven. Plastic Trim OR Metal Trim • Secure the bottom trim to the bottom of the oven using 3 screws provided. 6 INSTALL MOUNTING SCREWS • Slide the oven the remaining way into the opening so that the side flanges and control panel are against the cabinet frame. Make sure that the oven is centered in the opening. • Open the door, place a turntable tray in the oven and make sure that the tray in the unit is level. • Drill pilot holes through the side flanges. • Drive the color-matched screws into the side flanges. It is recommended that the screws be hand tightened. If installing oven with an accessory storage drawer: • Open the drawer. • Drill pilot holes through the side flanges. • Drive color-matched screws into the side flanges. It is recommended that the screws be hand tightened. NOTE: If installing the Profile Advantium 120V Oven with an accessory storage drawer, you must use the Under-the-Counter (UTC) mounting bracket for the drawer. If installing the Monogram Advantium integrated model ZSC1201 above 36″, the UTC mounting bracket for the accessory storage drawer must be used. 5 INSTALL BOTTOM TRIM WITH ACCESSORY DRAWER If installing with an accessory drawer, see installation instructions on page 17 or instructions that come with the accessory drawer. 7 FINALIZE INSTALLATION • Turn power on at the source. The interior light should come on when the door is opened. • Refer to Owner's Manual for operating instructions. 15
-
 1
1 -
2
-
3
-
4
-
5
-
6
-
7
-
8
-
9
-
 10
10 -
 11
11 -
 12
12 -
 13
13 -
 14
14 -
 15
15 -
 16
16 -
 17
17 -
 18
18 -
 19
19 -
 20
20
 |
 |
