Gigabyte B450 AORUS M RAID Setup Guide
Gigabyte B450 AORUS M Manual
 |
View all Gigabyte B450 AORUS M manuals
Add to My Manuals
Save this manual to your list of manuals |
Gigabyte B450 AORUS M manual content summary:
- Gigabyte B450 AORUS M | RAID Setup Guide - Page 1
2 A. Installing SATA hard drive(s) in your computer 2 B. Configuring SATA controller mode in BIOS Setup 3 C-1. UEFI RAID Configuration 4 C-2. Configuring Legacy RAID ROM 8 1-2 Installing the RAID/AHCI Driver and Operating System 12 A. Installing Windows 12 B. Rebuilding an Array 13 - 1 - - Gigabyte B450 AORUS M | RAID Setup Guide - Page 2
BIOS (Note 1) D. Install the RAID/AHCI driver and operating system Before you begin •• At least two SATA hard drives or SSDs (Note 2) (to ensure optimal performance, it is recommended that you use two hard drives with identical model and capacity). (Note 3) •• A Windows setup disk. •• Motherboard - Gigabyte B450 AORUS M | RAID Setup Guide - Page 3
the steps in "C-1." To enter the legacy RAID ROM, save the settings and exit BIOS Setup. Refer to "C-2" for more information. The BIOS Setup menus described in this section may differ from the exact settings for your motherboard. The actual BIOS Setup menu options you will see shall depend on the - Gigabyte B450 AORUS M | RAID Setup Guide - Page 4
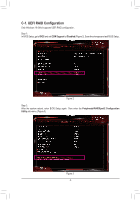
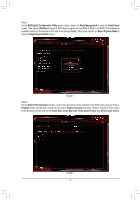
UEFI RAID Configuration Only Windows 10 64-bit supports UEFI RAID configuration. Step 1: In BIOS Setup, go to BIOS and set CSM Support to Disabled (Figure 2). Save the changes and exit BIOS Setup. Figure 2 Step 2: After the system reboot, enter BIOS Setup again. Then enter the Peripherals\RAIDXpert2 - Gigabyte B450 AORUS M | RAID Setup Guide - Page 5
Configuration Utility screen, press on Array Management to enter the Create Array screen. Then, select a RAID level (Figure 4). RAID levels supported include RAID 0, RAID 1, and RAID 10 (the selections available depend on the number of the hard drives being installed). Next, press - Gigabyte B450 AORUS M | RAID Setup Guide - Page 6
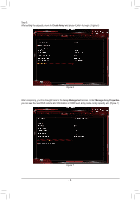
Step 5: After setting the capacity, move to Create Array and press to begin. (Figure 6) Figure 6 After completing, you'll be brought back to the Array Management screen. Under Manage Array Properties you can see the new RAID volume and information on RAID level, array name, array capacity, - Gigabyte B450 AORUS M | RAID Setup Guide - Page 7
Delete RAID Volume To delete a RAID array, select the array to be deleted on the RAIDXpert2 Configuration Utility\Array Management\Delete Array screen. Press on Delete Array to enter the Delete screen. Then set Confirm to Enabled and press on Yes (Figure 8). Figure 8 - 7 - - Gigabyte B450 AORUS M | RAID Setup Guide - Page 8
step and proceed with the installation of Windows operating system for a non-RAID configuration. Steps: In BIOS Setup, go to BIOS and set CSM Support to Enabled. Save the changes and exit BIOS Setup. After the POST memory test begins and before the operating system boot begins, look for a message - Gigabyte B450 AORUS M | RAID Setup Guide - Page 9
First, select a RAID mode and press . The selections available depend on the number of the hard drives being installed. Then follow the on-screen instructions to specify the array size. You can select All available space to use the maximum size allowed or use the up or down arrow key - Gigabyte B450 AORUS M | RAID Setup Guide - Page 10
to return to the previous screen. When completed, you will see the new array on the main screen (Figure 14). To exit the RAID BIOS utility, press and then press to confirm. AMD-RAID Array Configuration (Build: 8.1.0-00046) Creates an array from the connected disks Arrays 1----RAID0 - Gigabyte B450 AORUS M | RAID Setup Guide - Page 11
Deleting an Array The Delete Array(s) menu option allows for deletion of disk array assignments. Deleting an existing disk array could result in loss of data. Record all array information including the array type, the disk members, and stripe block size in case you wish to undo a deletion. 1. Select - Gigabyte B450 AORUS M | RAID Setup Guide - Page 12
Driver and Operating System With the correct BIOS settings, you are ready to install the operating system. A. Installing Windows As some operating systems already include RAID/AHCI driver, you do not need to install separate RAID/AHCI driver all required drivers from the motherboard driver disk using - Gigabyte B450 AORUS M | RAID Setup Guide - Page 13
is added to replace a failed drive to rebuild a RAID 1 array. While in the operating system, make sure the Chipset and RAID drivers have been installed from the motherboard driver disk. Then double-click the RAIDXpert2 icon on the desktop to launch the RAID utility. Step 1: Enter the login ID and
-
 1
1 -
 2
2 -
 3
3 -
 4
4 -
 5
5 -
 6
6 -
 7
7 -
8
-
9
-
10
-
11
-
12
-
13
 |
 |

- 1 -
Configuring a RAID Set (B450 Series)
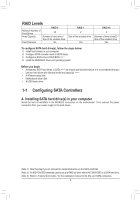
RAID Levels
.....................................................................................................................
2
1-1 Configuring SATA Controllers
....................................................................................
2
A. Installing SATA hard drive(s) in your computer
.......................................................
2
B. Configuring SATA controller mode in BIOS Setup
..................................................
3
C-1. UEFI RAID Configuration
....................................................................................
4
C-2. Configuring Legacy RAID ROM
..........................................................................
8
1-2 Installing the RAID/AHCI Driver and Operating System
..........................................
12
A. Installing Windows
...............................................................................................
12
B. Rebuilding an Array
..............................................................................................
13