Gigabyte GA-880GM-UD2H Manual - Page 80
Create Arrays Manually, Main Menu, Define LD Menu, Define LD
 |
UPC - 818313010384
View all Gigabyte GA-880GM-UD2H manuals
Add to My Manuals
Save this manual to your list of manuals |
Page 80 highlights
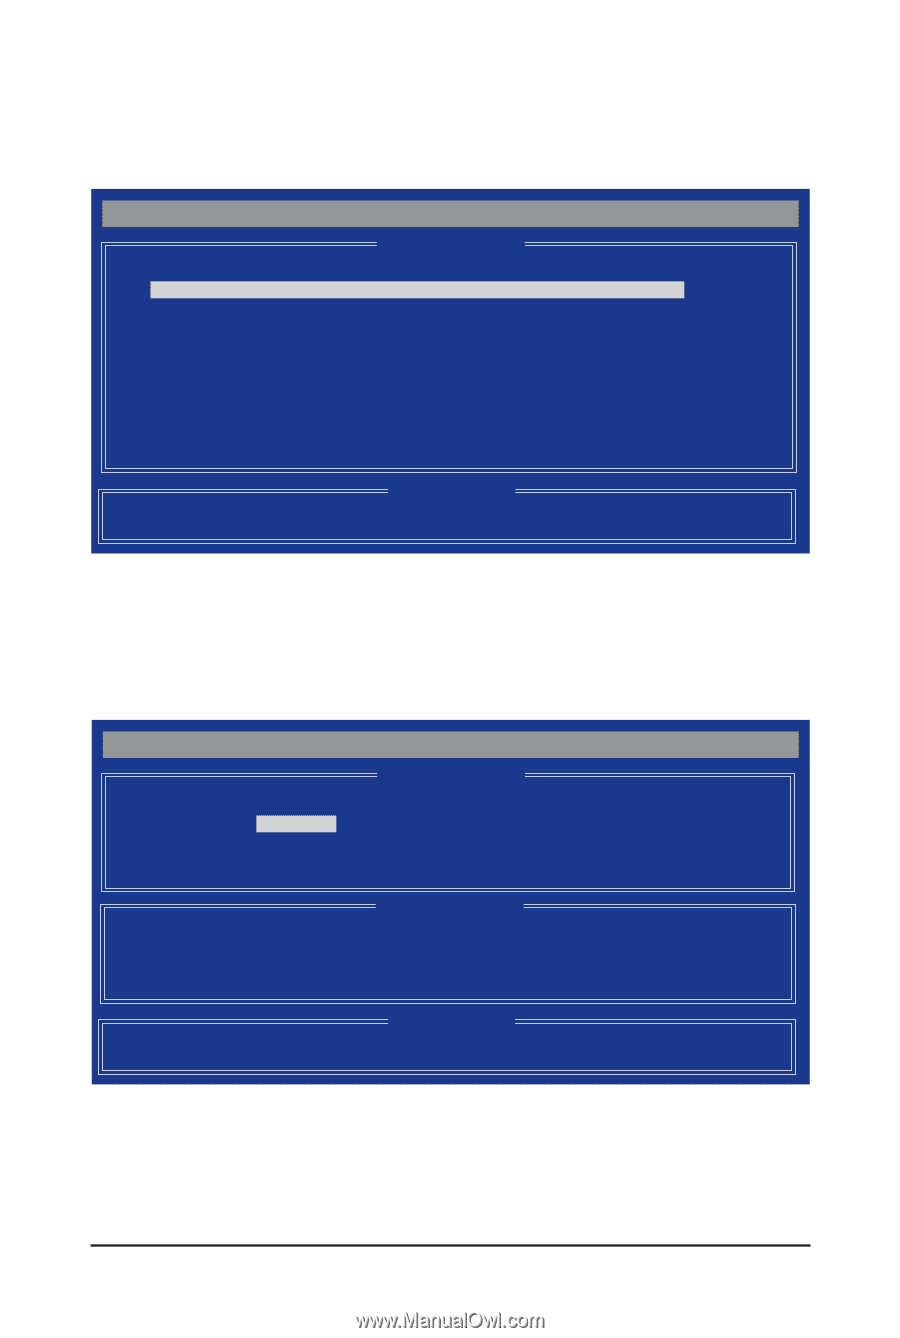
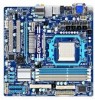
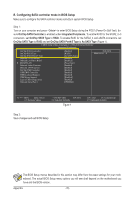
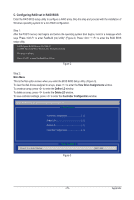
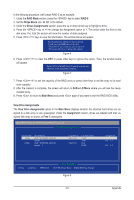
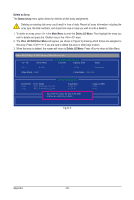
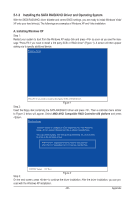
Create Arrays Manually To create a new array, press to enter the Define LD Menu window (Figure 4). The Define LD selection from the Main Menu allows users to begin the process of manually defining the drive elements and RAID levels for one or multiple disk arrays. Option ROM Utility (c) 2009 Advanced Micro Devices, Inc. [ Define LD Menu ] LD No RAID Mode LD 1 ---- LD 2 ---- LD 3 ---- LD 4 ---- LD 5 ---- LD 6 ---- LD 7 ---- LD 8 ---- LD 9 ---- LD 10 ---- Total Drv Capacity (GB Status [h] Up [i] Down [ Keys Available ] [ESC] Exit Figure 4 [Enter] Select In Figure 4, use the up or down arrow key to move to a logical disk set and press to enter the RAID configuration menu (Figure 5). Option ROM Utility (c) 2009 Advanced Micro Devices, Inc. LD No RAID Mode [ Define LD Menu ] Total Drv LD 1 RAID 0 0 Stripe Block: 64 KB Gigabyte Boundary: ON [ Drives Assignments ] Channel:ID Drive Model 1:Mas WDC WD800JD-22LSA0 2:Mas WDC WD800JD-22LSA0 Capabilities SATA 3G SATA 3G Fast Init: ON Cache Mode: WriteThru Capacity (GB) 79.89 80.02 Assignment N N [h] Up [i] Down [ESC] Exit [[KKeeyyssAAvvaailialabblele]] [Space] Change [Ctrl-Y] Save [PgUp/Dn] Page Change Figure 5 Appendix - 80 -
-
 1
1 -
2
-
3
-
4
-
5
-
6
-
7
-
8
-
9
-
10
-
11
-
12
-
13
-
14
-
15
-
16
-
17
-
18
-
19
-
20
-
21
-
22
-
23
-
24
-
25
-
26
-
27
-
28
-
29
-
30
-
31
-
32
-
33
-
34
-
35
-
36
-
37
-
38
-
39
-
40
-
41
-
42
-
43
-
44
-
45
-
46
-
47
-
48
-
49
-
50
-
51
-
52
-
53
-
54
-
55
-
56
-
57
-
58
-
59
-
60
-
61
-
62
-
63
-
64
-
65
-
66
-
67
-
68
-
69
-
70
-
71
-
72
-
73
-
74
-
 75
75 -
 76
76 -
 77
77 -
 78
78 -
 79
79 -
 80
80 -
 81
81 -
 82
82 -
 83
83 -
 84
84 -
 85
85 -
86
-
87
-
88
-
89
-
90
-
91
-
92
-
93
-
94
-
95
-
96
-
97
-
98
-
99
-
100
-
101
-
102
-
103
-
104
 |
 |