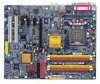
Gigabyte GA-8I925X-G Manual
Gigabyte GA-8I925X-G Manual
 |
View all Gigabyte GA-8I925X-G manuals
Add to My Manuals
Save this manual to your list of manuals |
Gigabyte GA-8I925X-G manual content summary:
- Gigabyte GA-8I925X-G | Manual - Page 1
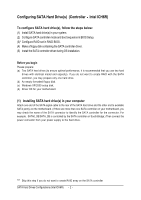
(s) (Controller Intel ICH6R 2 (1) Installing SATA hard drive(s) in your computer 2 (2) Configuring SATA controller mode and boot sequence in BIOS Setup 3 (3) Configuring RAID set in RAID BIOS 5 (4) Making a SATA Driver Disk ...9 (5) Installing SATA controller driver during OS installation 11 - Gigabyte GA-8I925X-G | Manual - Page 2
identical model and capacity). If you do not want to create RAID with the SATA controller, you may prepare only one hard drive. (b) An empty formatted floppy disk. (c) Windows XP/2000 setup disk. (d) Driver CD for your motherboard. (1) Installing SATA hard drive(s) in your computer Attach one end - Gigabyte GA-8I925X-G | Manual - Page 3
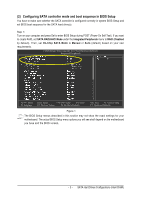
1: Turn on your computer and press Del to enter BIOS Setup during POST (Power-On Self Test). If you want to create RAID, set SATA RAID/AHCI Mode under the Integrated Peripherals menu to RAID (Disabled by default). Then, set On-Chip SATA Mode to Manual or Auto (default) based on your own requirements - Gigabyte GA-8I925X-G | Manual - Page 4
CMOS Setup Utility-Copyright (C) 1984-2004 Award Software ¤å Hard Disk Boot Priority `` K L KL Figure 2 Step 3: Set First Boot Device under the Advanced BIOS Features menu to CD-ROM to boot from CD-ROM after system restarts (Figure 3). CMOS Setup Utility-Copyright (C) 1984-2004 Award Software - Gigabyte GA-8I925X-G | Manual - Page 5
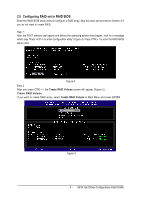
Configuration utility" (Figure 4). Press CTRL+ I to enter the RAID BIOS setup utility. Figure 4 Step 2 After you press CTRL+ I, the Create RAID Volume screen will appear (Figure 5). Create RAID Volume If you want to create RAID array, select Create RAID Volume in Main Menu and press ENTER. KL Figure - Gigabyte GA-8I925X-G | Manual - Page 6
(letters cannot be Åé special characters) under the Name item. When finished, press ENTER to select a RAID level (Figure ¤¤ 6). There are two RAID levels: RAID0(Stripe) and RAID1(Mirror). Select a RAID level and press ENTER. ¤å KL Figure 6 Step 4: Set the stripe block size (Figure 7). The KB - Gigabyte GA-8I925X-G | Manual - Page 7
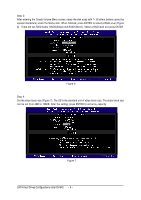
Step 5: After setting all the items above, select Create Volume and press ENTER (Figure 8) to begin the creation of the RAID array. KL Figure 8 Step 6: When prompted to confirm whether to create this volume, press Y to create or N to cancel. KL Figure 9 - 7 - SATA Hard Drives Configurations ( - Gigabyte GA-8I925X-G | Manual - Page 8
If you want to delete a RAID volume, select the Delete RAID Volume option in Main Menu. Press ENTER and follow on-screen instructions. KL To exit the ICH6R RAID BIOS utility, press ESC in Main Menu. Now, you can proceed to the installation of the SATA driver and operating system. - 8 - SATA Hard - Gigabyte GA-8I925X-G | Manual - Page 9
. ¤å First of all, you need to copy the driver for the SATA controller from the motherboard driver CD to a floppy disk. The instructions below explain how to copy the driver. Step 1: Find an available system and insert the motherboard driver CD into the CD-ROM drive. The installation utility - Gigabyte GA-8I925X-G | Manual - Page 10
13 Step 5: Insert an empty floppy disk and press 1 to select 1)Intel Application Accelerator 4.0. Then it will take about one minute to copy the SATA driver from the motherboard driver CD to the floppy disk. Step 6: Press 0 to exit when the procedure is complete (Figure 14). You have copied the SATA - Gigabyte GA-8I925X-G | Manual - Page 11
the SATA driver disk and configured BIOS settings, you are ready to install Windows 2000/XP onto your SATA hard drive with the SATA driver. The following see the "Press F6 if you need to install a 3rd party SCSI or RAID driver" message (Figure 15). After pressing F6, there will be a few moments of - Gigabyte GA-8I925X-G | Manual - Page 12
Intel(R) 82801FR SATA RAID Controller* and press ENTER. Then it will begin to load the SATA driver from the floppy disk. Figure 17 If a message appears saying one or some file(s) cannot be found, please check the floppy disk or copy the correct SATA driver again from the motherboard driver CD. Step - Gigabyte GA-8I925X-G | Manual - Page 13
Åé 2000/XP installation. ¤¤ ¤å Figure 19 (Note: Each time you add a new hard drive to a RAID array, the RAID driver will have to be installed under Windows once for that hard drive. After that, the driver will not have to be installed.) SATA Hard Drives Configurations (Intel ICH6R) - 13 -
-
 1
1 -
 2
2 -
 3
3 -
 4
4 -
 5
5 -
 6
6 -
 7
7 -
8
-
9
-
10
-
11
-
12
-
13
 |
 |

Table of Contents
Configuring SATA Hard Drive(s)
(Controller
Intel ICH6R)
.........................................................
2
(1)
Installing SATA hard drive(s) in your computer
..........................................................................
2
(2)
Configuring SATA controller mode and boot sequence in BIOS Setup
....................................
3
(3)
Configuring RAID set in RAID BIOS
.............................................................................................
5
(4)
Making a SATA Driver Disk
...........................................................................................................
9
(5)
Installing SATA controller driver during OS installation
.............................................................
11