Gigabyte GA-8I925X-G Manual - Page 6
There are two RAID levels: RAID0Stripe and RAID1Mirror. Select a RAID level and press ENTER.
 |
View all Gigabyte GA-8I925X-G manuals
Add to My Manuals
Save this manual to your list of manuals |
Page 6 highlights
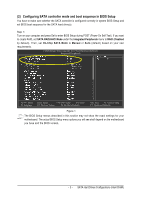
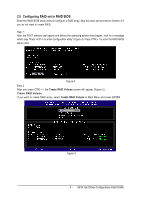
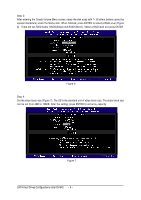
Ác Step 3: After entering the Create Volume Menu screen, name the disk array with 1~16 letters (letters cannot be Åé special characters) under the Name item. When finished, press ENTER to select a RAID level (Figure ¤¤ 6). There are two RAID levels: RAID0(Stripe) and RAID1(Mirror). Select a RAID level and press ENTER. ¤å KL Figure 6 Step 4: Set the stripe block size (Figure 7). The KB is the standard unit of stripe block size. The stripe block size can be set from 4KB to 128KB. After the setting, press ENTER to set array capacity. KL Figure 7 SATA Hard Drives Configurations (Intel ICH6R) - 6 -
-
 1
1 -
 2
2 -
 3
3 -
 4
4 -
 5
5 -
 6
6 -
 7
7 -
 8
8 -
 9
9 -
 10
10 -
 11
11 -
 12
12 -
13
 |
 |

SATA Hard Drives Configurations (Intel ICH6R)
- 6 -
Ác
Åé
¤¤
¤å
Step 4:
Set the stripe block size (Figure 7). The
KB
is the standard unit of stripe block size. The stripe block size
can be set from 4KB to 128KB. After the setting, press ENTER
to set array capacity.
Figure 7
Figure 6
Step 3:
After entering the Create Volume Menu screen, name the disk array with 1~16 letters (letters cannot be
special characters) under the Name item. When finished, press ENTER to select a RAID level (Figure
6).
There are two RAID levels: RAID0(Stripe) and RAID1(Mirror). Select a RAID level and press ENTER.