Gigabyte GV-NX85T128P Manual - Page 6
Hardware Installation
 |
View all Gigabyte GV-NX85T128P manuals
Add to My Manuals
Save this manual to your list of manuals |
Page 6 highlights
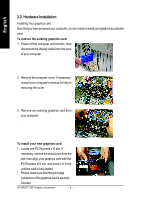
English 2.2. Hardware Installation Installing Your graphics card. Now that you have prepared your computer, you are ready to install your graphics accelerator card. To remove the existing graphics card: 1. Power off the computer and monitor, then disconnect the display cable from the back of your computer. 2. Remove the computer cover. If necessary, consult your computer's manual for help in removing the cover. 3. Remove any existing graphics card from your computer. . To install your new graphics card: 1. Locate one PCI Express x16 slot. If necessary, remove the metal cover from the slot; then align your graphics card with the PCI Express x16 slot, and press it in firmly until the card is fully seated. * Please make sure that the gold edge connectors of the graphics card is securely inserted. GV-NX85T128P Graphics Accelerator - 6 -
-
 1
1 -
 2
2 -
 3
3 -
 4
4 -
 5
5 -
 6
6 -
 7
7 -
 8
8 -
 9
9 -
 10
10 -
 11
11 -
 12
12 -
13
-
14
-
15
-
16
-
17
-
18
-
19
-
20
-
21
-
22
-
23
-
24
-
25
-
26
-
27
-
28
-
29
-
30
-
31
-
32
-
33
-
34
-
35
-
36
-
37
-
38
-
39
-
40
 |
 |
