Gigabyte X299X AORUS MASTER User Manual - Page 68
Select Disks, Create Volume
 |
View all Gigabyte X299X AORUS MASTER manuals
Add to My Manuals
Save this manual to your list of manuals |
Page 68 highlights
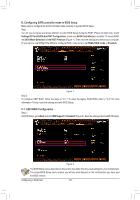
Step 4: Under Select Disks item, select the hard drives to be included in the RAID array. Press the key on the hard drives to be selected (selected hard drives are marked with "X"). Then set the stripe block size (Figure 5). The stripe block size can be set from 4 KB to 128 KB. Once you have selected the stripe block size, set the volume capacity. Figure 5 Step 5: After setting the capacity, move to Create Volume and press to begin. (Figure 6) Figure 6 Configuring a RAID Set - 68 -
-
 1
1 -
2
-
3
-
4
-
5
-
6
-
7
-
8
-
9
-
10
-
11
-
12
-
13
-
14
-
15
-
16
-
17
-
18
-
19
-
20
-
21
-
22
-
23
-
24
-
25
-
26
-
27
-
28
-
29
-
30
-
31
-
32
-
33
-
34
-
35
-
36
-
37
-
38
-
39
-
40
-
41
-
42
-
43
-
44
-
45
-
46
-
47
-
48
-
49
-
50
-
51
-
52
-
53
-
54
-
55
-
56
-
57
-
58
-
59
-
60
-
61
-
62
-
 63
63 -
 64
64 -
 65
65 -
 66
66 -
 67
67 -
 68
68 -
 69
69 -
 70
70 -
 71
71 -
 72
72 -
 73
73 -
74
-
75
-
76
-
77
-
78
-
79
-
80
-
81
-
82
-
83
-
84
-
85
-
86
-
87
-
88
-
89
-
90
-
91
-
92
-
93
-
94
-
95
-
96
-
97
-
98
-
99
-
100
-
101
-
102
-
103
-
104
-
105
-
106
-
107
-
108
-
109
-
110
-
111
-
112
-
113
-
114
-
115
-
116
-
117
-
118
-
119
-
120
-
121
-
122
-
123
-
124
-
125
-
126
-
127
-
128
-
129
-
130
-
131
-
132
 |
 |

Configuring a RAID Set
- 68 -
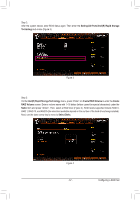
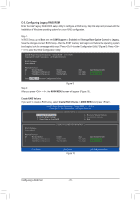
Step 4:
Under
Select Disks
item, select the hard drives to be included in the RAID array. Press the <Space> key on
the hard drives to be selected (selected hard drives are marked with "X"). Then set the stripe block size (Figure
5). The stripe block size can be set from 4 KB to 128 KB. Once you have selected the stripe block size, set
the volume capacity.
Figure 5
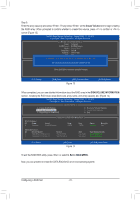
Step 5:
After setting the capacity, move to
Create Volume
and press <Enter> to begin. (Figure 6)
Figure 6