Haier 22T32 User Manual
Haier 22T32 Manual
 |
View all Haier 22T32 manuals
Add to My Manuals
Save this manual to your list of manuals |
Haier 22T32 manual content summary:
- Haier 22T32 | User Manual - Page 1
...17 Menu Operation Instruction...18 TV SETTING ...19 Auto Tuning...19 DTV Manu al Tuning...20 ATV Manual Tuning...20 Progra m Edit...21 Select Channel with CH+/CH -...21 Select Channel with Numeri c keys...22 PICTURE ...22 SOUND ...23 TIME ...24 SETUP...25 LOCK...26 Simple Troubleshooting...27 - Haier 22T32 | User Manual - Page 2
extend its life, please read below regulations carefully before using it and comply with the following safety instructions. 1 Read the manual and marking label before using the machine, and keep the user manual for later use. 2 There is high voltage inside the machine, follow all the warnings and - Haier 22T32 | User Manual - Page 3
the power cord and antenna cable. 17 When the following troubles occur, please pull out the plug and call the In spite of correct operation according to the user manual but it still can't work normally. D. Some , overexerting and uneven ground. The appliance is not intended for use by young - Haier 22T32 | User Manual - Page 4
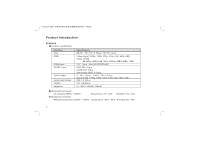
19T3/22T3 ( )(MSD 119 ) Product Introduction Features interface specification: HDMI SCART Input YCbCr/Ypbpr Video signal: 1080p, 1080i, 720p, 576p, 576i, 480p, 480i Audio: LPCM 88.2KHz, 48KHz, 44.1KHz, 32KHz, 24Bit, 20Bit, 16Bit /SECAM RGB:75 1Vp-p CVBS:75 1Vp-p Audio Input:20K 0.5Vp-p Signal - Haier 22T32 | User Manual - Page 5
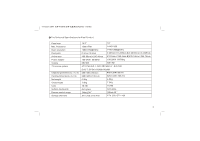
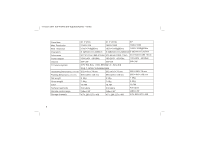
19T3/22T3 ( )(MSD 119 ) The Technical Specifications for Final Product Max. Resolution Best resolution Pixel pitch Active area Power adapter Volume TV receive system Unpacking Dimension L H W Packing Dimension L H W Net weight Gross weight Color Surface treatments Remote control range Storage - Haier 22T32 | User Manual - Page 6
19T3/22T3 ( )(MSD 119 ) Max. Resolution Best resolution Pixel pitch Active area Power adapter Volume TV receive system Unpacking Dimension L H W Packing Dimension L H W Net weight Gross weight Color Surface treatments Remote control range Storage channels 21.5"(HD) 21.5" (FHD) 22" 1366 768 - Haier 22T32 | User Manual - Page 7
19T3/22T3 ( )(MSD 119 ) VGA input mode 18.5" / 21.5"(HD) S/N Mode 1 VGA 2 3 SVGA 4 XGA 5 WXGA Resolution 720 400 640 480 800 600 1024 768 1360 768 Note: Recommended mode: 1360 768@60Hz 19" S/N 1 2 3 4 5 6 Mode VGA SVGA XGA WXGA Resolution 720 400 640 480 800 600 1024 768 1280 768 - Haier 22T32 | User Manual - Page 8
19T3/22T3 ( )(MSD 119 ) 21.5" (FHD) S/N 1 2 3 4 5 6 7 8 9 10 Mode VGA SVGA XGA SXGA WXGA WUXGA Resolution 720 400 640 480 800 600 1024 768 1280 720 1280 960 1280 1024 1360 768 1600 900 1920 1080 Note: Recommended mode: 1920 1080@60Hz Refresh(Hz) 70 60 60 60 60 60 60 60 60 60 7 - Haier 22T32 | User Manual - Page 9
19T3/22T3 ( )(MSD 119 ) 22" S/N Mode 1 VGA 2 3 SVGA 4 5 XGA 6 7 WXGA 8 Resolution 720 400 640 480 800 600 800 600 1024 768 1280 960 1280 1024 1680 1050 Note: Recommended mode: 1680 1050@60Hz Refresh(Hz) 70 60 56 60 60 60 60 60 8 - Haier 22T32 | User Manual - Page 10
is subject to change without notices. If there are differences between manual and real operation, please do according to real operation. Listing base); User manual; Power cord; Remote control; If any of above listed items is missing, please contact your dealer or our service department. Power - Haier 22T32 | User Manual - Page 11
19T3/22T3 ( )(MSD 119 ) Installing Note: Pull out the power plug before installing or taking down the unit. You can find more connectors when you take off the cover board on the left of the rear cover [ Fig.2] Antenna connection [Fig.1] Antenna or CATV socket. Power Switch Power Supply Y Pb Pr - Haier 22T32 | User Manual - Page 12
19T3/22T3 ( )(MSD 119 ) DVD connection [Fig.1] Connect the Y, Pb/Cb, Pr/Cr output end of DVD to the unit with audio or video cables. Connect left and right audio output end of DVD to the unit. AV connection [Fig.2] If you need watch image of DVD and connect your TV games console, you can connect - Haier 22T32 | User Manual - Page 13
VESA on the rear cover with bolts. 4. Spin M4 bolts into the left-right nuts on the wall mounting stand. 3-4 mm of depth from bolts washer to stand is recommended. 5. Hang the machine onto the slot of the wall mounting board. Then lock the two bolts on the sides. Note: Installation - Haier 22T32 | User Manual - Page 14
19T3/22T3 ( )(MSD 119 ) Front Panel Control Keys SOURCE 3 CH+ 4 CH- VOL+ 5 VOL- MENU 6 POWER 7 8 12 1) Power Indicator. 2) Remote Receiving Sensor. 3) SOURCE: Press this key to enter the menu of signal source and choose signal source. 4) CH+/CH-: Press these two keys to select the - Haier 22T32 | User Manual - Page 15
19T3/22T3 ( )(MSD 119 ) Remote Control POWER WIDE(16:9) MUTE Numerical CURSOR KEY F1 DTV MENU SMART S SMART P SOURCE CH+/CHVOL+/VOLOK INFO Time Return L/R INDEX ZOOM REVAL TTX HOLD LIST LANGUAGE SAVE Switch the receiver in and out of standby mode. Switch picture ratio: Auto, 4:3, 16:9, ZOOM1, - Haier 22T32 | User Manual - Page 16
and use EXIT key to switch off Teletext or to show the Electronic Program Guide of current channel during no-menu state. Teletext green key or display subtitle key, to set or display your favorite programs. remote control user manual about teletext TeleText: Press 'Teletext' key, It loops in 3 - Haier 22T32 | User Manual - Page 17
19T3/22T3 ( )(MSD 119 ) Remote control battery installation method: Take off the cover of battery box, fix two AAA batteries with 1.5 volt, and conform with the polarity of remote control battery box. Note: Appearance of the remote control may be different from this picture, please according to - Haier 22T32 | User Manual - Page 18
19T3/22T3 ( )(MSD 119 ) Basic Operation Instruction Power On Plug power cord into the electrical socket, press power switch button on right lower of the back cover , then press '' '' key on the - Haier 22T32 | User Manual - Page 19
can not be adjusted at current mode will be hidden automatically and the color of the selections will be changed into gray. 7. Menu Operation Instruction in this manual is explained according to TV mode. The operations in other modes are similar to the one in TV mode. Users can take it as - Haier 22T32 | User Manual - Page 20
On, you need to enter the Password for entering TV SETTING submenu. Default password: 0000, super password: 8888. TV SETTING Auto Tuning DTV Manual Tuning ATV Manual Tuning Programme Edit Auto Tuning Press the ''MENU'' key, TV SETTING menu displays on the screen. Press ''Down'' key on the remote - Haier 22T32 | User Manual - Page 21
front panel to choose Search, and then press ''Left/Right'' key on the remote control or ''VOL+/VOL-'' key on the front panel to conduct manual search, after searching you may save the channel searched to other positions, at this time press ''Up/Down'' key on the remote control or ''CH - Haier 22T32 | User Manual - Page 22
channel is skipped, if you want to check this channel you must set the Skip in ATV Manual Tuning menu for No. Press Programme Edit ''Red'' key to save after the operation has finished. During manual search also may press ''MENU'' key to interrupt the search and return to the last menu - Haier 22T32 | User Manual - Page 23
19T3/22T3 ( )(MSD 119 ) Press Program key on the remote control or "CH+/ CH-" key on the front panel to select the channels. Select channels with the Return key you can go to the last channel when pressing the Return key. For example, if the last channel is 10 and the current channel is 20, you - Haier 22T32 | User Manual - Page 24
19T3/22T3 ( )(MSD 119 ) submenu (Fig.13), press ''Left/Right'' key on the remote control or ''VOL+/VOL-'' key on the front panel again to adjust the size of simulation quantity, may also choose other items through pressing ''Up/Down'' key on the remote control or ''CH+/CH-'' key on the front - Haier 22T32 | User Manual - Page 25
19T3/22T3 ( )(MSD 119 ) left and right volume (L50 to R50), generally set the balance at 0. After choosing Auto Volume press ''Left/Right'' key on the remote control or ''VOL+/VOL-'' key on the front panel to choose On or Off. After choosing Surround Sound press ''Left/Right'' key on the remote - Haier 22T32 | User Manual - Page 26
19T3/22T3 ( )(MSD 119 ) After choosing the Sleep Time press ''Left/Right'' key on the remote control or ''VOL+/VOL-'' key on the front panel to choose sleep time mode:Off,10 min,20 min, 30min, 60min, 90min and 120 min After choosing Auto Sleep press ''Left/Right'' key on the remote control or '' - Haier 22T32 | User Manual - Page 27
19T3/22T3 ( )(MSD 119 ) choosing Yes button press ''OK'' key to resume the factory setting, otherwise cancel the replacement operation. LOCK Block Programme Press the ''MENU'' key, TV SETTING menu shows on the screen, press ''Left/Right'' key on LOCK DTV 1 YLE TV1 DTV 2 YLE TV2 the remote - Haier 22T32 | User Manual - Page 28
and adjustments are similar with TV. User can check at convenience. HDMI connector can realize DVI connector function with external HDMI/DVI commutator. Simple Troubleshooting Symptom Snowflake speckle and sound noise. TV image is better, but has noise. No image. No sound. TV image has stripes. TV - Haier 22T32 | User Manual - Page 29
time, this picture will bring a 'leave shadow' in screen. Usually the 'leave shadow' will disappear gradually when you turn off the unit's power. However, this trouble can't be repaired , Which isn't covered by warranty. 28
-
 1
1 -
 2
2 -
 3
3 -
 4
4 -
 5
5 -
 6
6 -
 7
7 -
8
-
9
-
10
-
11
-
12
-
13
-
14
-
15
-
16
-
17
-
18
-
19
-
20
-
21
-
22
-
23
-
24
-
25
-
26
-
27
-
28
-
29
 |
 |

TABLE
OF
CONTENTS
Important Safety Instructions
.................................................................................................
1
Product Introduction
...............................................................................................................
3
Features
...............................................................................................................................................
3
Listing
............ .....................................................................................................................................
9
Installing
. .............................................................................................................................................
10
...................................................................................................................
13
Remote control
................. ..................................................................................................................
14
17
............................................................................................................................................
17
...............................................................................................................................................
17
......................................................................................................................
17
.................................................................................................................
18
TV SETTING
.......................................................................................................................................
19
Auto Tuning
.......................................................................................................................................................
19
DTV Manu al Tuning
...........................................................................................................................................
20
ATV Manual Tuning
...........................................................................................................................................
20
Progra m Edit
......................................................................................................................................................
21
Select Channel with CH+/CH -
............................................................................................................................
21
Select Channel with Numeri c keys
.....................................................................................................................
22
PICTURE
............................................................................................................................................
22
...............................................................................................................................................
23
...................................................................................................................................................
24
SETUP
................................................................................................................................................
25
LOCK
..... .............................................................................................................................................
26
Simple Troubleshooting
........................................................................................................
27
Front Panel
Control Keys
Basic Operation Instruction
..................................................................................................
Power On
Standby
Signal Source Selection
Menu Operation Instruction
SOUND
TIME
19T3/22T3
(
)(M
D 119
)
S