Haier HRF10WNBWW User Manual - Page 11
Cajón para Frutas y Verduras y Cubierta, La Botella del Estante de la puerta Huggers
 |
View all Haier HRF10WNBWW manuals
Add to My Manuals
Save this manual to your list of manuals |
Page 11 highlights
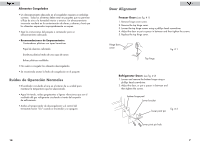
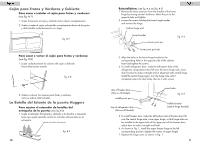
Español Cajón para Frutas y Verduras y Cubierta Para sacar e instalar el cajón para frutas y verduras: (vea fig. # 7) 1. Sujete firmemente el cajón y deslícelo hacia afuera completamente. 2. Vuelva a meter el cajón colocándolo correctamente dentro de las guías y deslizándolo cuidadosamente a su lugar. fig. # 7 Para sacar e volver el cajón para frutas y verduras: (vea fig. # 8) 1. Sujete cuidadosamente la cubierta del cajón y deslícela hacia afuera para sacarla. fig. # 8 2. Vuelva a colocar los cajones para frutas y verduras como se indica anteriormente. La Botella del Estante de la puerta Huggers Para ajustar el retenedor de botellas del entrepaño de la puerta: (Vea fig #10) 1. Sujete el retenedor firmemente y deslícelo a la derecha o izquierda hasta que quede ajustado contra los artículos almacenados en el entrepaño. retenedor de botellas del entrepaño fig. # 9 12 English Reinstallation: (see fig. # 4 and fig. # 5) 1. Remove the lower pivot pin from the bracket of the lower hinge by turning counter clockwise. Move the pin to the opposite hole and tighten. 2. Loosen the screws holding the lower hinge bracket and remove the hinge. bottom hinge pad lower bracket lower pivot pin fig. # 4 lower pivot pin hole 3. Align the holes in the lower hinge bracket to the corresponding holes in the opposite side of the cabinet. Insert and tighten the screws. 4. To install refrigerator door: make the left bottom hole of the refrigerator compartment door fall over the lower hinge axle, move door forward to make it straight and in alignment with central hinge. Install the central hinge again, turn the hinge axle until it completely enters the door body, then fix it with screws. stop of freezer door (Not on all Models) middle pivot pin stop of refrigerator door (Not on all Models) screw holes fig. # 5 middle bracket (central hinge bracket) 5. To install freezer door: make the left bottom hole of freezer door fall over the central hinge axle; raise upper hinge, so that hinge axle can be installed in the upper hole of the upper part of the freezer door; adjust door to make it straight and level. 6. As shown in Fig. 1, install the upper freezer hinge to the left corresponding position. (tighten the screws of upper hinge) 7. Replace the hinge cover as shown in Fig. 1. 9
-
 1
1 -
2
-
3
-
4
-
5
-
 6
6 -
 7
7 -
 8
8 -
 9
9 -
 10
10 -
 11
11 -
 12
12 -
 13
13 -
 14
14 -
 15
15 -
 16
16 -
17
-
18
-
19
-
20
-
21
-
22
-
23
-
24
-
25
-
26
-
27
-
28
-
29
-
30
 |
 |
