Hamilton Beach 59999 Use & Care - Page 5
How to Use the Fancy Food Cutter
 |
UPC - 040094599998
View all Hamilton Beach 59999 manuals
Add to My Manuals
Save this manual to your list of manuals |
Page 5 highlights
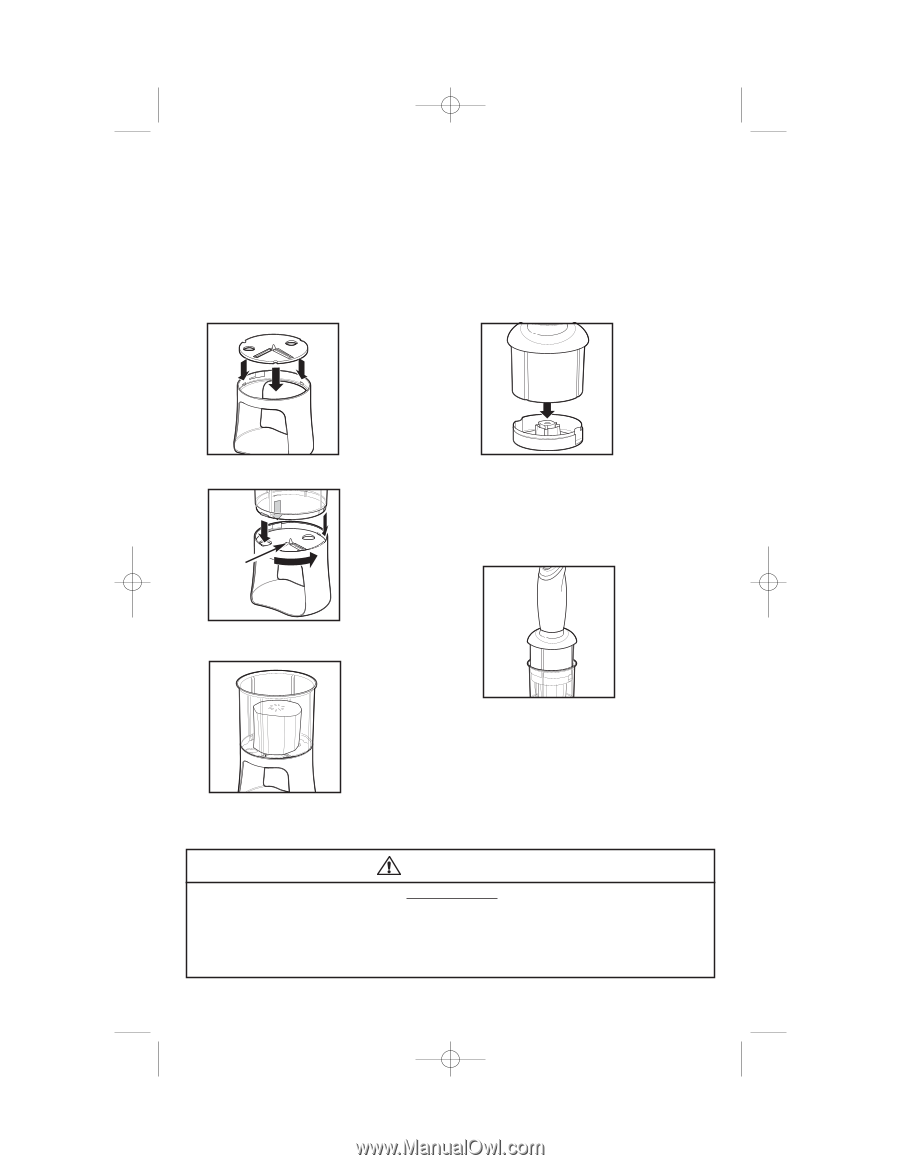
840128900 ENv03.qxd 8/3/04 2:24 PM Page 5 How to Use the Fancy Food Cutter This attachment has 3 different cutting blades: ribbon, julienne, and grating. The ribbon and julienne blades produce long, nearly continuous "ribbons" or "strings" of food (respectively). The grating blade grates hard foods, such as Parmesan cheese and baker's chocolate. See the Cutter Processing Chart for specific information of food types. NOTE: Wash all parts before first use. See Cleaning Instructions. 1. To place selected blade onto cutter base, align the three locating tabs with sharp side of blade up. 4. To assemble cutter adapter, attach cutter food grip on cutter adapter until parts snap together. 2. Attach food chamber to cutter base. Turn food chamber counterclock- wise until it locks into Spike place. Allow cutter base to rest on counter or work surface. 3. Place a single piece of food in food chamber. Center food on spike in blade. Cut food to be no longer than 21⁄2 inches and at least 1 inch wide. Both ends of food should be cut flat to allow food grip to rotate the food. 5. To attach motor body on cutter adapter, hold unit upright and turning motor body clockwise until you feel assembly lock into place. 6. Slide cutter adapter into food chamber by aligning the side features 7. Plug into outlet. 8. Grasp unit in hand. Push and hold speed switch while slowly pressing down with motor body. NOTE: Approximately 1⁄2 inch of food will not process. 9. Unplug from outlet when not in use. CAUTION Sharp Blades • Unplug cord before inserting, removing or cleaning parts, and when not in use. • Do not place fingers or utensils into discharge. • Do not contact moving parts. • Use caution when changing or cleaning parts. 5
-
 1
1 -
 2
2 -
 3
3 -
 4
4 -
 5
5 -
 6
6 -
 7
7 -
 8
8 -
 9
9 -
 10
10 -
 11
11 -
12
-
13
-
14
-
15
-
16
-
17
-
18
-
19
-
20
-
21
-
22
-
23
-
24
-
25
-
26
-
27
-
28
 |
 |