Harman Kardon AVR 1565 Owners Manual - Page 19
Harman Kardon AVR 1565 Manual
 |
View all Harman Kardon AVR 1565 manuals
Add to My Manuals
Save this manual to your list of manuals |
Page 19 highlights
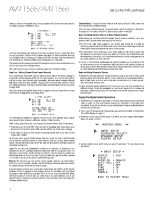
AVR 1565/AVR 1566 5. For each source device you connected to a digital audio input: a) Use the remote's Up and Down arrow buttons to select "Source." Use the Left and Right arrow buttons to change the listed source to one of the sources you connected to a digital audio input connector. b) Use the remote's down arrow button to select "Audio In." Set Up the AVR, continued, and Operating Your AVR Operating Your AVR Now that you have installed your components and completed a basic configuration, you are ready to begin enjoying your home theater system. Controlling the Volume Adjust the volume either by turning the front-panel Volume knob (clockwise to increase volume or counterclockwise to decrease volume) or by pressing the Volume Up/Down buttons on the remote. The volume is displayed as a negative number of decibels (dB) below the 0dB reference point. 0dB is the maximum recommended volume for your AVR. Although it's possible to turn the volume to a higher level, doing so may damage your hearing and your speakers. For certain more dynamic audio materials, even 0dB may be too high, allowing for damage to equipment. Use caution with regard to volume levels. * INPUT SETUP * SOURCE : TITLE: AUDIO IN : AUTO POLL : BXR : TONE : BASS : TREBLE : DVD OPT 1 ON OFF IN 0 0 Muting the Sound To mute all speakers and the headphones, press the Mute button on the remote. Any recording in progress will not be affected. The MUTE message will appear in the frontpanel display as a reminder. To restore the sound, press the Mute button again, or adjust the volume. BACK TO MASTER MENU c) Use the remote's Left and Right arrow buttons to select the digital audio input where you connected the source device. Listening Through Headphones Plug the 1/4-inch stereo plug on a pair of headphones into the front-panel Phones jack for private listening. The default Headphone Bypass mode delivers a conventional two-channel signal to the headphones. Press the Surround Modes button on the front panel or use the remote and OSD to switch to HARMAN headphone virtual surround processing, which emulates a 5.1-channel speaker system. No other surround modes are available for the headphones. Additional Input Setup Menu Items You can also adjust the following settings independently for each source: Title: You may change the display name for any source (except the radio). This feature may help you to select the correct source device even when you have forgotten which physical connections you used. 1. Move the cursor to the Title line and press the OK button. A block cursor will blink. 2. Use the Up/Down buttons to scroll through the alphabet in upper and lower case, the numbers and many punctuation marks. When you have selected the desired character, press the Right button to move to the next space. Press the Right button twice to leave a blank space. 3. Press the OK button when you have finished. Auto Poll: The Auto Poll feature is used when both an analog audio and a digital audio connection have been made for one source device. If no digital signal is available, the AVR will automatically switch to the analog input for the source. This situation can occur with some cable or satellite television broadcasts, where some channels are broadcast with digital audio and others with analog audio, or when a DVD player is paused or stopped. For some sources such as DVD players, the Auto Poll feature is unnecessary and may be undesirable. To turn Auto Poll off, move the cursor to the Auto Poll line and press the Left/ Right buttons until Off appears. With Auto Poll turned off, the AVR will check for a signal only at the audio input assigned to the source. The remaining Input Setup menu items adjust the AVR's audio performance for that source and may be skipped at this time. For most listening, we recommend leaving these settings at their factory defaults, allowing you to enjoy the sound mix created by your favorite movie and music artists. BXR: Enhances bass performance when playing MP3 tracks. Select On, or leave it at the default Off setting for non-MP3 audio sources. Tone: This setting determines whether the treble and bass controls are active. When this line is set to Off, the tone controls are out of the circuit, with no changes to the sound. When this line is set to On, the bass and treble frequencies are boosted or cut, depending upon the Bass and Treble settings (see below). Bass and Treble: Boost or cut the low or high frequencies by up to 10dB by using the Left/Right buttons to change the setting by 2dB at a time. When you're finished, press the remote's OSD button to turn off the on-screen menu. Selecting a Source There are two different ways to select a source: • Press the front-panel Source Select buttons. • Directly select any source by pressing its Source Selector button on the remote. The AVR selects the audio and video inputs assigned to the source and any other settings you made during setup. The source name, the audio and video inputs assigned to the source, and the surround mode will appear on the front panel. Video Troubleshooting Tips If there is no picture: • Check the source selection. • Check all connections for a loose or incorrect connection. • Check the video-input selection on the TV/display device. Additional Tips for Troubleshooting HDMI Connections • Turn off all devices (including the TV, the AVR and any source components). • Unplug the HDMI cables, starting with the cable between the AVR and the TV, and continuing with the cables between the AVR and each source device. • Carefully reconnect the cables from the source devices to the AVR. Connect the cable from the AVR to the TV last. • Turn on the devices in this order: TV, AVR, source devices. NOTE: Depending upon the particular components involved, the complexity of the required communication between HDMI components may cause delays of up to a minute in the completion of some actions, such as input switching or switching between SD and HD channels. 19
-
 1
1 -
2
-
3
-
4
-
5
-
6
-
7
-
8
-
9
-
10
-
11
-
12
-
13
-
 14
14 -
 15
15 -
 16
16 -
 17
17 -
 18
18 -
 19
19 -
 20
20 -
 21
21 -
 22
22 -
 23
23 -
 24
24 -
25
-
26
-
27
-
28
-
29
-
30
-
31
-
32
-
33
-
34
-
35
-
36
-
37
-
38
-
39
-
40
-
41
 |
 |