Harman Kardon PA 2000 Owners Manual - Page 7
Installation and Configuration - power amplifier
 |
View all Harman Kardon PA 2000 manuals
Add to My Manuals
Save this manual to your list of manuals |
Page 7 highlights
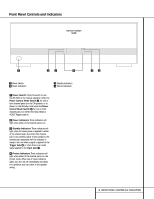
Installation and Configuration SAFETY NOTE: When making connections between any source components such as AV receivers, surround processors or multiroom controllers and the PA 2000, or when making any connections to speakers, be certain that both the source device and the PA 2000 are turned off. To ensure that there will be no unwanted signal transients that can damage equipment or speakers, it is always best to unplug all equipment before making any connections. Modern electronic products often have a "standby" mode that may be activated even though the product may appear to be turned off. Power Control Connections The PA 2000 features a built-in remote turn-on system that will automatically turn on either or both of the amplifier pairs in one of three ways. Depending on your specific application, the unit may be turned on manually using the Power Switch 1, or via automatic sensing of either an input source or a low-voltage trigger signal. For manual operation, no special installation is required. For automatic turn-on, follow the instructions below for the chosen trigger method. Note that when the unit is operated in the standard, two-pair output mode, each of the channel pairs may be operated by the same trigger method, or they may be turned on via different methods. Remote Turn-On From an External Device Using the Low-Voltage Trigger To configure the PA 2000 so that either or both of the channel pairs turn on automatically in response to a low-voltage trigger signal, follow these steps: 1. Place the Power Control Mode Switch £ for either channel in the center position, so that the switch is over the words "AC/DC TRIGGER". 2a.To trigger the amplifier from a device such as a preamp surround processor or multiroom controller with a built-in trigger jack, connect one end of a cable with a 3.5mm mono mini-plug to the Trigger Jack § on the PA 2000. Connect the other end to a matching jack on the device that will provide a 3-volt to 30-volt signal when the unit is to be turned on. or 2b.To trigger the amplifier using the switched AC accessory outlet on an AV receiver or other source device, purchase a small AC to DC power converter, as is typically used to replace the batteries in portable electronics devices. Select a model that is capable of delivering 3 to 12 volts DC, and make certain that one of the "tips" provided with the unit is a 3.5mm mini-plug. Plug the transformer end of the converter into the switched AC output on the source product, and connect the 3.5mm mini-plug to the Trigger Jack §. 3. Press the Power Switch 1 in so that it is engaged, and note that the Standby Indicator 3 will light for the channel pairs selected for trigger control operation. When the source control unit providing the power is turned on, the PA 2000 will automatically turn on. When the source unit is turned off, the PA 2000 will return to the Standby mode. Remote Turn-On Using Music Sense To configure the PA 2000 so that either or both of the channel pairs turn on automatically when the amplifier is receiving an audio signal, follow these steps: • Connect the audio input as normal to the audio Input Jacks ¡. • For each channel pair that you wish to con- trol using an incoming audio signal, slide the Power Control Mode Switch £ to the far left so that the switch is under the words "MUSIC SENSE". • Press the Power Switch 1 in so that it is engaged, and note that the Standby Indicator 3 will light for the channel pairs selected for trigger control operation. In this configuration, the PA 2000 will automatically turn on whenever it is receiving an audio input signal. The unit will return to the Standby mode 10 to 15 minutes after the audio signal stops. NOTE: When the PA 2000 is used in the Bridged mode as a single-pair stereo amplifier, use the Power Control Mode Switch £ in the area labeled "BRIDGE/CHANNEL ONE" to make the settings for the desired turn-on mode. 7 INSTALLATION & CONFIGURATION
-
 1
1 -
 2
2 -
 3
3 -
 4
4 -
 5
5 -
 6
6 -
 7
7 -
 8
8 -
 9
9 -
 10
10 -
 11
11 -
 12
12 -
13
-
14
-
15
-
16
 |
 |
