Hayward DV5000™ DV5000 Owner's Manual - Page 5
of 39, DV5000ML, Rev.
 |
View all Hayward DV5000™ manuals
Add to My Manuals
Save this manual to your list of manuals |
Page 5 highlights
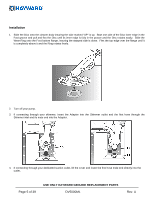
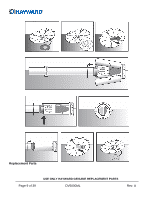
Installation 1. Slide the Disc onto the cleaner body insuring the side marked "UP" is up. Start one side of the Disc inner edge in the Foot groove and pull and flex the Disc until its inner edge is fully in the groove and the Disc rotates easily. Slide the Wear Ring onto the Foot bottom flange, insuring the stepped side is down. Flex the top edge over the flange until it is completely above it and the Ring rotates freely. 2. Turn off your pump. 3. If connecting through your skimmer, insert the Adapter into the Skimmer outlet and the first hose through the Skimmer inlet and its male end into the Adapter. 4. If connecting through your dedicated suction outlet, lift the cover and insert the first hose male end directly into the outlet. Page 5 of 39 USE ONLY HAYWARD GENUINE REPLACEMENT PARTS DV5000ML Rev. A
-
 1
1 -
 2
2 -
 3
3 -
 4
4 -
 5
5 -
 6
6 -
 7
7 -
 8
8 -
 9
9 -
 10
10 -
 11
11 -
12
-
13
-
14
-
15
-
16
-
17
-
18
-
19
-
20
-
21
-
22
-
23
-
24
-
25
-
26
-
27
-
28
-
29
-
30
-
31
-
32
-
33
-
34
-
35
-
36
-
37
-
38
-
39
 |
 |
