HP 10/100 3Com 3C905B-TX 3COM LAN cards (D6500A, D6509A), User Guide - Page 14
Installing the NIC, Unplug the PC and disconnect all cables.
 |
View all HP 10/100 3Com 3C905B-TX manuals
Add to My Manuals
Save this manual to your list of manuals |
Page 14 highlights
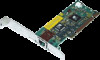
CAUTION 2 Installing the NIC Installing the NIC Installing the NIC Before you begin, make sure that you also have the user guide and the 3C905B-TX EtherDisk diskettes. Each NIC is packed in an antistatic container to protect it during shipment. Before handling the NIC, touch the metal chassis of your PC. Maintain grounding by wearing a wrist strap attached to the chassis. Handle the NIC by its backplate and top edge. Do not touch the edge connector. To install the 3C905B-TX NIC in your PC and connect it to the network, follow these steps: 1 Open the shipping container and inspect each item for damage. 2 Remove all jewelry from your hands and wrists. Use only insulated or nonconductive tools. 3 Unplug the PC and disconnect all cables. 4 Remove the PC cover. 5 Choose an empty bus mastering PCI slot. A sample PCI slot is shown in Figure 3. If you do not know how to identify a PCI slot, check your PC documentation or ask your system administrator. 6 Remove the PCI slot's backplate. Store it in a safe place. 7 Insert the 3C905B-TX NIC into an empty PCI slot, shown in Figure 3. Make sure that the NIC is firmly seated in the slot. The card may be installed in a minitower model or in a desktop model. Figure 3 Inserting the NIC 14 English
-
 1
1 -
2
-
3
-
4
-
5
-
6
-
7
-
8
-
 9
9 -
 10
10 -
 11
11 -
 12
12 -
 13
13 -
 14
14 -
 15
15 -
 16
16 -
 17
17 -
 18
18 -
 19
19 -
20
-
21
-
22
-
23
-
24
-
25
-
26
-
27
-
28
-
29
-
30
-
31
-
32
-
33
-
34
-
35
-
36
-
37
-
38
-
39
-
40
-
41
-
42
-
43
-
44
-
45
-
46
-
47
-
48
-
49
-
50
-
51
-
52
-
53
-
54
-
55
-
56
-
57
-
58
-
59
-
60
-
61
-
62
-
63
-
64
-
65
-
66
 |
 |
