HP 1120c HP DeskJet 1120C Professional Series - (English) User's Guide - Page 7
Step 3, Connect the Cables, Step 4 - Install the Print Cartridges - printer cable
 |
View all HP 1120c manuals
Add to My Manuals
Save this manual to your list of manuals |
Page 7 highlights
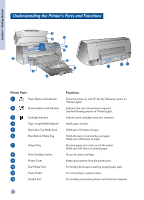
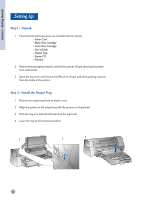
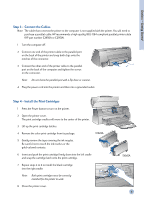
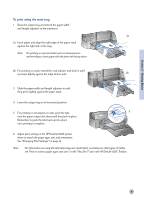
Section 1 - Getting Started Step 3 - Connect the Cables Note: The cable that connects the printer to the computer is not supplied with the printer. You will need to purchase a parallel cable. HP recommends a high-quality IEEE-1284 compliant parallel printer cable (HP part number C2950A or C2951A). 1 Turn the computer off. 2 Connect one end of the printer cable to the parallel port on the back of the printer and snap both clips onto the notches of the connector. 3 Connect the other end of the printer cable to the parallel port on the back of the computer and tighten the screws on the connector. Note: Do not share the parallel port with a Zip drive or scanner. 4 Plug the power cord into the printer and then into a grounded outlet. Step 4 - Install the Print Cartridges 1 Press the Power button to turn on the printer. 2 Open the printer cover. The print cartridge cradles will move to the center of the printer. 3 Lift up the print cartridge latches. 4 Remove the color print cartridge from its package. C1823A 5 Gently remove the tape covering the ink nozzles. Be careful not to touch the ink nozzles or the gold-colored contacts. 6 Insert and push the print cartridge firmly down into the left cradle and snap the cartridge latch onto the print cartridge. 7 Repeat steps 4 to 6 to install the black cartridge into the right cradle. Note: Both print cartridges must be correctly installed for the printer to work. 8 Close the printer cover. 51645A 5
-
 1
1 -
 2
2 -
 3
3 -
 4
4 -
 5
5 -
 6
6 -
 7
7 -
 8
8 -
 9
9 -
 10
10 -
 11
11 -
 12
12 -
13
-
14
-
15
-
16
-
17
-
18
-
19
-
20
-
21
-
22
-
23
-
24
-
25
-
26
-
27
-
28
-
29
-
30
-
31
 |
 |
