HP 2000fc HP StorageWorks 2000 Family Modular Smart Array chassis and midplane - Page 4
Installing I/O modules, Verifying component installation
 |
View all HP 2000fc manuals
Add to My Manuals
Save this manual to your list of manuals |
Page 4 highlights
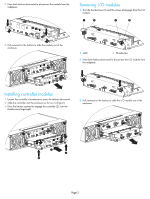
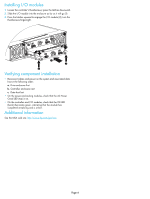
Installing I/O modules 1. Loosen the controller's thumbscrews; press the latches downward. 2. Slide the I/O module into the enclosure as far as it will go (1). 3. Press the latches upward to engage the I/O module (2); turn the thumbscrews finger-tight. Service Service 1 2 2 Verifying component installation • Reconnect cables and power on the system and associated data host in the following order: a. Drive enclosure first b. Controller enclosure next c. Data host last • On the power-and-cooling modules, check that the AC Power Good LED (top) is on. • On the controller and I/O modules, check that the OK LED (back) illuminates green, indicating that the module has completed initializing and is online. Additional information See the MSA web site: http://www.hp.com/go/msa. Page 4
-
 1
1 -
 2
2 -
 3
3 -
 4
4
 |
 |
