HP 381513-B21 HP Smart Array P800 Controller for ProLiant Servers User Guide - Page 22
module in its place, and go to the next step., If you are replacing the cache module
 |
UPC - 882780622029
View all HP 381513-B21 manuals
Add to My Manuals
Save this manual to your list of manuals |
Page 22 highlights
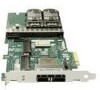
4. Pull the flanges on the battery clip outward (1), and then swivel the clip 180 degrees so that it rests on the batteries (2). 5. Swivel the latches on the DIMM connector outward (1). 6. Slide the battery assembly and the cache module off the controller board (2). The procedure at this point depends on whether you are replacing the controller or the cache module. o If you are replacing the controller, go directly to the next step. o If you are replacing the cache module, pull it out of the battery assembly, install the new cache module in its place, and go to the next step. 7. Install the cache module and batteries on the controller board. a. Hold the controller board near the DIMM connector and at the top and right edges to minimize bending of the board. Upgrading or replacing controller options 22
-
 1
1 -
2
-
3
-
4
-
5
-
6
-
7
-
8
-
9
-
10
-
11
-
12
-
13
-
14
-
15
-
16
-
 17
17 -
 18
18 -
 19
19 -
 20
20 -
 21
21 -
 22
22 -
 23
23 -
 24
24 -
 25
25 -
 26
26 -
 27
27 -
28
-
29
-
30
-
31
-
32
-
33
-
34
-
35
-
36
-
37
-
38
-
39
-
40
-
41
-
42
-
43
 |
 |
